City and Canada Bay – Thursday Morning 2nd January 2025.

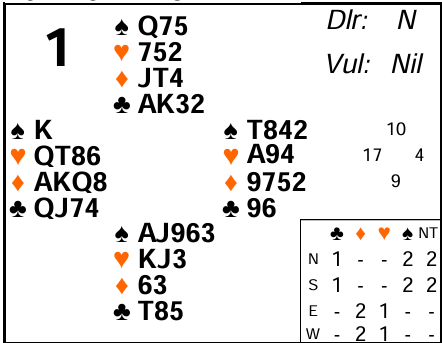
Board 1 seems like a good place to start for the first column of the new year. It shows the value of 3rd seat openings but also had some chances for the defenders to signal to make their lives easier.
North and East will surely pass and many Souths would then do so as well. After all they hold a balanced 9 count. But there are many advantages to getting into the auction first and a tactical 1♠ opening has a lot to be said for it. South knows it’s the opponents’ hand (his partner passed and he only has 9 points). But if your partnership agrees to do this you need to make sure the opponents are aware of it. I’ll discuss that more in the advanced section.
If South does pass then West will open. The textbook opening with 1444 is the middle suit of 1♦. With 4441 hands you need to decide in advance what you are going to rebid when partner inevitably responds in your singleton! Here if you open 1♣ then you’d be stuck for a rebid if partner responds 1♠. You aren’t really strong enough to reverse into 2♥ since, although you do have 17 points, you don’t have 54+ shape and it’s not very comfortable to force partner to go back to 3♣ if they need to. A 1♦ opening bid allows you to rebid a simple 2♣ after a 1♠ response so partner can just go back to 2♦ if necessary. Yes partner will think you are at least 54 in diamond and clubs but that can’t be helped – with 4441 hands you almost always end up having to “lie” to some extent – it’s just a question of how!
1♦ will probably be passed back round to South – who at this point should definitely re-open with 1♠. Firstly he is almost as good as he can be for his initial pass. Secondly, his partner is known to have some values now – after all where are the points? East has at most 5 for his pass of 1♦. West probably has 20 at most for his failure to open more than the 1 level. Add those 25 to South’s own 9 to get 34 which means partner has a minimum of 6 points – and quite possibly more. So South should definitely compete with 1♠.
West has a strong enough hand that he is willing to compete again (even though partner passed his opening bid, whenever he has a fit for any of partner’s suits, the hands will play quite well – so it’s well worth having another go). West can therefore double 1♠ (takeout and showing extra values). North should raise spades now – but only to 2♠ since he has a balanced hand and (at least in this scenario) his partner passed originally. Now East can come back to life. His hand is already limited by passing his partner’s 1♦. But you should always consider your hand in the context of what you have already done and the subsequent auction. Here that means East’s hand is now enormous! Consider why:
a) He has 4 card diamond support
b) He has nothing in spades and partner is almost sure to have at most 1 after the opponents have bid and raise them. So it looks like any values partner does have are useful.
c) He has an ace in a side suit (not only a certain entry but the best possible card he could really hold, having already passed).
So East is then well worth 3♦ over 2♠.
Many pairs did play in 2♠ by South though so we’ll focus on the defence and play to that contract. West has an easy diamond lead. Personally I would lead the ♦K asking for a count signal – see advanced section for more on that style. After cashing 2 diamonds, West might just safely continue a 3rd round. Or he might switch to a heart. Why might he risk a heart? Because East should have signalled hearts to him! See advanced section for how East can do that.
Deep Finesse says 2♠ makes but he can see all the cards! The spade suit can in theory be played for no loser by cashing the ♠A first, then finessing against East’s ♠10. But in the real world, it’s very likely that declarer will finesse into the singleton ♠K and perhaps also lose to the ♠10 with East later. For example it would be quite reasonable to lead ♠Q from North, hoping that West instead has singleton ♠10. That would not work well on this hand! 2♠ could easily go 2 off (losing 2 spades, 2 hearts, 2 diamonds and a club).
Key points to note
3rd seat light openings can be tactically very effective. But you need to make your partnership style very clear to your opponents if you do it regularly.
Always consider your hand in the context of what you have already shown. Partner heard you bid (or not bid) the round before. So if he took another action, he is aware you might be weak.
Don’t be frightened to compete – especially when the opponents have bid 1X P P it often means partner is guaranteed to have some values.
Leading Aces & Queens for attitude and Kings for count can help defenders get the signal they want more often – but, as with any convention, there are still downsides.
Defenders can use the spot cards on the 2nd/3rd round of a suit as suit preference signals to indicate what other suits they have values in. This can help partner switch to the right suit.
More advanced
Why might it be advantageous for South to open 1♠ in 3rd seat? He knows it is likely to be the opponents’ hand (his partner passed and he only has 9 points) and 1♠ takes up a lot of bidding space. So that will make it much harder for them to find their contract. If he does this, then West can make a takeout double and it’s up to North to decide what level to raise spades to. Here he should probably only bid 2♠ to allow for the fact partner might be opening light (and because he is very balanced). There are some bidding methods available to accommodate this better – see advanced section for more. 2♠ may well buy the contract – it’s not that appealing for East to bid and West may not be willing to compete a 2nd time to force his side to the 3 level.
Be aware it can be quite contentious to open really light in 3rd seat. If the opponents assume you have a normal opening bid, they may easily miss out on bidding their own contract. A really light opening can be considered a “psyche” (i.e. a gross misrepresentation of your hand’s structure or strength). If your partnership has agreed to open light in these circumstances, then you should absolutely make that style clear to your opponents – both on your convention card and possibly even by alerting the opening to warn them.
After a 3rd seat 1 major opening it can be tricky to know how high to bid. That’s because the range of the 1 level opening is now much wider (anything from about 9 to 20 points). So it’s not safe for responder to go too high – but equally the opener might still have a very bid hand and needs to know responder’s range as well.
There is a bidding convention known as “Drury” which can help resolve that. The standard version has a 2♣ response as artificial and showing a GOOD raise of spades (i.e. a hand that would probably be shown as invitational – e.g. 10-11 opposite a “normal” opening bid). A simple raise to 2S is therefore less than that. This method allows the opener to rebid 2♠ if they have opened light and save the partnership from getting too high. Another version of Drury also distinguishes the size of the trump fit – 2♣ shows a good 3 card raise, and 2♦ shows a good 4 card raise. Be aware of course that like any convention Drury also has a downside – if responder has a hand with clubs (and diamonds if playing the 2nd version) he can’t bid them naturally, he will have to respond 1NT instead. The hand here is a good example where the auction might go P P 1♠ X 2♣ P 2♠. North has a classic 2♣ Drury bid showing a decent raise. South, having opened light, then shuts up shop. But had South had a stronger hand, he now knows he can afford to go higher.
When defending 2♠, West will surely start with 2 top diamonds. A leading method I like is “Ace/Queen for attitude, King for count”. This describes the type of signal you want from partner based on what you lead. Here, holding AKQ of the suit, you want to know how many rounds you can cash. So you lead the King to get that signal. But from a holding like AKxx or KQxx you want to know if partner likes or dislikes the suit before continuing it. So you lead the Ace or Queen to ask for an attitude signal. Of course there are downsides to this too. For example if you hold KQxx(x) you want to get an attitude signal so you might lead the Q. But partner doesn’t magically know you have done that! If he can’t see the Jack then from his perspective it might be a simple lead from QJ10xx. Hence if he holds the Ace and the King is not in dummy, he might overtake your Queen with his Ace and risk crashing two of your sides’ top honours!
So if West leads ♦K, East should give him the requested count signal (the ♦2 if playing reverse count). After West cashes the ♦A next, he now knows no more rounds are cashing so he may want to look for defensive tricks elsewhere. But East can, and should, be helping West. His 1st card (♦2) is a count card but on the 2nd round he has a free choice of his other 3 diamonds to play. So he can use those cards in a suit preference manner – highest card shows interest in the highest side suit, lowest card shows interest in the lowest side suit, middle card shows no preference. Here, holding ♥A East should play the ♦9 (his highest) under West’s ♦A. This should allow East to safely lead a heart and the defence can quickly set their 2 heart tricks up. It doesn’t make much difference on this hand but it can be critical for the defence to find the right switch early enough before declarer can set up more tricks himself. The use of small spot cards on the 2nd or 3rd round of a suit as suit preference signals is a very powerful advanced defensive technique – it can explain why good players often seem to find the right switch against you far more often than average players do!
Julian Foster (many times NSW representative) ♣♦♥♠


