City and Canada Bay – Monday Morning 22nd July 2024.

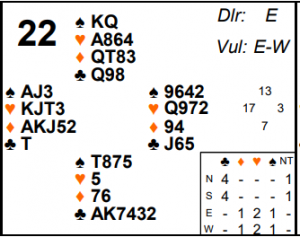
Board 22 last week saw a wide variety of contracts. In the city session it was played 9 times and there were 8 different contracts! Canada Bay had 12 tables and 6 different contracts.
As so often is the case, competing in the auction was important. To start with both East and South are likely to pass. South should be put off pre-empting in clubs with a 4 card major suit on the side – if his partner has a reasonable hand with spades they could easily make 4♠ but opening 3♣ will make that impossible to find.
West has a normal 1♦ opening and North can’t really bid anything over that (he’s not strong enough for a 1NT overcall and a takeout double will surely hear partner bidding spades a lot of the time – and then what?) It is fine to pass and hope either he or partner can come back in later. On this hand East will pass and that’s exactly what should happen – South should now come back to life with 2♣.
A few pairs passed out 1♦ but there are many reasons for South to bid at this point:
- He has shape (6-4 hands are almost always worth bidding on!)
- He has already limited his hand by passing originally so there’s no danger partner will get too excited.
- He is not vulnerable.
- He is pinpointing a great lead for partner if West does have a big hand and ends up as declarer.
- Partner may have quite a decent hand but had no bid available over 1♦ so it could still be North South’s contract. It’s important to “protect” partner and it’s quite appropriate to come in a bit lighter than usual here.
- In fact South knows North must have quite a few points – see advanced section for why.
- All the opponents’ strength seems to be concentrated in one hand. See advanced section for why that matters.
So suppose South does bid 2♣. Now what? West has a good hand and, even though partner has passed his opening bid, he should still be interested in competing – his hand is worth a lot with any fit in partner’s hand. But he wants to find out what suit(s) partner has. So he should make a takeout double inviting partner to bid one of them (or show some diamond support that he was too weak to show on the first round). A double is a far more flexible bid than 2♥ which is committing to either hearts or diamonds (partner might be sitting there with 2 points and 6 spades!)
Now it’s back to North. He mustn’t get carried away – yes he has 13 points but the whole point of partner protecting the auction by coming back in was to allow for that. So partner has already bid some of those points for him! A good adjustment is for the protecting hand (South here) to mentally add about a King to his hand – therefore the other hand (North here) needs to do the opposite and subtract about a King. Hence North should imagine he only has 10 points. That’s not enough to try game but he certainly should raise to 3♣, and he might consider showing a “cue raise” with a bid of the opponents’ suit – i.e. 2♦.
3♣ might be enough to buy the auction. Even though East has 4 hearts and has heard his partner make a takeout double of clubs, he still only has a miserable 3 count and a balanced hand. He might venture 2♥ but 3♥ is asking a bit much when there’s no guarantee partner even has 4 hearts (he could be 4351 and bid the same way) and East is also vulnerable.
The North South pairs who did manage to play in clubs scored well – 10 tricks are fairly straightforward. West surely starts with 2 top diamonds and might play a 3rd diamond so that East can at least ruff one of the diamond winners away. Declarer should immediately play on spades as he is planning to take at least one spade ruff in dummy. West will win and might try a trump or a 4th diamond for East to ruff but it doesn’t really help. South can overruff, cross to ♠Q, play ♥A, ♥ ruff and ruff a spade. When the ♠J luckily falls at this point declarer’s ♠10 becomes a winner so he just has to draw trumps and has the rest of the tricks.
Those playing in 1♦ usually scraped home – even though trumps split badly the North hand has both the long hearts and the long trumps. So when declarer sets up his hearts, North has to follow to them and South can’t ruff.
The most interesting contract is 2♥ played by East West. Assume the defence lead clubs (they should – see advanced section for why). Declarer will ruff in West. Now what? If he starts drawing trumps the 4-1 split could prove nasty. He can eventually draw them but North will now have 2 diamond tricks as he is sitting over West’s diamonds. Alternatively declarer might start trying to ruff diamonds in East. If he’s careless and ruffs the first one with the ♥2 then South can overruff with ♥5 and now things could get ugly! But even if he ruffs high and perhaps crosses to ♠A for another diamond ruff, he will eventually have to play trumps. But if he’s ruffing diamonds in East and clubs in West then North will end up with the long trumps. This is known as “losing control”- i.e. declarer is no longer in a position to draw trumps.
Some pairs got as high as 4♥ East West – I’m not sure how but it usually ended up with the bad result it deserved – at least -200!
Key points to note
- Don’t open pre-empts with side 4 card majors – you could miss a good contract your way.
- If the auction proceeds 1X P P to you, it’s reasonable to come back into the auction with a hand weaker in points than usual. This is known as “protection” – you are protecting the fact that your side could still win the auction because partner may have had to pass with quite a reasonable hand over dealer’s first bid. A good guide is to mentally add about a King to your hand.
- If you have already passed when you had the chance to open, it’s often quite safe to bid later in the auction (with some shape) because partner knows you have at most 10 points so tends not to get too carried away!
- If partner does protect the auction, mentally deduct about a King from your hand (partner has already bid that for you!)
- When defending, a holding of Axxx of trumps is very powerful and can often cause declarer impossible problems! It is very often right to duck the Ace for at least one round as this gives you control of the trump suit not declarer.
More advanced
How can South tell North must have values here? By thinking about the points. There are 40 points in the pack but where are they? Left hand opponent only opened at the 1 level and right hand opponent has at most 5 points for his pass. Even if you give LHO 19 and RHO 5 (their likely maximums), your 7 points still leaves partner with 9. And, in practice, that’s about the minimum he could have. He could have anywhere up to about 14 (with 15 or more he’d be likely to have overcalled 1NT).
After an auction 1X P P it indicates nearly all the opponents values are in one hand. That often means your side can do well – because it’s going to be hard for them to defend. It is far easier to play a hand with 10 points opposite 10 than with 20 opposite 0 – because you have entries to both hands. It’s exactly the same when defending. The big hand will keep getting on lead and will have to lead away from its honours and give tricks away. Frequently you find game being made on 22-23 points or even fewer in these situations.
Why should both North and South lead clubs against a heart contract? Because North knows (and South should suspect) trumps are splitting badly for declarer. In that situation it is very often right to lead a long suit to try and force declarer to ruff and weaken his trumps.
With a good trump holding it is frequently better to lead a long suit instead of a short suit hoping for ruffs. Here North might consider leading a spade with the aim of setting up a spade ruff in his hand. He may well get a ruff here but it will still mean only 4 tricks for the defence (♠Q, ♥A, ♣A and the spade ruff). Forcing West to ruff makes his life much harder. Another reason for North to do this is because he knows he is sitting over West’s diamond suit so it’s not going to set up easily. Forcing trumps out of the West hand will take the entries away to be able to set diamonds up and later enjoy them.
Finally, a holding of Axxx in trumps is very powerful, especially when the opponents have a 4-4 fit. The Ace gives you control of the whole suit. Imagine declarer ruffs a 2nd club and starts playing trumps. You should duck – not just the 1stround but the 2nd round as well! Now declarer is in an impossible position. If he plays a 3rd trump you can win and declarer only has 1 trump left which you can now force out with yet more clubs. If partner happened to have another entry that could lead to declarer going at least 3 down!
That isn’t the case here but it would still leave you the last trump and able to ruff declarer’s own winners. So in practice declarer will have to give up playing trumps after 2 rounds but that will allow you to at least score your small trump.
An alternative declarer might try here is to set his diamonds up first. But, as we saw earlier, that is dangerous too – once he has ruffed in both the West and East hands that leaves North with longer trumps than either declarer or dummy.
Note there are also hands where you have a good holding in declarer’s first bid suit and you then want to lead trumps to try and prevent him taking ruffs in dummy. Had I held ♥Axx here I might well have led a small one with the aim of getting back in and being able to then play A and a 3rd round. Here, however, the fact I have 4 trumps persuades me to try and force declarer off instead.
Of course if East West are only in 2♥ then even defending perfectly to hold them to 8 tricks and -110 is still not going to score well – because North South can score +130 in clubs (or start doubling hearts for even larger penalties if East West get too high)! That’s why it’s essential to protect the auction with hands like South’s. There is actually a saying you hear “six – four – bid more”! Which basically emphasises that hands with a lot of shape like that should not be frightened of bidding – points are far less important when there is distribution around!
Julian Foster (many times NSW representative)


