City and Canada Bay – Monday Morning 29th July 2024.
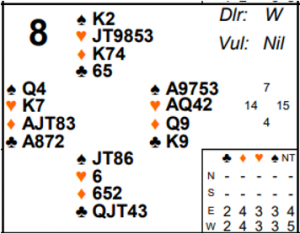
Board 8 last week had some fairly consistent results (most East West pairs made 10 tricks in 3NT) but the bidding to reach it could well have varied quite a bit and contained some interesting points.
West has 14 points and probably opened 1♦ at most tables. But this is the type of hand I would strongly considering upgrading to a strong 1NT (15-17) opening.
For a number of reasons:
- It has a good 5 card suit which makes the hand worth at least 15 points anyway.
- It has honour holdings in both short majors (you tend to want opponents leading round to these rather than through them).
- It stops the opponents being able to overcall 1M which might easily allow them to find a fit and compete there. Overcalling at the 2 level is much riskier for them.
- It describes the broad balanced nature of the hand. Yes we can certainly rebid 2♣ after a 1M response but it still feels like we may want to play no-trumps!
After 1♦ the auction may continue uncontested 1♠-2♣ (if North sticks in a weak jump 2♥ bid he may regret it!). Now East has a classic 2♥ 4th suit forcing bid available. Having already bid 3 suits naturally it’s unlikely the pair will want to play in the 4th. Not impossible but a much more practical use of the bid is as an artificial query that just asks partner to describe his hand further. It’s nearly always played as game forcing but with a hand that doesn’t yet know which the best game will be. Most commonly it’s asking for a stopper in the 4th suit but it can also be looking for delayed support of responder’s suit or to allow opener to show some extra shape. Here East isn’t worried about a heart stopper but he does want to know if West has 3 spades so he can play 4♠. When West doesn’t bid 2♠, East just bids 3NT. He’s not strong enough to look further – partner doesn’t have to have any extra values.
After a 1NT opening from West, East will most probably transfer to spades and then bid 3♥ to show at least 5-4. That will usually enable a fit in either major to be found but it takes up quite a lot of space (it’s nicer for East if he was 45xx as now he can transfer to 2♥ and then bid 2♠ which is still much lower).
When West has no fit for either major the pair will also subside in 3NT. There is, however, another useful and increasingly popular convention called Smolen that East could use which improves bidding accuracy here. See advanced section for more.
What about the play? Depending on who is declarer the opening leads will differ but the result will probably be the same. Most routes are going to lead to 10 tricks. Declarer will try the diamond finesse and when that loses he will normally make 1 spade, 3 hearts, 4 diamonds and 2 clubs.
North will almost certainly lead the safe ♥J although if the auction has revealed East has hearts then he might try his doubleton club hoping to hit something in partner’s hand. South will almost certainly lead ♣Q regardless of the auction which initially looks safe but actually may not be! Declarer can win with ♣K then try the losing diamond finesse. If North returns a 2nd club (quite reasonable if South started with ♣QJ108) this will go ♣6,9,10,K and that allow declarer to use his ♣87 to force out ♣J and set up a 3rd club trick which will make 11 overall. South’s better lead on this hand is actually ♠J but he can’t know that in advance.
West can, however, genuinely always make 11 tricks whatever North leads although it’s quite an advanced play and a bit double dummy. More advanced players may like to see if you can spot it.
Key points to note
- Points are only a guide to a hand. Don’t be frightened to upgrade and downgrade depending on their texture (even though it has 1 fewer point a holding of an AJ109x is actually worth more than AQxxx since it has better suit quality and more chance of playing for 3+ tricks).
- Opening 1NT slightly off shape can be very effective as it pre-empts the whole 1 level and may stop opponents being able to make a cheap 1M overcall of a 1m opening.
- It’s worth exploring different ways of bidding hands with majors over 1NT. Simple stayman and transfers are not the only option.
- After your side has bid 3 suits naturally a bid of the 4th suit is artificial just asking for more information (either delayed support for responder’s 1st suit or a stopper in the 4th suit to play no-trumps). It’s usually played as game forcing and is a really valuable bidding tool.
More advanced
Smolen is a way of responding to NT openings with a game forcing point range and 5-4 in the majors. Instead of transferring to one suit and bidding the other, responder starts with simple stayman. Obviously if partner responds in a major a fit has been found. If he responds 2♦ you now bid 3 of your 4 card major (showing 4 of that major and 5 of the other). This leaves room to explore all options. It also frees up the sequence 1NT – 2♥ – 2♠ – 3♥ to show at least 55 shape. That’s useful because if 3♥ could be a 4 card suit in that sequence then opener has to bid 3NT with either 2 or 3 hearts so responder with 55 is then guessing if they do have a heart fit.
Smolen can be played after both 1NT and 2NT openings although the options are obviously more limited after 2NT given there is a level less space.
So what about the advanced play for 11 tricks? It’s known as a “strip squeeze” and it can be applied to North here. He will almost certainly lead ♥J. Declarer should win in hand, cross back to a 2nd heart to try running ♦Q in case they are 3-3 with Kxx onside. When North wins the ♦K he’ll almost certainly lead another heart. Now declarer runs the diamonds discarding 3 spades from East. Then he plays ♣A, ♣K to end up in East with the last 3 cards being ♠Ax and a losing heart. West has ♠Qx and a losing club. But what are North’s last 3 cards? He has a choice of poisons. If he keeps ♠Kx then he only has 1 heart left – so declarer throws him in with it and he has to lead away from ♠K. His other choice is to bare the ♠K but that gives declarer 2 spade tricks.
This doesn’t work if the contract is played by East because South can lead the ♠J through at trick 1 and break all that up. North of course can’t lead a spade safely.
Why is this play double dummy? Because there’s no reason for declarer to suspect North even has ♠K in the first place. He’d look very silly if he exited a heart in that end game and found North had 2 winning clubs left to cash! Nevertheless, if the auction or earlier play has indicated a key card is with one player, you can sometimes engineer this sort of ending. It tends to happen in matchpoint pairs where squeezing an extra trick can be very worthwhile. Playing teams it’s far less important.
Julian Foster (many times NSW representative)