City and Canada Bay – Monday Morning 12th August 2024.
Apologies there was no column last week. Unfortunately, I had to do a quick dash to the UK after a death in the family so there was a lot to organise and bridge was not a priority. However, normal service should now resume.
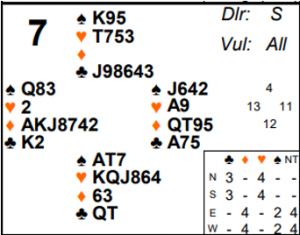
Board 7 last week saw both sides making game even though one of them could have been beaten.
The normal start to the auction is 1♥ 2♦. Then it’s a question of how far North chooses to raise hearts. He only has 4 high card points but his hand is worth way more than that with a void and 4 card support. There are cases for 2♥, 3♥(pre-emptive) or a straight 4♥. None of these bids should cause South to go overboard though because North should start with a 3♦ “cue raise” with a good hand containing values. Whatever North does, East also has a strong hand in support for his partner’s diamonds. His is in fact the type of hand that, space permitting, SHOULD make a cue raise to tell partner his support is based on a good hand with values. This may enable his partner to go on towards slam if he also has a strong hand (not the case here). Over 2♥ or 3♥ East can therefore bid 3♥ or 4♥ to show strong diamond raises. If North jumps immediately to 4♥, there’s obviously no room for that and East just has to bid 5♦. Note that even holding 11 points and 2 aces he might still be bidding 5♦ as a sacrifice over 4♥ – see advanced section for more.
Looking at the traveller, about half the field played in 5♦. A couple of pairs played 4♠ East West, the rest in 4♥ North-South.
What about the play?
4♥ should make. Declarer can draw trumps and set up the club suit. That will provide discards for any remaining losers. In practice, the defence will almost certainly lead diamonds so dummy will be forced to ruff but there are still enough trump entries and the ♠K in dummy to reach the club winners later and discard declarer’s 3rd spade. Alternatively, if the defence start attacking spades then declarer will have 3 spade tricks anyway.
5♦ should go off but is a bit harder to defend. Assuming the defence lead hearts declarer has 10 easy tricks. But in practice 5♦ made almost all times it was played – which suggests the defence either led spades themselves or immediately jumped in with ♠A or ♠K when they were led. However, if declarer has to play on spades himself he should end up losing 3 tricks there. The spade suit is what’s known as “frozen”. Whichever side leads it first gives away a trick. See advanced section for more on this and other things declarer might try on this hand.
Key points to note
- Points are only a partial guide. Shape is much more powerful. Here it’s North South with a combined 16 points that make game and East West with 24 that should sacrifice over them!
- Try to avoid making “the last guess”. Put pressure on the opponents by jumping aggressively – especially when you have a good fit and shape. They will have to guess what to do.
- Save your aces and kings to beat other picture cards – don’t jump in and play them into thin air, it frequently costs a trick.
- Learn to recognise suits where you want the opponents to lead them first. You may be able to remove the other suits from your own hands by ruffing and then force the opponents to open that suit for you.
- Use the bidding and the known shape in some suits to work out which opponent is more likely to hold a short honour – then aim to lead through that opponent (hoping later to be able to duck to the now singleton honour).
More advanced
I said East might bid 5♦ as a sacrifice over 4♥ . This might seem strange considering he has two aces and quite a few values when his partner has overcalled at the 2 level. However, how many TRICKS does he have against 4♥ ? Quite possibly only the two aces – with his 4 card diamond support it’s quite possible his side has no diamond trick or at best 1. And there’s no guaranteed they have any more black suit tricks. Despite the points there is still a good chance 4♥ is making based on the shape (as indeed it is on this hand).
What about 5♦? It’s very likely East West have at least 9 tricks (6 diamonds, East’s 2 aces and another card (for a vulnerable 2 level overcall West must have something else besides ♦AK only). So if 4♥ is making then 5♦ is likely to cost at most 500 against 620. The nightmare scenario for East is if 4♥ is going off and bidding 5♦ converts +100 to -500.
This is why it can often be advantageous to jump the bidding quickly. A 4♥ bid from North will put a lot of pressure on East and force him to guess. Whenever you do that there’s a chance your opponent will guess wrong! Lower bids might allow the pair more space to ascertain if they have extras values or if they think they are better defending.
How might West improve his chances in 5♦? Two things.
First he should eliminate hearts and clubs. He can ruff both a heart and a club in hand to leave him holding only spades and diamonds. Now when the defence win a spade, they cannot safely return those suits as it will give a ruff and discard. This is a good general technique as it restricts what the defence can do.
Second he should aim to lead through South. His best chance of avoiding 3 losers is to find one defender with both honours or with precisely Hx and lead through that defender. He won’t be able to afford to play his honour into thin air or the ♠QJ will be worth a trick between them . So he must duck, and West’s ♠Q loses to a top honour with North. Now declarer ducks the 2nd round completely and hopes the other top honour is now singleton. On this hand he’s out of luck but it’s still the right play.
But why play South for ♠Hx instead of North? Two reasons:
a) he opened the bidding so has more points – and could in fact have ♠AK too.
b) he opened 1♥ so he is known to have at least 5. It’s therefore likely he has more hearts than North. Hence he’s more likely to be short in spades. That becomes even more likely when South also turns up with both trumps.
The hand is a good example of why passive defence is often best. You need to wait to use your aces and kings to capture honours. As long as North South don’t panic and start jumping in with spade honours into thin air, they will score 3 tricks in the suit and defeat 5♦. This is why the spade suit is “frozen” – if North or South lead it first they will end up having to play the ♠K and ♠A against nothing (declarer just plays low at trick 2) which means 5♦ will make. Conversely if East West lead it, North South just also play low and capture the Q or J with a top honour and return the suit.
There are quite a few similar frozen positions. Here’s another.
Kxx Axx Jxxx Qxx. Whichever side leads the suit may make no tricks at all as their honours will lose to the ones sitting over them.
Julian Foster (many times NSW representative)