City and Canada Bay – Thursday Morning 20th February 2025.
Most East West pairs on board 10 last week would have faced a weak 2♥ opening from South. A pre-empt like that can often make it hard for the opponents when they have to start bidding almost at the 3 level. Let’s have a look at what can be done to help.
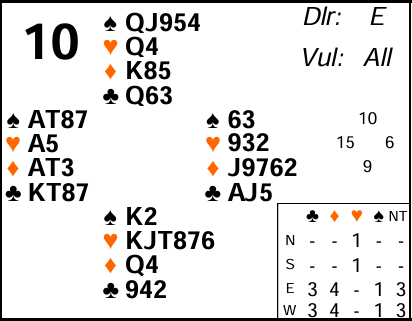
Although it looks like a few tables played 2♥, West has a pretty clear takeout double of 2♥ as he has a decent hand with support for all the other suits. North has no reason to bid any more so it comes back to East. He has 6 points. Many players would bid 3♦, their longest suit.
But suppose instead you held xx xxx Jxxxx xxx (1 point). You can’t pass 2♥x of course so you might also have to bid 3♦. Or what about xx xxx KQxxx AJx (10 points)? Once again diamonds is your longest suit.
But if you bid 3♦ on all three of these hands what is West meant to do with the hand he holds? Opposite 1 or 6 points he doesn’t want to go any further. But opposite 10 his side is close to making game. How can he tell? The answer is that he can’t – it’s a blind guess! So the solution has to be for East NOT to bid 3♦ on all three of those hands. It’s a very similar scenario to when you are responding to a takeout double at the 1 level. You might be forced to bid on nothing so when you do have some values you need to jump the bidding. Here, however, the opposing pre-empt usually means you don’t have room to jump (you certainly don’t want to be jumping to 4 of a minor because that goes past 3NT). So you need another way to tell partner whether you have values or not.
A common convention used here to help distinguish that strength is “Lebensohl”. Basically a bid of 2NT in response to the double is used as an artificial bid showing any weak hand (usually about 0-7) and an immediate bid at the 3 level then shows values (about 8-11). Hands stronger than that can jump to game themselves or make a cue bid of the opponents’ suit.
Lebensohl is a very useful convention and the concept or other variations of it can be used elsewhere too – see advanced section for more. By being able to distinguish some level of East’s strength it enables West to know whether to pass or bid on when he has a hand in the 15-17 range. Without that it’s a total guess.
One obvious question is what does East do if he wanted to bid 2NT naturally? As always, every convention has its downsides! With that sort of hand East will now have to do something else. One option (especially at pairs) is to risk a pass and hope to take a penalty. Another is to bid 3NT (sometimes the opponents misdefend!) Although this can sometimes come unstuck it’s generally felt that this downside is more than compensated by the ability to show two different strengths of hand in response to the double.
Over 2NT the doubler should almost always bid 3♣ (see advanced section for when he might not). Partner then either passes that or bids his own suit. So on this hand East would bid 2NT, West would bid 3♣, East would correct to 3♦ and that would be it (yes it so happens that 3NT can make but they have a combined 21 points and it’s very lucky – see advanced section for more).
Another possible start might be that South opens a multi 2♦. There are assorted bidding conventions available to West over that – see advanced section for more. But it will often come back to a similar position.
What about the play in 3♦? South doesn’t have a clear lead and I’d probably choose a club trying not to give anything away and to lead through dummy’s perceived strength. On this hand that doesn’t work well as it just picks up partner’s ♣Q! How should declarer play the trump suit? In isolation normal is to start with small to the ♦10. This will work well if South has one of the honours. You expect the ♦10 to lose to one of the honours (as it does to the ♦K). On the 2nd round lead the ♦J and finesse again (as it turns out the ♦Q appears immediately). That should now mean declarer makes 10 tricks (4 diamonds, 4 clubs and the two major suit aces). But there are traps for declarer. What should he do on a heart lead? Or what about if South tries an unlikely ♠K? 10 trick can in fact always be made but it’s not so easy. See advanced section for more discussion.
Some North South pairs pushed on to 3♥. That should lead to a poor score of -200 as the defence can take 3 clubs and 3 other aces. However many were allowed to escape for -100. The defence do have a 2nd chance to get it right even if they don’t find the club lead immediately. Say they lead ♦A and another to set ♦K up for a discard, declarer still can’t get to dummy quickly. He will no doubt lead a low heart towards the ♥Q and at that point West needs to dive in with ♥A and switch to clubs before a loser can be discarded.
Key points to note
If partner makes a takeout double of a weak two, it’s very valuable to be able to distinguish between really weak hands that may be forced to bid, and hands that have enough values for game if partner has more than a minimum takeout double. Lebensohl is a useful convention that lets you do that. (It can also be played in other positions).
Natural weak twos can be harder to defend against than a multi 2♦ because you may have to risk coming in immediately – over a multi you can usually afford to pass and wait to see what happens before committing yourself.
Sometimes it pays to duck a round of a suit led (if you are pretty sure it’s not a singleton!). That can mean when you lose a trick, the other hand can’t return the suit.
More advanced
The big advantage of playing Lebensohl is it allows doubler to gain at least some indication of partner’s strength. Usually the doubler will just bid 3♣ over 2NT to find out what partner has. The one time doubler can’t do that is if he holds a hand too good to risk having partner pass 3♣! That might be a really large balanced hand, or a hand he initially felt was too strong to just overcall in a suit. So when the doubler bids something OTHER than 3♣ over 2NT he is showing a really strong hand with game interest even opposite a known weak hand from partner.
Another common place Lebensohl is played is when your side opens 1NT and they overcall. Once again it’s useful for responder to be able to distinguish between hands that just want to compete to the 3 level and hands that are genuinely interested in game. Playing 2NT Lebensohl there allows that. (Some pairs play transfers in this position which can achieve the same thing).
If South opens a multi 2♦ there are a few defensive conventions in use over that. One I like is that suit bids are all natural and double is either 13-15 balanced or any enormous hand. Partner assumes the 13-15 balanced since that’s far more common. But I have seen other methods where double is played as any 16+ hand; or where double is played as takeout of hearts and 2♥ is takeout of spades.
An important thing often overlooked over a multi though is that you can pass and come in later. The multi 2♦ opening will almost never be passed by responder (especially not if one of the options is a large balanced hand). So you can wait and bid on the 2nd round once you know what opener’s hand type is. That could work fine on this hand – pass over 2♦. North will bid 2♥ (to play opposite a weak 2♥) and that will be passed back to West who can now make a takeout double – effectively the same auction as when South opens 2♥ immediately. The fact you can pass on the first round can be important. You may not be able to do the same over a weak two as it could be passed out – hence you sometimes may end up having to take the risk to wade into an auction and get into trouble! It’s one reason why natural weak twos are actually a more effective bidding method than the Multi (another is responder immediately knows opener’s suit so may be able to pre-empt high immediately, something he can’t do if partner might have a weak two in the other suit!)
The play in 3♦ is quite easy on a club lead. On a heart lead, however, declarer has to take a bit more care. Suppose he immediately won the ♥A, crossed to hand in clubs, and tried a diamond to the ♦10 and ♦K. Now North could return a heart and South could play a 3rd round. Declarer would have to ruff with the ♦A or allow North to score ♦8. After a vulnerable weak two, South will almost always have exactly 6 (with 7 he might have opened 3♥, with 5 he probably wouldn’t have opened at all). So you can afford to duck the 1st heart and then win ♥A. Now if you play trumps the same way, North no longer has a heart to return when he wins ♦K. This gives declarer time to draw trumps. (He can in fact cash ♦A on the 2nd round which will drop South’s now singleton ♦Q).
An even more challenging lead on this hand might be ♠K! It’s a very random lead that could be completely disastrous but here it would give declarer a nasty problem. There’s a good chance it’s a singleton so he could look very stupid if he ducks, then loses a trump to North and runs into a spade ruff! But if he takes ♠A immediately and plays trumps losing to ♦K then North can play 2 more rounds of spades which will allow South to score the ♦Q as well. But in fact this is still OK. After North cashes ♠Q he will have ♠J95 left and dummy will have ♠107. If he plays a low spade, declarer discards a heart (and later discards his other heart on the 4th club). If he plays the ♠J, declarer ruffs, gets overruffed by the ♦Q but can now draw trumps and has ♠10 and the 4th club as winners to discard both his hearts. The defence only score 1 spade and 2 trumps.
Finally, observe how lucky 3NT by East West is. Firstly hearts need to be exactly 6-2 so the long suit can be cut off. Secondly, South has to be kept off lead in diamonds. Thirdly, declarer needs to guess who has ♣Q to be able to score 3 clubs, 4 diamonds and 2 major suit aces.
Julian Foster (many times NSW representative) ♣♦♥♠