City and Canada Bay – Thursday Morning 27th March 2025.
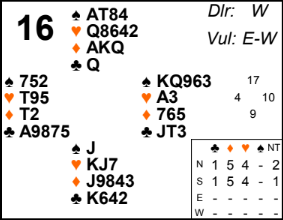
Back to a normal column with just one hand this week! Board 16 saw almost all North South pairs playing in 4♥. But there were different routes to the play and the defence which are worth having a look at.
First the auction. Normal to me feels like Pass 1♥ 1♠ 2♥ 2♠ 4♥ end. When West raises spades, that means East West surely have at least 8 between them. Hence North, holding 4 himself, can virtually see the spade shortage in South’s hand. That means he knows some ruffs in dummy should be available, hence it’s worth a shot at 4♥. Although it’s often right to bid 4♠ over 4♥, the vulnerability and the relatively balanced nature of both their hands should put East West off doing so here.
The normal lead is ♠K which declarer will win. Now what? A very good exercise for declarer on every hand is to count tricks(!) but especially so here since there are lots of possible ways of playing this hand. So what do we have? In trumps assuming a 3-2 break you’d expect to lose just ♥A so that means you’d have 1 spade, 4 hearts and 3 diamonds. So you need 2 more. The first job for declarer is to consider various plans to get those 2 extra tricks. Having done that, the next thing is to play through what might happen – and see if that unearths any problems. There are 4 plausible options to get 2 more tricks here:
- Ruff 2 spade losers in dummy.
- Set up a club trick (you have ♣KQ between the hands). So perhaps you aim to ruff 1 spade in dummy and take 1 club trick?
- Aim to ruff all 3 of your spade losers with all 3 of dummy’s trumps. Immediately ruff a spade, cross to ♦A, spade ruff, cross to ♦K, spade ruff.
- Lastly you do have all the top diamonds so if you can run that suit as winners you’ll have plenty of tricks.
Which of these would (or did) you try? Try projecting ahead as to what might happen if you embark on these lines. Can you see possible problems? Check the advanced section for the solutions.
When I did that exercise I decided I preferred the 2nd option. So I would play ♣Q at trick 2. After West wins ♣A what is he going to do? It looks quite natural for him to try and stop spade ruffs so he might easily lead a trump and East might easily think that’s a good idea and play ♥A and another. But that’s fine – declarer can win in dummy, cash ♣K discarding a spade, cross to a diamond, ruff a spade with dummy’s one remaining trump, cross back to hand (either with a 2nd diamond or, better, with a club ruff) to draw the last trump. He still loses the 4th spade but that’s 10 tricks losing 1 spade, ♥A and ♣A.
However he should in fact make 11 tricks on that defence! See advanced section both for how and, as a further exercise, what the defenders actually have to do to stop declarer making 11 tricks? (They can’t stop him making 10).
Finally – there are a couple of other reasons to play ♣Q at trick 2. See advanced section for what they are.
Key points to note
When you hold 4 of a suit which the opponents overcall and raise, it means partner will almost certainly be short. That means you may be able to ruff your losers in that suit in dummy if you play the hand.
Always count your tricks and work out how many more you need for your contract.
There are often several ways of playing a hand to get the extra tricks you need. Try to get in the habit of considering the various options and projecting what will happen if you try each of them.
Entries to a long suit are critical – as defenders you may be able to stop declarer reaching a long suit in dummy.
Blockages are a nuisance – but can sometimes be overcome!
More advanced
So what are the possible problems with each of the possible lines mentioned?
- Take 2 spade ruffs in dummy. The snag here is the quality of your own trumps. If you start ruffing with South’s trump honours, you could easily lose another heart trick to the ♥10 or ♥9.
- Set up ♣K and take 1 spade ruff. No real flaw with this.
- Aim to ruff all 3 of your spade losers with all 3 of dummy’s trumps. Play this through. After spade ruff, diamond to ♦A, spade ruff, diamond to ♦K, spade ruff – then what? Having ruffed with ♥J and ♥K in South you are now definitely going to lose at least 2 trumps. But you are also at risk of never scoring a club trick and when you lose ♥A, the defence may be able to take a diamond ruff too. This doesn’t feel like a good line to me.
- Aim to run the diamonds. Two problems with this one – firstly the suit is blocked, secondly how will you reach the long diamonds in the South hand? The diamonds will only run after trumps have been drawn so you need to be able to finish drawing trumps in the South hand and have diamond winners left there. Shouldn’t be possible – although….
If the play has gone ♠K to ♠A, ♣Q to ♣A and then 2 rounds of trumps – declarer could now continue with his original plan to take 1 spade ruff and cash ♣K. But a better option is now available! With trumps having broken 3-2, you can now finish drawing trumps in South which is where the long diamonds are. But the diamonds are still blocked I hear you say? Not really! How about cashing ♦AK, crossing back to South’s ♥K drawing the last trump. Now cash the ♣K you set up at trick 2 – AND DISCARD THE BLOCKING ♦Q on it! Now your remaining three diamonds in dummy are all winners on which you can pitch all 3 of your spade losers – and make 11 tricks! This technique of discarding a blocking honour can be very effective – although it’s often a bit of a blind spot for players.
That play should in fact help you work out what the defence have to do to stop that. They need to stop you from being able to draw trumps ending in dummy. Which means West actually needs to play a 2nd round of spades himself to force dummy to ruff. Now with only 2 trumps in dummy it’s impossible to end up there having drawn trumps and the long diamonds are dead. But of course as we saw earlier this just means declarer can take one of the other routes to 10 tricks!
Lastly, two other reasons why ♣Q at trick 2 is good are:
a) it gives you a quick route back to your hand later (club ruffs) without having to play on diamonds (where the more rounds you play the more you expose yourself to the risk of a diamond ruff);
b) it doesn’t immediately reveal what your plan is and it forces West to make a key decision for the defence early in the hand before he knows that plan. So it’s more likely he will mis-defend by trying to stop spade ruffs (after all the defence don’t know your diamonds are so good – so they probably won’t be thinking about the risk of the long suit in dummy ever running!) Always remember the defenders can’t see your hand. Even though you know what the right defence is, frequently they don’t!
Julian Foster (many times NSW representative) ♣♦♥♠