City and Canada Bay – Thursday Morning 16th January 2025.

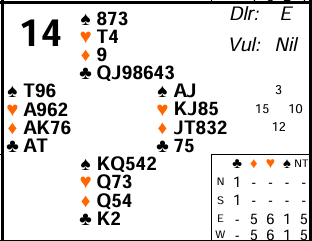
East West had a combined 25 points on board 14 last week but across the two venues, only two pairs reached game. South will have opened the bidding and it’s sometimes hard to diagnose you have game on if the opponents get into the auction first. Let’s see how they could have done better
East will usually pass as dealer and South will open 1♠. West has a problem over that – there isn’t really a suitable bid for his hand. He has the values for a 1NT overcall but lacks a spade stop. He has some of the other suits covered but if he makes a takeout double and hears partner bids clubs then he is in trouble (he can’t now bid a red suit as that would show a hand too good to have overcalled that suit originally). His best action is actually to pass – he may easily have another chance to bid later depending on what happens.
North will most likely pass 1♠ (some could have stretched to raise to 2♠ with 3 card support and a singleton but that risks partner going overboard). After 1♠ P P it’s back to East. Holding a near maximum for his original pass and knowing partner may frequently have had to pass on quite a decent hand over 1♠ East should definitely come back into the auction. This is what’s known as “protecting” the auction – in other words protecting his side’s potential contract. He has quite a few choices to do that:
- 1NT – many players play this as weak in protective seat – although he would like more spades (with only ♠AJ he won’t be able to hold the suit up for long when the defence lead it).
- 2♦ – I don’t like this personally. Yes it’s a 5 card suit but not a very good one, it’s not a suit you want partner to lead, and the hand has other places it could play.
- Double – my preferred action. This time if partner bids clubs, East can bid 2♦ which will imply both red suits. Note the difference between West doing that directly over 1♠ – if West were to double and then bid a red suit it implies he has a hand with that suit which is too good to overcall (although see advanced section for an alternative). But East is already limited by his original pass so when he bids 2♦ after a double he can’t have that big single suited hand.
Over double, what should West do? He has a huge hand now given he didn’t act over 1♠ originally. So he should be the one to drive the pair towards game (yes he does need to downgrade his hand a little bit to allow for partner being in protective seat where he may come back in with fewer points than usual – but East cannot know he actually has 15 points on this hand!). His best action is to cue bid the opponents’ suit (2♠) which just means he has a good hand but no clear bid and wants partner to describe his hand further. East’s original takeout double already implied hearts so he might now choose to bid 2NT to show that he did in fact have a spade stopper for his double. But equally he might just bid his longest suit with 3♦. Now West might show his hearts, or might ask for a spade stopper by bidding 3♠. East should then be happy bidding 3NT with ♠AJ (see advanced section for why). Over 3♥ East should raise to 4♥. Why? Because West went through 2♠ first rather than just bidding 2♥ or 3♥ immediately. That shows a stronger hand.
Quite a few pairs played in a diamond partscore and that usually made 9 or 10 tricks. It would be quite possible to lose a trick in each suit if you finessed into South’s ♥Q and also played for diamonds 2-2. South does, however, have a nasty lead. Leading ♣K would be extremely random (even though it happens to work on this hand). A more normal and perfectly reasonable lead is ♠K. That should lead to 10 tricks. Declarer should win and, after cashing 2 top trumps, should return ♠J to set the ♠10 up in West to discard his club loser on.
What about the play in no-trumps? This time South might try a low spade hoping his partner has the ♠J. No such luck here so declarer wins the ♠J at trick 1. Now, even if he gets diamonds wrong, he will still make a minimum of 2 spades, 2 hearts, 4 diamonds and 1 club.
Against a contract of 4♥ played by West, North is likely to lead his singleton diamond – which, unluckily for him, helps declarer pick up the whole diamond suit. Now declarer should cash 2 top trumps and play on diamonds. South can ruff in and switch to a club but it’s too late – East’s 5th diamond will provide a discard for West’s club loser.
In fact double dummy East West can even make 6♥! That’s extremely unlikely in the real world but you might want to test yourself as to how they can do so. See advanced section for the solution. In practice on this hand even bidding and making game was worth a virtual top!
Key points to note
Just because the opponents open doesn’t mean your side can’t make game. Don’t be afraid to come back into an auction that starts 1X P P (especially if you have suitable shape for a takeout double) – partner may have had to pass on quite a good hand and it could easily be your side’s contract.
Doubling and then bidding a new suit usually shows a hand too good to have overcalled that suit the previous round (but if a passed hand does this then that’s impossible so it’s now just showing the other two suits). So when you make a takeout double, decide in advance what you will do over whatever partner might respond.
In response to a takeout double strong hands can cue bid the opponent’s suit. That just asks partner to describe their hand further. Doing that and then bidding a suit is a stronger action than just bidding the suit immediately.
A “backwards” finesse is an advanced technique that can sometimes pick up a suit where the regular finesse is known to fail (usually because that defender is known to have all the points).
More advanced
Traditionally if you make a takeout double over a 1 level opening you are showing at least some support for all the other suits. So if you double then bid a different suit on the next round you are showing a hand with that suit which was too good to overcall it initially. The modern style is to still make a simple overcall with pretty strong hands (anything up to 17 or 18) so doubling and bidding a suit nowadays tends to show a very strong hand. But there is an alternative approach – which is known as “Equal level conversion”. In this style, if you double and then bid a new suit at the same level as partner’s response you are not showing any extra values – instead you are just saying you in fact didn’t have that suit but did have the other two. It would be a reasonable action for West to take over 1♠ as he could bid 2♦ over partner’s 2♣ and imply both red suits (as opposed to traditional methods where that auction would show a huge hand with diamonds). As discussed above, it’s also something East could do if 1♠ were passed round to him – although for him the situation is different as he can’t have a strong hand. Equal level conversion certainly has its advantages but, as with any bidding choice, comes at a cost. The cost is of course what do you do when you DO have a really strong hand with a suit. You can’t now simply bid it on the 2nd round as that won’t show any extra values and partner might pass. So instead you either have to jump, or cue the opponents’ suit – which can make the auction quite messy and use a lot of bidding space. That’s quite a big cost in practice and the reason I think why you don’t see that many pairs playing equal level conversion in practice.
I mentioned that East should be happy to bid 3NT with ♠AJ as a stopper if West asks for a stop. This hand shows the reason why it can often be effective – provided he is the declarer. Whenever partner has as little as ♠10xx then with the lead coming round to the ♠AJ holding, he is guaranteed two stoppers. The same isn’t true if West were playing it – now North could lead through the ♠AJ holding, South could win the ♠Q and then play a small one to knock out the ♠A.
So how could East West make 6♥? They would have to get both hearts and diamonds right. In diamonds it’s just a matter of finessing South instead of playing for the ♦Q to drop. Hearts is more complex – the natural play in the suit is ♥A and then low towards the ♥KJ. That will fail on this hand. Instead declarer has to take what’s known as a “backwards finesse” – he needs to run the ♥J from East (or play ♥K then ♥J to pin North’s ♥10). South has to cover ♥J otherwise declarer just runs it. But now declarer can finesse against North’s ♥10 (although on this particular hand it happens to drop). This technique can be used when it’s known from the auction that the normal finesse will lose (because that hand has all the missing points). This hand is close to that – once South opens the bidding he is going to have most of the 15 missing points – but there is just room for North to have ♥Q. If, however, declarer had seen the club suit played already and knew North had ♣QJ then it becomes almost certain that South will have ♥Q to make up his opening bid. Hence the normal heart finesse can’t work so declarer either needs to play for it to drop doubleton or try this backward finesse. Note the backwards finesse is only possible if declarer has some of the lower pips in the suit (here the ♥9 and ♥8) – without those South can just cover the ♥J and there’s then no finesse position available.
Finally be aware that this is almost entirely double dummy and of purely academic interest – there is no particular reason for declarer to do any of those things in the real world on this hand since he’s not likely to have seen any clubs played and also has no reason to suppose that the ♦Q isn’t going to drop.
Julian Foster (many times NSW representative) ♣♦♥♠


