City and Canada Bay – Thursday Morning 23rd January 2025.
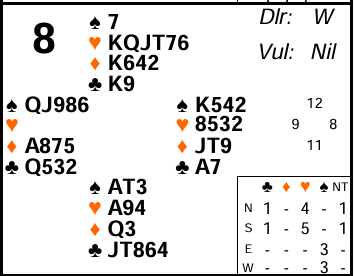
On board 8 North South can make game in hearts but East West had a good sacrifice available in spades that would enable them to score better than conceding -420 or -450. The challenge for them was often to get into the auction in the first place though. Let’s have a look.
Most Wests will pass as dealer although if you have an opening bid to show a weak hand with spades and a minor, that would work well on this hand. East should immediately bid to 4♠ opposite that – he has prime spade support, and his cards in the minors are likely to fit well with whichever minor partner has (of course on this particular hand he happens to have both!)
After the more common pass, however, North will open 1♥ and East will pass. Then it’s a question of what South chooses to do. In terms of points he has an invitational range. These days a popular method is Bergen raises where 3♣ and 3♦ are used to show weaker and stronger raises with a jump to 3♥ being pre-emptive. All those bids show 4 card support, however. With 3 card support and invitational values the traditional approach was to first bid another suit (2♣ here) and then jump to 3♥ on the next round. But the downside of that is it can allow the opponents into the auction more easily and then it may be uncomfortably high on the next round to belatedly show the support. A good maxim in bridge is “support with support” – i.e. find a bid to immediately tell partner you have a fit with his suit. When playing Bergen raises, it’s quite common to use a jump in the other major to show an invitational hand with exactly 3 card support. So here South could jump to 2♠ over 1♥.
Even though North only has 12 points, he should most definitely accept any invite to game as he has a fair bit of extra shape (another maxim in bridge is “6-4 bid more”!), not many losers, and he knows of a 9 card trump fit. At many tables 4♥ appears to have been the final contract which, as we’ll see shortly, usually makes 10 or 11 tricks.
It’s all very well saying what North should do – however, we have skipped over West! Yes he could just pass on the 2nd round but in fact he has a chance to make a bid which could pave the way for his side to find their good spade contract. Coming into the auction at that point does certainly carry some risk (he doesn’t yet know how strong North is). But doing so is a variation of a concept known as “pre-protection” – i.e. staying in the auction in case your side can make something. There are in fact many advantages for West bidding:
- It may point partner to a good lead
- He has shortage in hearts – his partner may not be able to act as he will likely have length in hearts
- There’s a good chance his side has spades which outrank all the other suits s0 it may enable his side to find their own contract, or a sacrifice
- Partner is unlikely to go overboard because West is already a passed hand
- It could easily be his side’s last chance to bid
So suppose West doubled 2♠? It’s worth established pairs discussing what that means exactly (see advanced section for more). But it should definitely be showing spades in this auction – and that should definitely encourage East to bid on. Why? Again several reasons:
- It will give the opponents a problem! Usually the last thing you want to hear over your 4♥ is 4♠! Now you have to decide whether to double or bid on. If you give your opponents problems, they will get them wrong some of the time!
- He has 4 small hearts – which are known to be opposite partner’s shortage (the opponents have effectively bid and raised hearts). That means the two hands are likely to fit well.
- The vulnerability is equal so going 2 off (-300) will be OK provided the opponents are making 4♥ (-420 or -450). Had East West been vulnerable they should be far more cautious as now only 2 off (-500) will be disastrous.
The play in 4♥ should be fairly straightforward. East is likely to lead ♠2 (if partner has made a bid implying spades in the auction) or possibly ♦J. Declarer should knock out the ♦A and aim to then ruff his two diamond losers in dummy. But you may note that North can be held to 10 tricks in hearts whereas South can make 11 – can you work out why? See advanced section. Declarer also needs to guess clubs correctly to have a chance to make 11 tricks of course (i.e. lead clubs from South and play West for ♣Q and not ♣A) – but there’s a fair chance he should be able to get that right – again see advanced section for how.
If East West do end up playing in 4♠ it’s actually unlikely they will be doubled on this hand (neither North nor South can be remotely certain that they can beat 4♠). They can in fact make 9 tricks (likely to lose a spade, a diamond and a club plus either another club or a diamond ruff depending on what the defence do).
Only a few pairs seem to have found 4♠ but those that did scored well – either by playing there for -50 or by North South bidding onto 5♥ and going off. Some North Souths appear to have gone off in 4♥ too – perhaps they drew trumps too quickly and then couldn’t do anything with their diamond losers?
Key points to note
Wherever possible support partner immediately when you have a fit – it makes auctions much easier (“Support with support”)
With shape be inclined to bid more aggressively (“6-4, bid more!”)
Don’t be frightened to come back into an auction where the opponents have bid and raised – even before they have passed the contract they are in. It may be your side’s last chance to compete. But it does carry some risk so you should have some suitable distribution.
Agree what double from your side means after the opponents use a Bergen raise. Showing the suit bid or takeout of the suit being raised are the two common choices.
As declarer always consider what holding(s) the opening lead is likely to have been from. Mentally note what cards that places with each defender. You may be able to use that information later to place other cards once you see other suits played – especially after factoring in what each defender did (or didn’t do) in the auction.
More advanced
West making a bid after South raises hearts in some fashion is sometimes referred to as “pre-protection”. That more literally applies after a bid North could pass (e.g. 1♥ P 2♥) – West is worried that the hand may get passed out because his partner won’t be able to bid. So he gets in first (effectively protecting the auction in advance in case it does get passed out) – at the same time accepting the risk that occasionally he may come unstuck if North is sitting over him with a big hand and is able to penalise. That’s why a hand making a pre-protection bid should generally have some distribution (as West does here) so it won’t be so easy to penalise them. The situation on this hand is a bit different after 1♥ P 2♠ though. That isn’t going to get passed out so West will have another chance to bid. So he could wait and if North signs off in 3♥ he could THEN come back in. But that’s now a level higher and the opponents know more about each other’s hands – if you are going to take a risk in the auction, it’s usually better to do so early on before it’s clear whose hand it is.
After a Bergen raise from the opponents, it’s worth discussing what your bids mean. The most important bid to discuss is double. There are two plausible options. Does it show the suit bid (so for example spades after 1♥ P 2♠) or is it takeout of the suit that has effectively been bid and raised (hearts here)? Also what does a bid of 3 of their major show? A Michaels cue bid perhaps showing 55 in the other major and a minor? As usual what exactly these bids mean doesn’t matter so much – what’s much more important is that you and your partner have an agreement so you are on the same wavelength! For what it’s worth, I prefer double to be takeout as I think it’s more flexible. I have also seem some pairs agree that a double of the weaker Bergen raise is takeout but a double of the stronger Bergen raise is lead directing (the logic being your side is more likely to want to compete over the weaker raise, but it’s less likely to be your hand after a stronger raise so lead directing is more useful).
The defence to hold North to 10 tricks in hearts is a trump lead. Now when West wins ♦A, he can put East in with ♣A to lead a 2nd trump. That prevents North from ruffing both of his diamond losers in dummy. When played by South, however, West can’t lead a trump so the defence only has the chance to play 1 round of trumps instead of 2. Because North South have all the top trumps, North can ruff diamonds in dummy and still draw trumps comfortably from the North hand.
Why might declarer in 4♥ get the guess in clubs right? By analysing the lead, counting the points during the play and remembering the auction. Suppose East leads the ♠2. The first thing to ask yourself (as declarer should with any opening lead) is what holding(s) might that be from? Players normally lead top from adjacent honours in a suit contract. So that means East won’t have a holding like ♠KQxx or ♠QJxx. Plausible holdings for him are ♠Kxxx, ♠KJxx, ♠Qxxx, or ♠Jxxx. Any of those mean that West must hold at least 1 spade honour. Declarer’s first action should be to knock out the ♦A so he’ll soon discover West also has that. On this hand after West wins ♦A, its entirely likely he will lead ♠Q in case it’s cashing so that will tell declarer more about the spade layout. The next thing is to remember the auction and note West passed originally as dealer. Then count the points. West is known to have at least 6 (♠Q and ♦A) and could easily have more in spades. So if West also had the ♣A then he’s getting pretty close to an opening bid (particularly these days where opening on 10 or 11 points is increasingly common). Therefore, while it’s not certain, it feels right for declarer to place ♣A with East – in which case he needs to place ♣Q with West to have a chance of a trick in the suit. Hence he should run ♣J from dummy or lead low to ♣9. Yes it takes practice to remember what was bid and deduce or keep track of what cards are where. But this sort of analysis, deduction and counting is key to more advanced declarer play – each hand is like a logic puzzle and the picture gradually gets clearer as each bid is made and, later, as each trick is played.
Julian Foster (many times NSW representative) ♣♦♥♠