Because Monday 7th Oct was a public holiday there was no session at Canada Bay. The column will therefore instead feature a hand from the Sydney Bridge Centre Spring Teams congress which was held on Saturday 28th September.
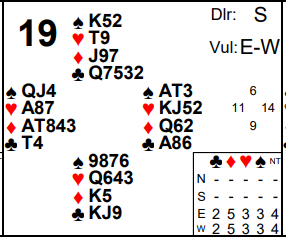
This is a hand from the last match. A lot of the field bid the East West cards on board 19 to 3NT. The challenge was then to make it! As so often, a combination of the auction and the opponents’ actions in the defence give clues.
Let’s consider the auction first though. After a pass from South, some Wests no doubt opened 1♦ after which the auction is likely to be uncontested 1♦ – 1♥ – 1NT – 3NT. If instead West chooses to pass then North usually will too (although I did hear one adventurous soul took advantage of being 3rd seat at favourable vulnerability and opened 3♣!) Now East West should still reach 3NT via something like 1♣ – 1♦ – 1NT – 2NT – 3NT (or whatever invitational sequence West has available to him – see advanced section for more).
At my own table we started P 1♦ P 1♥ but South ventured in with a double. This isn’t something I’d have done but he is close to maximum as a passed hand and does have 4 spades so it could lead to his side competing in spades if they do have a fit. On the other hand you don’t really want partner to be leading a spade if you end up defending! Nor does your ♦K look to be well situated after 1♦ on your left. We continued with XX from West (which in our methods showed 3 card heart support – see advanced section for more), 2♣ from North and I closed proceedings with 3NT.
Played by West the normal lead was a club and declarer no doubt ducked 2 rounds before winning ♣A. Now what? You can’t make the contract without some diamond tricks (even if the spade and heart finesses work that’s still only 3 tricks in each of those suits plus the two minor suit aces). So many declarers probably played ♦A and tried a diamond towards the ♦Q hoping the ♦J would fall doubleton or the ♦K would appear (and clubs would be 4-4). No good today.
Played by East a club lead from South is less likely – he may prefer a spade. But it still boils down to the same problem. After winning the spade at trick 1 declarer will again play on diamonds – this time no doubt feeling more comfortable as he still holds the ♣A. But if ♦Q loses to ♦K then as long as South finds the club switch now the contract is still going off because North will get in with the ♦J before declarer can reach 9 tricks.
But Deep Finesse shows East West can in fact make 4NT. The winning play in diamonds is to not play the ♦Q but to duck so South’s ♦K pops up. Now declarer can collect 4 diamonds to go with 3 spades 2 hearts and ♣A (in fact he can make 3 hearts but only via a very unlikely play of running ♥J from East to pin North’s ♥109 doubleton!)
Can declarer get this right? There are certainly clues. Most Norths will have led a 4th highest ♣3 and later played ♣2 so will almost certainly have shown in the defence that they hold 5 clubs. Played by East at our table that wasn’t the case but, because of North’s 2♣ bid, South did lead a club. He in fact started with ♣K and continued ♣J, ♣9. It therefore again looked like North had 5 clubs – partly from the cards played but also because of his free 2♣ bid. North looks to have very few points on the hand and is known to only have ♣Q so surely he wouldn’t venture 2♣ on only ♣Qxxx? He’s far more likely to have 5.
Having inferred that North has 5 clubs, does that change things when after ♦A and a low diamond, the ♦9 appears from North? It certainly should! The key, as so often, is to put yourselves into the minds of your opponents. Imagine you are North, your side has won the 1st two club tricks, you are looking at ♦K and 2 more winning clubs. Are you playing ♦9? No of course not! You are taking your ♦K and cashing 2 more clubs to beat the contract. So the one card North surely cannot hold is ♦K. Therefore, it cannot gain to play ♦Q. If you duck, South’s ♦K may be doubleton (as it is here). But even if North started with ♦9x and South with ♦KJx that’s still OK – he can win ♦J this round but has no more clubs and has to play something else – which gives declarer time to knock out ♦K and eventually just lose 2 clubs and 2 diamonds (with the aid of the spade finesse he will make 3 spades, 2 hearts, 3 diamonds and 1 club).
At our table the contract appeared hopeless – the double from South surely makes it likely the ♠K is offside and more likely that North has the ♦K. But the same logic still applies! So I ducked without much hope and got a pleasant surprise when the ♦K did appear! At teams you are playing to try and make your contact because the bonus for doing so is valuable and the cost of going an extra 1 off is small. Very different to pairs where you might form a view that the contract can’t be made and then try to find a line to go only 1 off instead of 2 off. If you beat a lot of pairs going 2 off then you will still score very well.
One other interesting point arises in the play here – it is in fact essential to play a diamond towards the ♦A to make the contract. Why? See advanced section for the answer.
Key points to note
- There are lots of bidding methods available after a 1NT rebid – it’s worthwhile for more experienced pairs to explore some of them (e.g. various forms of checkback, ways to show weak, invites, game forces, etc).
- When declaring and trying to work out where a card is, try to imagine what you’d do as a defender with a hand holding that card. Sometimes, like on this hand, that points to where it must be – which in turn points to how you have to play the key suit.
- No matter how unlikely it might appear from the auction, at teams you should still play to try and make your contract. Going one extra off won’t make much difference. Very different to pairs where deliberately playing for 1 off could be a winning move if lots of other pairs are going 2 off.
More advanced
If West passed initially and the auction had then gone 1♣ – 1♦ – 1NT he will want to invite game. (Note East is better off rebidding 1NT despite holding 4 hearts – this reserves auctions like 1♣ – 1♦ – 1♥ as showing shape. The pair can always use some form of checkback for West to enquire about majors if he is interested). Checkback can also be used to show an invite. For example use of two way checkback in sequences like this has 2♦ as a game force, 2♣ as invitational checkback (opener must bid 2♦ over 2♣ and now actions from responder are invitational). So here West could bid 1♣ – 1♦ – 1NT – 2♣ – 2♦ – 2NT which shows an invitational hand without a major (he’d bid 2 major over 2♦ with one). East holding a maximum for his 11-14 1NT rebid should go to game. But what does that mean for the sequence 1♣ – 1♦ – 1NT – 2NT? It’s not needed as invitational as well – so many pairs choose to play that as a relay to 3♣ which allows responder to get out there (he might have held a weak hand with a 4 card major and 6 clubs initially – having responded in the major and found there wasn’t a fit there, he now wants to be able to just get out in 3♣).
It is quite common these days to play support doubles. This typically applies after a 1 minor P 1 major auction where the opponents then overcall below 2 of your major. Double is used to show 3 card support for the major. This can be very helpful for responder when he holds a 5 card suit. Some pairs also choose to extend this to play support redoubles – i.e. in auctions 1 minor P 1 major X where XX is used to also show 3 card support. It’s less clear that this is so useful though – sometimes it’s handy to be able to use XX to show you had a really big hand and you are interested in penalising the opponents. It’s something worth agreeing with your partner.
After a club lead you are going to end up in East so when you start playing on diamonds the natural thing to do is lead towards the ♦A. But in fact it is essential to do that to make the contract! If you were in the West hand and just cashed the ♦A, South could unblock the ♦K! Yes this gives declarer a 2nd diamond trick with ♦Q but that isn’t enough because he still only has 3 spades, 2 hearts, 2 diamonds and 1 club. However, the unblock leaves North holding ♦J9 over dummy’s ♦10 and he now has a certain diamond entry. If you lead a diamond towards the ♦A South no longer has this chance – because if he chooses to play ♦K, declarer can just duck it. Thanks to Richard McAuliffe for pointing this out. There are often surprising possibilities in the defence to create entries to partner’s hand (particularly important in no-trumps). Discards can do the trick as well. Imagine declarer has a suit of AQxxx opposite xxx and you hold Kx sitting under the AQxxx. If you discard your K, then partner’s Jxx is now a certain entry. Otherwise declarer could lead up twice and duck when your K appears to prevent partner being able to get on lead.
Julian Foster (many times NSW representative) ♣♦♥♠


Thanks Julian.
Keep up the good work.