City and Canada Bay – Thursday Morning 17th April 2025.
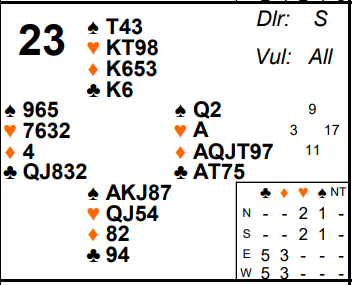
East West could actually make game in clubs on board 23 last week. But it’s almost impossible to bid as we’ll see. At almost every table East West either played diamonds or North South played spades. In spades, the defence may be quite hard and declarer can (and should!) in fact make it harder.
Many Souths will have opened 1♠. I certainly would. Yes it’s only 11 points with no shortage but the spade suit takes room away from the opponents and it’s a suit you would definitely want partner to lead. It’s so advantageous to get into the auction first. West will pass and North will raise to 2♠. Now it’s East’s turn and he of course has the best hand at the table (even ignoring the value of his ♠Q which is unlikely to be worth much when the opponents bid and raise the suit). It seems pretty normal to overcall 3♦. On this hand that should really end the auction – South has no reason to bid onto 3♠ vulnerable with a complete minimum with no extra shape and what’s likely to only be an 8 card fit (North could have raised other ways with 4 card support). West obviously can’t bid and North should be happy defending with ♦Kxxx and only 3 spades.
3♦ by East should make 9 tricks. South will naturally lead a top spade. As soon as the defenders see dummy they should note that it may have no entries at all (they don’t know declarer’s club holding of course). So the last thing they want to do is switch suits and perhaps take a finesse for declarer that he can’t take himself. Therefore they should continue with 3 rounds of spades. Declarer has to ruff and, with no entry to dummy, will have to play ♦AQ to knock out ♦K. At that point, fortunately for declarer, North wins it and he doesn’t have any more spades (if South had won it, he could have played a 4th spade forcing declarer to ruff again and now he would be in trouble since he is down to the same length of trumps as North but still hasn’t got his club suit going). As it is, North will probably play a heart (South should in fact have signalled this for him – see advanced section for how). Now declarer wins ♥A, draws trumps (which leaves him with 1) and tries ♣A in case there’s a singleton ♣K. When there isn’t he knocks that out and the rest of his hand is high. So he ends up losing 2 spades and both minor suit kings.
It’s often the case that a 2nd suit plays much better than the 1st one bid and that’s definitely the case here. East West can in fact make 5♣. But in reality no-one played in clubs and I can’t see any sensible way they could really find it. The only possible chance might be if East decided his hand was too good to just overcall 3♦ and started with a double. The trouble with that of course is West will assume it’s takeout to start with and might well bid 3♥. Now East will have to bid 4♦ and still the club fit is not found. West would need to choose to bid 3♣ over the double. Now East would definitely be interested in game but even that isn’t clear cut – 11 tricks in clubs are a lot and he is almost certainly looking at 2 immediate spade losers. It just so happens on this hand that partner has a singleton diamond (which provides a ruffing entry to West) and good enough clubs to finesse North’s ♣K. Then the diamond suit can be established – declarer just ends up losing 2 spades. All in all, reaching 5♣ is extremely unlikely!
Some North south pairs did push on in spades with varying degrees of success. West will naturally lead ♦4 which East will win with ♦9. Question – what card should declarer play on this trick and why? See advanced section for the answer.
After winning at trick 1, it gets hard for East since he has all the values and doesn’t want to give the minor suit Kings in dummy tricks if he can avoid it. So he might exit a trump. But that’s only going to defer his problem. After drawing trumps declarer will knock out ♥A and now East only has minor suit cards left so will have to give one of the minor Kings a trick. That would mean 9 tricks for declarer (5 spades, 3 hearts and one of the minor suit kings). East could do slightly better by cashing the ♥A first so he can’t be later thrown in with it. Now declarer will have 8 tricks (5 spades and 3 hearts) but will have to lead a minor himself and East may then be able to carry on playing that minor safely.
Another way of holding declarer to 8 tricks is for East to give West a diamond ruff. He can then put a club through so now the defence score 2 clubs, 1 diamond, 1 diamond ruff and ♥A. Best defence can hold declarer to 7 tricks in spades though. Can you work out exactly how they do it?
Key points to note
Although some hands play much better in a 2nd suit, it’s sometimes almost impossible to find that suit. But don’t despair – it’s the same for everyone else!
Don’t push onto the 3 level vulnerable with a minimum hand with no shortage and only 8 trumps.
As declarer, be prepared to play false cards smoothly. Sometimes playing just one small pip instead of another (usually concealing a smaller pip) can make a world of difference to the problem from the defence’s point of view!
When a defender is forcing declarer to ruff, the card you lead in the suit can be used as a suit preference signal.
More advanced
Defending against diamonds, I said South should signal to North that he has something in hearts. How? By the spade card he plays on the 3rd round. He will of course start with ♠AK to drop declarer’s ♠Q but then on the 3rd round he has a free choice of all his remaining spades. So if he plays ♠J, that should be a suit preference signal preferring hearts to clubs. Likewise playing ♠7 would prefer clubs to hearts. Note of course this is only the case here because dummy’s last spade is ♠9 and North still has ♠10. Had dummy’s last spade been ♠10 then South would have had to play ♠J on the 3rd round and hence would not have been able to signal. It’s important as defenders to try and recognise when it’s been possible for partner to signal and when it hasn’t.
Playing in spades I also asked what diamond card declarer should play at trick 1 and why. The answer is he should play the ♦8 and not the ♦2. You might think it doesn’t matter but look at it from East’s point of view. He can see 10 diamonds between his hand and dummy – the only missing ones are 8,4,2. When partner leads the ♦4 the possible holdings he can have are ♦842 (i.e. he’s leading MUD), ♦42, or ♦4. When declarer follows at trick 1, the 1st of these is eliminated. If declarer lazily follows with ♦2, now East knows for sure that West has led a singleton (because from ♦84 he would have led the ♦8). If, however, declarer plays the ♦8 now East cannot tell if West has led ♦4 from ♦42 doubleton or ♦4 singleton. Playing the ♦A at trick 2 now becomes very dangerous for him – if declarer did start with singleton ♦8 he could now ruff and the ♦K has been set up as a winner on which a club loser can later be discarded (after ♠AK drop the ♠Q, declarer can reach dummy with ♠10).
It is amazing how often playing a mildly deceptive false card like this as declarer can give the defence no end of problems. It’s all about keeping open possibilities for them. Declarer can see the ♦2 and ♦3 between his two hands so he knows the ♦4 lead is almost certainly a singleton. But that doesn’t mean he needs to let East in on the secret! This sort of deceptive play can often prevent the defence taking a ruff they had available – in no-trumps it can also be valuable as it can mask the length of the opening leader’s suit.
So how do the defence hold spades to 7 tricks? It’s quite hard. After the diamond lead, East can cash ♥A, then needs to lead a LOW diamond to give West a ruff (the low diamond signalling clubs – despite him also wanting a heart ruff!) West then switches to ♣Q. If declarer covers East wins and returns a club to West’s ♣J in order to then take a heart ruff. If declarer doesn’t cover, after ♣Q holds then West, having now secured two club tricks for the defence, NOW plays a heart for a ruff (which he should do – why else would East have cashed ♥A earlier?). That ends up with the defence scoring a ruff in each hand, ♥A, ♦9 and 2 clubs. But it would be all too easy to do this in the wrong order. If West rushes to give East his heart ruff, they can’t now get their 2 clubs. Also East doesn’t know West has ♣QJ so he might signal hearts not clubs. Plus, as we saw earlier, if declarer has played ♦8 at trick 1, it could be very silly for East to play a low diamond at trick 2 in the first place (if the lead was from doubleton after all then declarer would discard a club loser and the ♦K would score in dummy)! Another possibility would be for East to risk cashing ♦A at trick 2. Then he might try a 3rd diamond. But that shouldn’t work either. Declarer can ruff with ♠J. When West can’t overruff, East is then known to have ♠Q so declarer can draw trumps in 3 rounds ending in dummy with ♠10 and discard a club loser on ♦K.
Julian Foster (many times NSW representative) ♣♦♥♠