City and Canada Bay – Thursday Morning 30th January 2025.
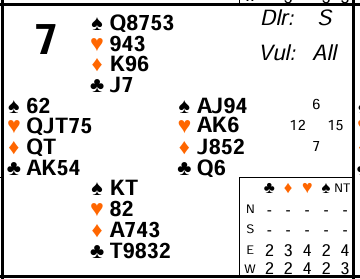
Board 7 last week was almost universally played in 4♥ by West. But there were a few traps waiting for inexperienced or careless declarers that meant they made fewer tricks than they might have. Let’s see what they were and how to avoid them.
The auction is likely to be uncontested by East West. 1♥-1♠-2♣-4♥ most likely. Once West opens East knows his side want to play in at least game and that they have a heart fit. Some Easts might therefore raise hearts immediately (perhaps with a 2NT game forcing raise) but it’s useful to guarantee 4 card support when you do that. Instead you bid another suit and then jump to game on the next round. This is called a “delayed game raise” and shows a game forcing hand with exactly 3 card support. Another advantage of that approach on this hand is it might unearth a 4-4 spade fit which could play better than hearts. See advanced section for why and for more about major suit raises.
In theory declarer has 3 losers playing in hearts (2 diamonds and 1 spade). His 4th club can be ruffed in dummy. But after that auction as North I’d lead a diamond (the unbid suit). Unless South finds a miraculous switch to ♠K at that point, declarer should now make 11 tricks. We’ll come back to that.
Some declarers went off in 4♥ – mainly after a spade lead. I suspect they either drew trumps prematurely (and then found themselves with a 4th round club loser) or they started off correctly by winning ♠A, playing ♣Q, ♣A and ruffing a club in dummy. But North discarded a diamond and they ruffed with ♥6 in dummy. That’s one of the traps on this hand. You need to look ahead a bit. That would leave you with just ♥AK in dummy. You can cash them but how do you get back to your hand to draw the last trump? You can’t do so without letting South gain the lead. He can then lead another club and North scores a ruff with ♥9. How do you avoid that? Simple if you think about it in time. Don’t ruff with ♥6, ruff high! You have all top trumps right down to ♥10 so you can easily afford to ruff with ♥A, then play ♥K and ♥6 to get back to hand for another round of trumps to get rid of North’s ♥9 (see advanced section for a slight improvement on this). In general whenever you have, or are going to land up with, a blocked holding (AK doubleton, or singleton A or K) it makes your entries potentially messy and you should see if you can avoid it.
After a diamond lead South will win ♦A and most likely either play a 2nd one or switch to a trump. Now the ♦J in dummy is either already a winner or can be easily set up to discard declarer’s spade loser on. Which should mean 11 tricks. But there’s a trap lurking here too. If after setting ♦J up, declarer plays clubs to take his ruff, North can again discard his 3rd diamond. If declarer tries to cash ♦J for his spade discard at this point, North will again score a ruff. That will take declarer back to 10 tricks. That trap can be avoided in the same way as above (i.e. ruff the club high so you can draw all the trumps). But even if declarer doesn’t do that and North remains with ♥9, it should still be OK. What’s the rush to take the spade discard? Declarer should leave ♦J in dummy and ruff dummy’s 4th diamond high in hand. Now draw the remaining trump and THEN cross back to ♠A and ♦J.
Most of these traps can be avoided by projecting the play ahead a few tricks and visualising what might then happen. Easy to say but not so easy to do – however it does get easier with practice!
Key points to note
Although it’s good to support immediately, game forcing hands with 3 card support for a major are usually best described by bidding another suit first and then jumping to game on the next round.
4-4 fits often play better than 5-3 fits because the 5-3 fit as a side suit can provide discards for losers – so it’s always worth investigating.
Try to avoid landing up with blocked holdings like AK doubleton, or singleton A or K. They make management of entries messy.
When ruffing losers in dummy, try to think what could go wrong (usually a defender being able to overruff, or discard in a side suit so he can then ruff that suit). Think ahead to see if you can do anything about it.
More advanced
Retaining an immediate game forcing raise bid over 1M (e.g. 2NT) to show 4 card support is useful because it guarantees at least a 9 card fit and that can help on slam going hands. A 9 card fit is massively more powerful than an 8 card fit.
Yes that does mean the “delayed game raise” is an exception to the “support with support” maxim. It works because the responding hand is strong enough to insist on game and hence will always be able to bid again. Support with support is far more important with weaker or invitational hands where you risk getting pre-empted out of the auction if you don’t raise when you had the chance.
I mentioned the delayed game raise might unearth a 4-4 spade fit here. 4-4 fits often play better than 5-3 because after drawing trumps the long side suit can be used to discard losers. Playing in the 5-3 fit that’s not possible as the 4-4 fit in the side suit provides no discards.
A similar theme of the delayed game raise is to possibly unearth a double fit. Hands with double fits tend to play well and knowledge of that can help find a good slam.
I mentioned a possible improved line. It’s purely to cash ONE top trump in dummy first. That’s just to check there isn’t a horrible 5-0 trump break! Once trumps are known to be 4-1 or 3-2, it’s quite safe to ruff high in dummy.
The general theme of this hand is common to many. Before embarking on a particular line declarer should always try to ask “what could go wrong”. Then consider if he can take some precautions to counter it. That’s the difference between a “top class” and a “good” declarer. It makes no difference on a lot of hands but, every so often the top class declarer will make a contract that good or average declarers won’t. Over time that difference adds up.
Of course what precautions you take should also vary depending on whether you are playing pairs or imp scoring. At imps making the contract is paramount so you generally should take any safety plays you can find. Overtricks don’t matter much. At pairs you generally want to play for the maximum number of tricks because overtricks are much more valuable. So you might see a safety play but consciously decide not to use it because it will only gain a very small proportion of the time.
Julian Foster (many times NSW representative) ♣♦♥♠