(With thanks to Peter Newman who told me about the hand).
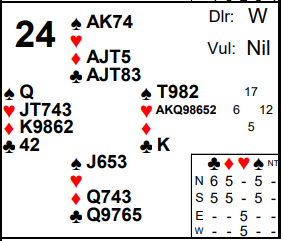
This hand came up at the Parramatta congress recently. Holding the East cards how do you react when partner opens 2♥, a weak two in a suit where you hold 8 hearts to the ♥AKQ?! North doubles and it’s over to you! It’s not often in your bridge career you will hold 8 card support for partner! So, having recovered from the shock, what to do?
Knowing your side has all 13 hearts lends itself to all sorts of psyching options (see advanced section) but the simple action is often the best – a jump to 4♥ initially maybe (but expecting to then compete further). Hamish Newman did so and then after hearing 4♠ on his left continued with 5♥ – getting doubled by North. With an 84 shape you are likely to bid more anyway but note how the auction helps here. The 4♠ bid on the left pretty much marks partner with shortage in spades. North will usually have 4 spades for his original double and South definitely has at least 4 for his 4♠ bid. Add that to the 4 spades in your own hand and that doesn’t leave many for partner! So you know most of your spade losers can be ruffed in partner’s hand.
Sure enough there ended up only being two black aces to lose for +650 in 5♥x, a score that happened a few times.
Although North can in theory make 6♣ this depends on dropping the ♣K singleton offside which isn’t by any means obvious. Several pairs didn’t manage this. Played by South slam can go off on an opening diamond lead ruffed as there is still a deep spade to lose. One declarer did make 6♠ on the ♥A lead. If West had opened 2♥ then that lead is definitely wrong here. Why? See advanced section for the solution.
With freak hands like this you normally want to try and play the hand if at all possible. Both sides can usually make a lot of tricks (here each side can make a 5 level contract). Frequently tricks you think might score in defence turn out not to as there are voids around. You want to avoid a nightmare score like -1660 (6 of a major doubled vulnerable making). At least if you declare the worst you will probably do is convert a small plus to a small minus.
One unfortunate pair took declaring a bit far on this hand though. They played 6NTx by East. Not sure how the bidding went but it was not what you might call a success – 9 off for -2300! It could have been worse too – if the defence get everything right they can score 5 clubs, 3 spades and 3 diamonds for 10 off! And that’s assuming declarer clings on to his spades and diamonds otherwise the defence might score a 12th trick there!
Of course not all Wests will have opened a weak two here. It will depend what bidding methods you are playing and what style of weak twos (see advanced section for more on this). Pairs playing a more traditional style where weak twos always have a 6 card suit will probably pass. Now West will be the one with the surprise as he’ll probably hear his partner jump to 4♥ over the likely 1♣ opening!
The play isn’t really the feature of this article but it’s worth noting that North and South have exactly the same distribution. In general in bridge this is a bad thing because it means it’s impossible to discard any losers on another suit’s winners (it’s sometimes referred to as “mirror” distribution). Here, provided the defence do nothing silly and discard hearts whenever they have to make a discard, it looks like there will end up being a spade loser and a diamond loser (West covers whatever diamonds are led from South and eventually his ♦9 will become a trick, as will one of East’s spades). That said, there is a chance to make 6♣ if the defence haven’t taken their diamond ruff – see advanced section for how.
Another thing to observe is the suit quality can make a big difference even when the high card points are no different. Give North or South ♠10 and now they have no spade loser. Similarly give them ♦9 and they have no diamond loser either. But good luck finding a bidding system to diagnose those cards!
Key points to note
When there are freak hands around you generally want to declare rather than defend.
Hands with huge support from partner can be bid a number of ways, including attempting to deceive the opponents, but a simple space consuming jump can often be better than trying to be clever.
Always listen to the auction. Sometimes you can infer that partner must be short in a suit. That helps you judge how useful your own hand is.
Ruff and discards nearly always cost a trick and should almost always be avoided by defenders.
Hands with matching (“mirror”) distribution generally play badly as there is nothing you can discard losers on.
Pre-empts should generally vary in style depending on both the vulnerability and the seat round the table you are in. Pre-empting style is a very important part of any system discussion with a new partner.
More advanced
Knowing his side have all 13 hearts and a safe place to retreat to (and that the opponents can almost certainly make a lot too) lends the potential for East to make a psychic bid after the double to try and create a distraction.
This is always a delicate area though. Psyches are a perfectly legitimate thing to do in bridge but:
a) partner must assume you have your bid until it’s clear from what has happened later in the auction. Pairs are most definitely not allowed to play “controlled psyches” (i.e. structure their system bids to allow for it).
b) it’s not appropriate to psyche against inexperienced players. You are likely to beat them anyway so why try and be clever – and perhaps put potential new players off the game?
If East does consider a psyche there are many possibilities. Pretend you have strength with a 2NT enquiry? Bid 2♠? It shouldn’t fool anyone experienced but you never know! Obviously if doubled he then retreats to hearts.
I said the lead of ♥A was wrong against a slam after West had opened 2♥. Why? Because East knows his side have all 13 hearts and hence a heart lead will be giving declarer a ruff and discard and more than likely cost a trick! It’s almost unheard of to know that your opening lead will be a ruff and discard and normally of course a lead from that holding would be a standout choice – but this just goes to show there are exceptions to everything in bridge! A passive ♠10 against 6♣ or 6♠ should lead to defeat.
I mentioned the style of weak twos. That’s extremely important and, for more experienced players, it often forms a greater part of their system discussion than exactly what conventions they do and don’t play. Which is often a great contrast to less experienced players who tend to focus on all the conventions (and many pairs play far too many conventions in my view!) Knowing the sort of hand your partnership will and won’t open a weak two is critical to knowing how to respond. For example if your style is to always have 6 then partner can raise on a doubleton. But if partner might be opening Jxxxx (like this hand) then raising on a doubleton could be suicidal! Similarly there are great variations (or should be) depending on the vulnerability and what seat you are in. The vulnerability is fairly obvious – the penalties are greater for doing off doubled when vulnerable so your pre-empts should be sounder. The variations between the seats is less commonly discussed:
- In 1st seat there’s a 1 in 3 chance it will be your partner you are pre-empting so it’s worth being aggressive as you will be hampering the opponents 2/3 of the time.
- In 2nd seat one opponent is already passed so it’s very different. Now it’s roughly 50:50 whose hand it is so your pre-empt should be more disciplined in case it’s partner that has the strong hand.
- In 3rd seat almost anything goes – if you have a weak hand and partner has already passed you KNOW it’s the opponents’ hand. That’s where you can pre-empt with a wider point range and be even more aggressive to make things hard for them (remember YOU know it’s their hand – they may not!)
- In 4th seat there’s no-one left to pre-empt so a 2 level opening is more usually played as intermediate (about 12-15).
Lastly I mentioned 6♣ could be made if the diamond ruff wasn’t found – despite the apparent deep losers in spades and diamonds. Say the lead is a spade. Win and draw trumps. One way is run ♦Q (covered). Cash another top spade to ensure West has none left and now play 3 more rounds of diamonds throwing West in with his ♦9. At this point he only has red cards left and has to give you a ruff and discard enabling you to discard your losing spade. Another is to endplay East instead – after the diamond finesse, throw East in with the 4th spade to also get a ruff/discard so your deep diamond loser disappears.
Julian Foster (many times NSW representative) ♣♦♥♠