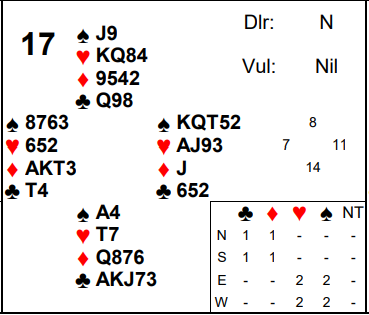
Defenders have a tougher job than declarer in general because they can’t see their combined assets – they have to try and work out what partner has, or could have, based on bidding, play, counting, etc. However they do have 2 advantages:
⁃ they get to start with the opening lead
⁃ they know in advance which suits are breaking for declarer and which finesses are working.
It’s the 2nd of these that this week’s hand look at – taken from the Gerda Stern Mixed Pairs matchpoint swiss pairs event at the recent Spring Nationals held in Sydney.
The bidding is likely to proceed P 1♠ 2♣ 2♠ 3♣. East West are likely to then push onto 3♠ (West because he has 4 card support instead of 3, East because he has a 5431 shape with nothing wasted in the opponents suit – see Advanced section for more discussion on both these).
South will usually begin with ♣A. Then what? At our table North deliberately discouraged with ♣9 (trying to get South to switch to a heart). This now caused South to think declarer had ♣Q. But instead of a heart she tried a switch to a devious ♦8. Had declarer been able to see through the cards he could have run this to his singleton ♦ and later perhaps discarded 2 losers on ♦AK. But of course from declarer’s point of view if North had ♦Q declarer has just created a diamond loser that he didn’t have! He also wanted to be in dummy to lead a trump towards his ♠KQ. So he won ♦A, cashed ♦K to discard a heart and then led a trump to the ♠JKA. South won and exited another trump. Declarer now exited a club (setting up to ruff his other club in dummy). South played ♣J but North overtook this with ♣Q and switched to ♥4. Once again, had declarer been able to see through the cards he could have put ♥J in. But instead he inserted the 9 which is technically the right play with this suit combination (see advanced section for why). No luck today though – the ♥9 lost to ♥10 and a heart return ensured a 2nd heart trick for the defence and 1 off. There were some clues declarer missed though. Can you see what? See advanced section for the answer.
Defeating 3♠ was worth 82% to North South because quite a lot of pairs did make it and some other North South pairs had pushed on too high in clubs and gone off.
Key points to note
Bidding on to the 3 level is attractive with a 9 card fit. It’s also appealing with a 5431 shape which tends to play well in suit contracts.
As a defender there are several ways of signalling beyond the basic count or attitude (usually suit preference). Such signals can definitely help partner but they do run the risk of an alert declarer also interpreting them!
Always remember declarer can’t see through the back of the cards. You might know the contract is cold – but he might not! Try to force him to make decisions early on in the play – before he has worked out the full hand.
Although it’s worth knowing the technically correct way to play various suit combinations, the odds often vary in the real world based on the bidding or earlier play. As declarer try and watch what the defenders have done – this may give you clues (in the same way declarer’s line of play may give the defenders clues!)
More advanced
It’s reasonable for East and West to push onto 3♠. West knows they have at least a 9 card fit and the difference between an 8 card trump fit and a 9 card fit is enormous. One way of thinking about it is drawing trumps. If they break 2-2 you only need to draw 2 rounds and will then have 5 more trumps left. That gives many more options to set up winners in a side suit by ruffing it out. Contrast that with an 8 card fit. Even with a 3-2 break to draw them all will take 3 rounds – and will leave you with only 2. Therefore, it’s well worth bidding on with a 9 card fit. It’s also reasonable for East to bid on too. A 5431 shape is attractive for trump suit play. It has a shortage to reduce losers as well as a potential 4 or 5 card side suit to set up.
In hearts in isolation with this suit combination the best play is to put the ♥9 in. You play for the K and Q to be in different hands and for North to hold the 10. Why might declarer have not done that here? Two reasons. Firstly he might ask himself what’s happened in clubs. South clearly has ♣AK but North has overtaken ♣J with ♣Q on the 2nd round. North raised clubs so he can’t have ♣Q9 doubleton (besides, if that was the layout, South would surely have continued 2 more rounds of clubs to allow North to overruff dummy at trick 3). So North must have started with ♣Q9x. Therefore, why did he discourage with ♣9 at trick 1? Secondly declarer might also consider what’s happened in trumps. North played ♠J on the 1st round and ♠9 on the 2nd round. Why? In both cases North was trying to signal that he had values in the highest outside suit (hearts) because he wanted his partner to switch to hearts.
It’s all well and good for the defenders to give signals to each other (indeed it’s impossible to defend well without help from partner) but doing so always runs the risk that an alert declarer might see and interpret those signals too! Maybe North was being too clever?!
Note here that South did well to switch to diamonds at trick 2 and not cash a 2nd club first. Had a 2nd club been cashed, declarer can run a diamond switch to his hand much more safely because, even if it did lose to North’s ♦Q, he can win a heart switch and immediately ruff a club to dummy to discard 2 heart losers on ♦AK. But without the 2nd club being cashed, declarer can’t quickly reach dummy for those discards so it’s now very dangerous for him to duck the diamond as North might win ♦Q and switch to hearts. North also did well to switch to a low heart and not ♥K. He knows the defence have to get some tricks there to have any chance of defeating 3♠. What’s more declarer must have some heart length (he can have at most 3 clubs, and is known to only have 1 diamond) so it costs nothing to switch to a low card not the ♥K (it’s only essential to switch to ♥K if declarer had ♥AJ doubleton precisely). South might also have had ♥Jx where a low heart untangles the suit a lot better. Finally, it might cause declarer to misguess – as was in fact what happened here.
This hand is a good example of why looking just at the Deep Finesse analysis of a hand is dangerous. Yes you might well be able to make a particular contract. But that’s when you know where all the cards are. The real world is not so easy – you have to pick what to do. Good defenders try to make this as hard as possible – either by trying to force you to make decisions before you know that much about the full hand, or switching to cards that don’t advertise their holdings too clearly.
Julian Foster (many times NSW representative) ♣♦♥♠