City and Polish Club – Thursday Morning 9th October 2025.
We are going to be making a few changes to the column going forward. This will be the last column that specifically focuses on a hand from the Thursday morning sessions. Instead it will now look more broadly.
I can’t look through all the hands from all the weekly sessions at SBC of course but I will perhaps rotate through them each week – and sometimes also add a general hand that I might have come across elsewhere as well. The focus will be more on trying to find a hand that has an element of interest in it – and some learning points for those players who are keen to improve their level of play.
If you find any hand difficult for any reason then feel free to email the office. I am happy to assist and might also be able to feature it in a future column.
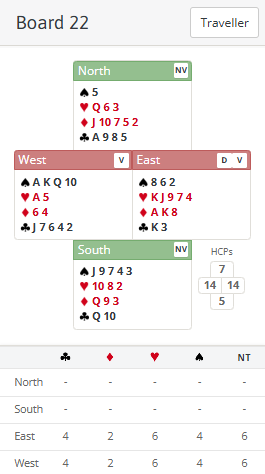
This particular board had 12 tricks available to East West in hearts or no-trumps. You wouldn’t expect to bid slam with only 28 points and it’s not a good spot anyway. The interest is more in how you do make the maximum number of tricks.
Starting with the auction as usual it’s going to be uncontested East West. East opens 1♥. Many players would respond 1♠ with West but I’d actually start with my longest suit 2♣. That’s because I am strong enough to show spades later (as soon as partner opens the bidding I know with my 14 points that I want to be in game – the only question is which one). But starting with my longest suit might enable 6♣ to be reached if East happened to be stronger with some clubs. (Another tactical reason could be to increase the chances of a spade lead if I later end up declaring no-trumps!)
On this hand East will rebid no-trumps (1NT or 2NT depending on what West bid) which will show 11-14 balanced. West can continue with 3♠ after 1♥-2♣-2NT although not so much for the purposes of finding a fit – see advanced section for why there’s less likely to be a fit after this auction but why he may wish to bid 3♠ anyway. East will no doubt bid 3NT and that should be the final contract.
Assuming South is on lead then the unbid suit is diamonds and leading ♦3 is fine – everything else looks extremely unappealing. Declarer will win and now has to consider how to play. He only has 7 top tricks but playing on hearts looks normal to seek more. The normal way to play the suit is ♥A and then finesse ♥J. Today that works extremely well as North, luckily, has ♥Qxx so declarer finds that he has 5 heart tricks. But there are other layouts where he can still make 4 heart tricks – see advanced section for more.
After cashing his hearts what if declarer now starts playing on spades? He can’t see through the back of the cards so he will surely play the suit from the top. On the 2nd round something interesting happens – North shows out. South is therefore now known to hold ♠J and the spade finesse of the ♠10 has become a certainty. That’s great but can you see the snag? The only certain way back to declarer’s own hand to take that spade finesse is with ♦K – and that would release his last diamond stopper. It would mean he makes 11 tricks (4 spades with the aid of the known finesse, 5 hearts and 2 diamonds). The defence would then score the last two with ♣A and either the 5th spade or a diamond winner.
On the hand, declarer can lead a club towards his ♣K but if the clubs lay differently that could be disastrous (imagine South taking ♣K with ♣A and returning a club to North’s remaining ♣Q109)!
But there is a way to be in a position to have a better chance of 12 tricks at the end – can you see what declarer should do? See advanced section for the solution.
Key points to note
If you have a game forcing hand in response to an opening bid, you can afford to respond in your longest suit even if it’s a minor. You are strong enough to show a major later.
Sometimes it’s worth bidding a suit even though you know partner is unlikely to have it – because it can express doubt about 3NT as a contract and help partner judge if he really does want to play 3NT or try something else.
When you have all the top cards in a suit it can sometimes be good to just cash a couple of them. It costs nothing and it might help you find out more about the hand. Occasionally it gives some certain information about where the cards are and turns a 50-50 finesse into a certainty.
More advanced
I said after 1♥-2♣-2NT there is less likely to be a spade fit. Why? Because if East had had 4 spades he would have most likely rebid 2♠ over 2♣ rather than 2NT. But it still makes sense for West to bid 3♠ because that imparts to his partner that he is not happy about no-trumps (if he were he could just raise 2NT to 3NT). Here he has 2 low diamonds so unless East has a good double diamond stopper, it could well be right not to play this hand in n0-trumps. His spades are strong so 4♠ on a 4-3 spade fit could play well – or 5♣ if partner doesn’t have a diamond stop either. Today of course it’s not a problem as East has 2 diamond stoppers and is happy to bid 3NT. But 3♠ gives the chance to express doubt about 3NT and help avoid it when it’s a bad spot.
The heart suit sits very well for East West on this hand. But even if they weren’t quite as favourable the presence of the ♥9 with East makes quite a difference to the chances to make 4 hearts. If North held either ♥Qx or ♥10x then declarer can just lose one heart to South.
So how should declarer make 12 tricks? The answer is to use a bit of foresight. It costs nothing to start with two top spades BEFORE playing on hearts. Most of the time it will make no difference. But occasionally it could find out some more information. Firstly the ♠J might drop, secondly the layout of the suit might be revealed (as happens here). Now, when declarer gets lucky in hearts, after he has finished cashing those the difference his foresight has created is he ALREADY KNOWS the spade finesse is working. So he can take that immediately (as opposed to only finding that out after cashing two rounds – and then needing to get back to his own hand another way). Having cashed 4 spades he now has 10 tricks and could cash ♦K for 11. But he could also consider trying the club towards the ♣K while he still retains the ♦K. It might still be dangerous though since he could find himself losing 3 clubs and never scoring his ♦K. Remember of course that the West hand also has to discard on East’s long hearts and those discards will have to be clubs since declarer won’t want to relinquish the ♠10 or the last diamond (which will cut off his own ♦K). So he will have to come down to only 2 clubs himself which means the suit is totally exposed if the ♣K loses to the ♣A.
But, depending on what the defenders have discarded, he might view to try it to have a chance of 12 tricks (the other line has no chance of 12 because even if ♣A was onside with North, it had released a diamond winner for North as well). Note also that if declarer had ♣K and ♣Q between the hands, this would definitely be the right way to play the hand because now it gives him a certain 11 tricks and a 50-50 chance for 12.
Julian Foster (many times NSW representative) ♣♦♥♠