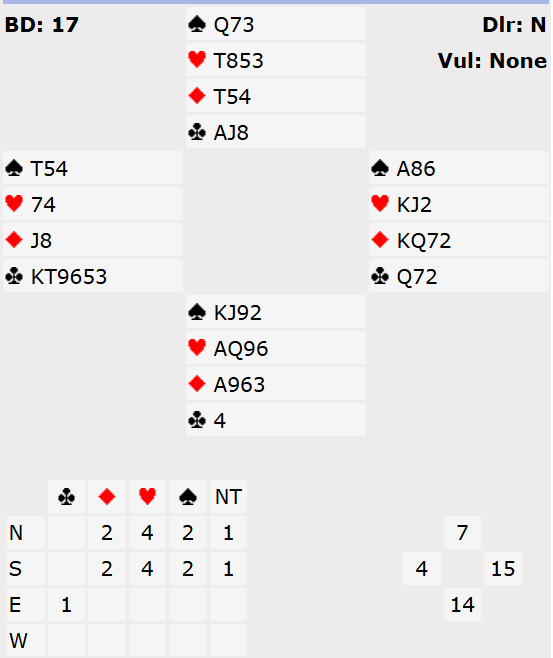
This hand is taken from the Summer Festival of bridge at Canberra in the swiss pairs event on Sunday 18th Jan. Although not a spectacular hand in terms of shape or points, it demonstrated simple good defence which often separates good pairs from average pairs.
There was also some interest in the bidding too. After a pass from North at many tables East will open a strong 1NT. Some South’s might then choose to show both majors, others might pass. West will pass 1NT but if South does show majors, North will bid 2♥ and it’s likely West will then compete to 3♣.
At my own table things were a bit different because we play a weak NT (11-14) opening. That means East opened 1♦. South decided to double. This is hardly a textbook takeout double but he was gambling that partner could bid one of the majors (had she bid 2♣ I don’t know what he was going to do!) West passed and North duly bid 1♥. An important thing to appreciate is that this bid is NOT like a normal response to an opening bid – it’s limited to about 7 points. See advanced section for why.
East couldn’t bid at this point (his partner would have responded had he had anything). South, no doubt relieved not to have heard a 2♣ response, passed 1♥. West now came to life with 2♣ himself. This is fairly safe because his hand is limited by the fact he didn’t bid on the round before and the opponents are also now known to be limited in values since they have passed 1♥. 2♣ ran back to South who competed to 2♥. East now raised to 3♣ and that was the end of the matter.
Now for the defence. At our table North led ♥5. The pair were playing “3rd & 5th” leads so this was in accordance with their methods. See advanced section for a bit more on this. From my (declarer’s) perspective, all I knew was South had the ♥A (underleading an ace in a suit contract is almost never done because it is so often wrong). So I tried ♥J in case North had led from ♥Q. South, however, won ♥Q. At this point it looks dangerous for him to switch to a spade as I might score a cheap trick with ♠Q. With both red aces sitting over dummy’s holding he rightly wanted to keep those to beat the kings. Therefore he switched to a trump. This also helped me to some extent as it found the ♣J. I put in the ♣10 and North won ♣A. She now returned ♥10 (good defence to tell partner she had it – otherwise he might not have know whether he could afford to play ♥9 if she had played a low one and I played low). I ducked (see advanced section for why this may not have been best) so North remained on lead.
At this point how many of us would just lazily play another heart to the ♥K, ♥A and a ruff from declarer? If you do that, declarer can draw trumps and lead ♦J to establish ♦KQ as tricks. This allows one of declarer’s spades to be discarded. The contract still goes off (the defence score 1 spade, 2 hearts, ♦A and ♣A) but North did better than that. She switched to the ♠3. This set up two spade tricks for the defence before their ♦A was knocked out so 3♣ now ended up 2 off.
How did North know to switch to a spade? Firstly partner had doubled 1♦ to start with, therefore implying something in spades. Secondly she could see it was the only place the defence could go for tricks and it might be necessary to try and knock the ♠A out of dummy before the ♦KQ could be set up. Once South won ♠K, he could also have lazily exited ♥A but he also did well and continued spades. How did he know to do that? Because North had switched to the ♠3, a low one. Normally when you switch to a suit in defence you should lead a low one if you have an honour in the suit, but a high one if you don’t. This helps partner know if it’s good to continue that suit or not. Here the only honour North could hold was ♠Q so South duly continued the suit.
The net result was 3♣ 2 off for a score of -100. On the hand, especially playing imps, scoring +100 instead of +50 is of no real consequence. But it’s this sort of accurate defence taking as many tricks as possible that is the hallmark of the best players. Sometimes that will be the only defence to beat a game and now it makes a huge difference to the score.
Key points to note
A minimum response to a takeout double shows about 0-7. With more than that you should jump. This allows partner to move on when they have doubled with 16 or so points.
A hand that has already passed can come back into the auction if the opponents are known to be limited. It can usually do so without fear of partner getting too carried away as well!
Don’t play aces and kings into thin air – try and save them to beat the lower honours.
When switching to a suit in defence lead a low card with an honour or a high card without. This helps partner know what you have and hence whether it’s worth continuing that suit or not.
More advanced
Responding to takeout doubles is an area where many inexperienced players go wrong. It is NOT the same as responding to an opening bid. You are basically being forced to bid over partner’s double (you can’t pass with nothing like you could over an opening bid as that will leave the opponents in their low level contract doubled – which is almost certainly going to make – probably with overtricks!). Because you might have to respond on absolutely nothing it means you need to tell partner if you have more than that. The normal ranges are a minimum response is about 0-7 and a jump is about 8-11 (with even more you can cue bid the opponents’ suit). Why is that important? Imagine partner has made a takeout double on a slightly stronger than minimum hand (e.g. 16 points). If you respond 1♥ on zero points and also respond 1♥ on 10 points it’s impossible for partner to know what to do. But a jump response enables the pair to reach game when doubler has more than a minimum. In a similar fashion if you have made a takeout double on a normal minimum hand and partner makes a minimum response (as here) then you shouldn’t raise immediately as that would show you had extras yourself (effectively it’s invitational opposite 0-7).
At the table I ducked ♥10 on the 2nd round leaving North on lead. I might have been better to cover with ♥K. I know this will lose to the ♥A but it will put South on lead. He was nervous about switching to a spade before and may still be. So it’s perhaps more likely he will continue hearts which is what I, as declarer, want him to do! Then again a good defender sitting South will ask himself the question of why did I do that? He may deduce the reason and decide to switch to a spade anyway!
Lastly, North led “3rd & 5th” on this hand. There are assorted leading methods in use. The most common is probably 4th highest but it’s not the only one. Most people playing 4th highest leads also make this “4th & 2nd” – meaning that you lead 4th highest from a suit headed with an honour but 2nd highest from a bad suit without an honour. 3rd and 5th basically means you lead lowest from a holding of 5 but 3rd from a holding of 3 or 4. Another method sometimes used is “attitude” – which basically means the lower the card you lead the more you like the suit (that tends to be more commonly used against no-trumps).
As usual there is no perfect method. 3rd and 5th tend to make it easier for partner to work out how many you have (for example with 3 low you lead the bottom one – playing 4th/2nd you lead the middle and partner is guessing whether you started with 3 or were leading top of a doubleton). On the other hand 3rd & 5th tends to be worse at telling partner whether you have honours in the suit or not. Invariably on some hands it’s the count that’s critical, on others it’s the honour distribution.
Julian Foster (many times NSW representative) ♣♦♥♠