Apologies again for the lack of a column last week. Sadly I landed up with flu at the Summer Festival of Bridge in Canberra and have been out of action. Hopefully things will return to normal from now on. This hand is taken from a recent New Zealand teams congress and shows the importance of counting tricks when defending as well as when declaring.
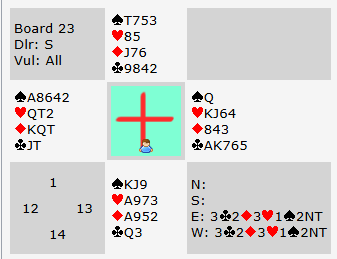
The auction began 1♦ 1♠ P 2♣ P. West now bid 2NT. You’d like to be a little stronger but it’s the most descriptive bid available. East raised to 3NT which became the final contract.
North, quite reasonably, led ♦6, his partner’s suit. South won ♦A and, also quite reasonably, returned a diamond (his partner might easily have led from ♦Qxx not ♦Jxx). West won ♦K (note he should win ♦K not ♦Q to leave South unclear where ♦Q is) and should start to count his tricks. He can get to 8 quite easily (1 spade, 3 hearts after knocking out ♥A, 2 diamonds and 2 clubs). But what about a 9th? There are only 15 points missing and South is going to have nearly all of them for his opening bid – certainly ♥A. So he is going to eventually get his diamonds going. Therefore the best chance of a 9th trick is surely to hope North has ♣Q and to score at least 3 clubs.
Usually when you have to knock a top card out it’s right to do that straight away. But that’s actually not the case on this hand. It’s better to take the club finesse immediately rather than knock out ♥A. Can you see why? See advanced section for the answer.
At the table I took the club finesse and it lost to South’s ♣Q. At this point I could have been beaten but South returned another diamond to set up his last one. This was a mistake. Now I could cash ♣10 and play on hearts to force an entry to dummy for more clubs. South got in with ♥A and cashed his winning diamond but that was only the defence’s 4th trick. Too late, he switched to ♠K but by then I had lots of tricks (1 spade, 3 hearts, 2 diamonds and 4 clubs). He needed to switch to ♠K when he was in with ♣Q. That sets up 2 spades to go with ♣Q and the two red aces. How can South tell? By also counting tricks. He knows he can only set up one more diamond so that’s only going to be 2 diamonds, ♥A and ♣Q. Not enough to beat 3NT. Therefore he needs to give up on diamonds and try for spade tricks instead. When he plays ♠K he is immediately setting up his ♠J and North should encourage to show his ♠10. At that point declarer is doomed.
Of course if South had had 5 diamonds it would be fine to continue the suit as now he has 2 winners when he gets in with ♥A. Note here declarer should know diamonds are 4-3 not 5-2. See advanced section for why.
Key points to note
Counting tricks is vital when declaring but it’s equally important when defending. Sometimes if you can see your original defence is not going to create enough tricks to beat the contract you may need to try an alternative.
Always watch for potential blocked holdings. ♣J10 on this hand should ring alarm bells! Frequently it’s right to play on these suits early to try to clear the blockages.
The defence’s cards in the suit they originally lead (and return) are normally going to be honest as they need to communicate with each other.
More advanced
Why is it right to take the club finesse immediately on this hand? Because of entries. Think ahead to what will happen if you instead immediately knock out ♥A? Assuming the defence hold up the ♥A to the 3rd round (as they should) that will leave a heart winner in dummy but no immediate way to reach it. After declarer’s last diamond is knocked out he will be left with ♣J10 in his own hand. If he now takes the club finesse and ♣Q is onside North can cover. That will allow access to the winning heart but it will leave the clubs blocked. By starting on clubs first even if North does cover you can cross back to ♣10, then play on hearts to force an entry back to dummy’s winning clubs.
Although this hand requires a bit more thought it usually is right to knock out a certain top loser first. Why? Frequently because you have no choice about which hand wins the ace. However, in another suit you may be in a position to control which defender wins it (e.g. by taking a 2 way finesse into what’s now a safe hand).
Lastly I said declarer should know diamonds are 4-3. How? From the defence’s lead and carding. North will almost certainly lead ♦6 and on the 2nd round he will play ♦7. That’s indicative of 3 not 2. Holding a doubleton he would have led high low. Also it’s conventional for the defender winning the trick to return back his original 4th highest to show his partner how many he has. So it’s likely South will return ♦2. That suggests he started with 4. Can declarer believe these cards? Usually yes. Early in a hand the defence tend to signal honestly because they can’t see each other’s hands and it’s more important to communicate honestly to each other than try and fool declarer. Later in the hand when they know more it may be very different!
Julian Foster (many times NSW representative) ♣♦♥♠