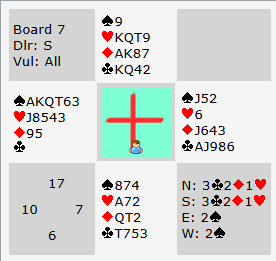
This is another hand from a New Zealand teams event. After a pass from South West opens 1♠. North has a clear takeout double and East will raise to 2♠. South passes and it’s back to West. 4♠ is clear at this point. With so much shape, on a hand like this the points are largely irrelevant. 4♠ will be the final contract. Now it’s over to the defence.
North will normally lead a top diamond to see dummy. After cashing a 2nd one what should he do next? At both tables in our match the play went the same way. North continued a third diamond which West ruffed (the ♦J was now set up as a winner in dummy). He played a heart which North won and played a 4th diamond so South could ruff the ♦J. That was no good though because declarer could now just ruff a heart, cash ♣A, then ruff clubs and hearts. He ended up with 6 trumps in his hand, 3 heart ruffs in dummy and ♣A for 10 tricks.
How should the defenders play? They need to switch to a trump to stop at least one of the heart ruffs in dummy. Even one round of trumps is enough. That limits declarer to 6 trumps in his own hand, 2 ruffs in dummy and ♣A. Ruffing ♦J away was an illusion. Declarer can never cash ♦J until he has drawn trumps. But if he does that he can’t also ruff hearts in dummy.
Playing a 3rd diamond created the problem but North may have been hoping South started with doubleton and could ruff. That may depend on what was led and what the defence’s leading and carding agreements are from AK holdings. See advanced section for more.
However, there’s still time to switch to a trump after declarer plays a heart. Can North work this out? Absolutely yes. Once declarer does not play ♥A himself it’s clear that card is with South. Hence North knows where all the points are (he can see all the club points, the diamond points have already been played and he now knows about ♥AKQ). That means West has at most ♥J outside his spade suit. Therefore surely he must have a lot of shape to jump to 4♠? So where will declarer’s tricks come from? Maybe 6 trumps in hand, ♣A in dummy. The only others must be heart ruffs in dummy.
Therefore by far the best chance for North is to try and reduce those ruffs by switching to a trump. There’s also more information and inferences about the shape available to North – see advanced section for more details.
The defence can actually beat 4♠ by 2 tricks if they play 2 rounds of trumps after cashing their diamonds (before declarer can discard one on ♣A). But to do that South needs to be wide awake! Can you see how? See advanced section for more.
Key points to note
Ruffing losers in the short trump hand in dummy is one of the most common ways to make more tricks. The defence can sometimes reduce the effect of this by leading trumps themselves.
What to lead from AK holdings and what to signal is subject to partnership agreement. It’s not always possible to know what signal you want and this can make it hard for the defenders.
Defenders should always try to count how many tricks declarer has. This can often be the key to identifying the best defence.
More advanced
It may be hard for North to tell what the diamond layout is on this hand. A fairly common leading method from AK holdings is A asking for attitude and K asking for count. The problem is you often don’t know at the time of making the initial lead what signal you want! Here if North leads ♦A South may encourage with ♦2 (assuming playing reverse signals) to confirm he has ♦Q. Then on ♦K he will play ♦10. The problem is he would ALSO do that with an original holding of ♦102. Perhaps South should predict what’s likely to happen and should play ♦10 at trick 1? Leading ♦K (asking for count) on this hand will work better as it will confirm how many South (and hence West) has.
If North does find the trump switch declarer might win ♠J in dummy and lead a heart. This is where South needs to be awake. He must rise ♥A to play a 2nd trump himself (because North doesn’t have another trump).
Even if declarer wins the trump in hand and leads a heart, South needs to overtake his partner’s card to play the 2nd trump. Can he tell? Not 100% – it’s possible East West only have an 8 card spade fit and North has a 2nd trump but that’s less likely given North’s takeout double. South might not like playing his ♥A unnecessarily but he should reason that if he allows 2 heart ruffs in dummy then his ♥A will drop anyway. So he might as well use it while he can.
Another way to look at the whole hand is to see that West has 7 red suit losers. He needs to deal with 4 of them to make 10 tricks. One can be discarded on ♣A but that’s all. So he needs to ruff 3 of them.
A different plausible defence might be for North to switch to ♣K with the aim of getting ♣A out of dummy so declarer can’t cross to it later to cash the winning ♦J. That might be the killing defence if declarer had a singleton club (perhaps he is 6421?) Here it turns out to be unnecessary.
Finally, if the defence start with 3 rounds of diamonds and then declarer leads a heart, North will win it and South should give a count signal. That should help North work out declarer’s shape. When South shows an odd number of hearts it surely must be 3. For two reasons:
a) If South had 5 hearts he might have ventured 3♥ over 2♠.
b) South having 5 hearts would give declarer 3. He is known to have 2 diamonds so that gives him a 7321 or 6322 shape. With the former 4♠ is likely to be cold. With the latter it’s very unlikely declarer would bid 4♠ when he’s known to have so few points.
All that points to South having 3 hearts which gives declarer 5 and a most likely shape of 6520. 5521 is not impossible but again it’s less likely declarer would jump straight to 4♠ with that (remembering his heart suit is known to be really poor quality). Good defenders should try to get into the habit of working out declarer’s shape as early as possible (and throughout the hand as more information becomes available) – it’s so often the key to getting the defence right.
Julian Foster (many times NSW representative) ♣♦♥♠