City and Polish Club – Thursday Morning 11th September 2025.
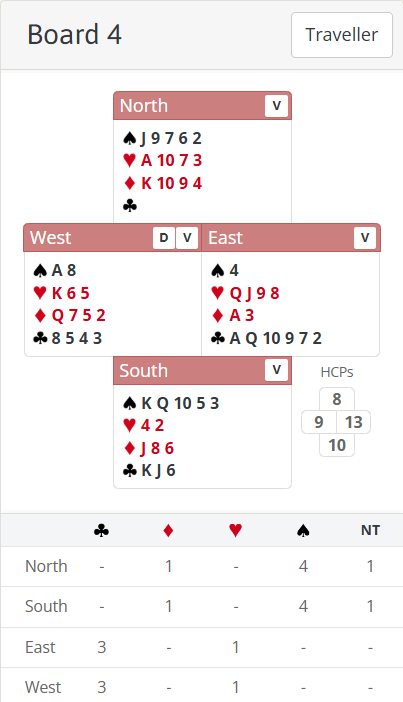
Board 4 last week looks like a boring 4♠ game for North South but a lot of pairs went off so I thought it worth having a closer look.
As usual first the bidding. West will pass and North may well do so as well unless he is playing a method where he can open a weak hand with both majors. Assuming a pass from North, East opens 1♣ and South should definitely overcall 1♠ – he has a decent 10 points but it also indicates a good lead for partner and it takes a fair bit of bidding space away from the opponents. West doesn’t have an obvious bid at that point. If his partner’s 1♣ showed at least 4 (rare these days!) he could raise to 2♣ but otherwise everything has flaws (X only has 3 hearts not the 4 it implies, 1NT with only Ax as a spade stopper isn’t a good description and pass might lead to his side missing out on a contract. I think I’d double but be prepared to apologise to partner if he lands up in a nasty 4-3 heart fit!
Whatever West does shouldn’t really matter though as North should now force to 4♠. His hand has become enormous with 5 card support, a void in the opponent’s 1st bid suit and an A and a K in the other suits. The fact he only has 8 high card points is irrelevant – a good example of why shape is far more important. In fact he may consider 4♣ which should be played as a splinter (club shortage and good spade support) – that could help pinpoint slam if East had had a much better hand. Note that’s a FAR more useful way to play 4♣ than just a straight ace ask which isn’t really helpful when there are voids around.
If East West can ascertain they have a big club fit they might consider 5♣ as a sacrifice – their hands fit well and it should only lose 1 heart, 1 diamond and 2 clubs which would be -500 against the opponents’ 620 for 4♠. But today that would have scored very badly as a number of pairs went off in 4♠.
I’m not immediately sure what they might have done – it’s possible they got stuck in the North hand and had to lead away from diamonds, perhaps by being forced to ruff clubs. Most Wests certainly led a club which declarer should ruff in dummy (see advanced section for thoughts on similar hands when declarer might consider not ruffing). With 10 trumps there’s no reason to delay drawing them so declarer plays a round losing to West’s ♠A. There’s nothing West can do. A 2nd club forces a 2nd ruff in dummy but that’s still ok as declarer can draw the final trump and still has 1 trump left for the 3rd club later.
He does, however, need to get the diamonds going and he should do that after drawing the last trump – but with ♦Q onside he can finesse it. See advanced section for more on why he should play West for ♦Q and East for ♦A. Ultimately the only tricks he should lose are ♠A, a heart and ♦A.
Lastly, it’s not really a problem here but suppose you held that diamond suit and the South hand was short of entries. How should the suit be played?
Key points to note
10 card trump fits are very powerful and drawing trumps is often the normal start.
Don’t use a jump to 4♣ as Gerber ace ask! It’s far better employed as a splinter or cue bid.
In a suit contract if a lead comes round to your King and there’s a void in dummy it can sometimes be beneficial NOT to ruff in dummy but to aim to discard 2 losers instead (one as the lead sets up your K and the other on the now winning K).
Try to think ahead about how you will need to play a suit and whether you will need more entries to repeat a finesse. That may influence what card you play on the 1st round – or when you first start playing the suit so there is time to take a 2nd finesse later.
More advanced
Sometimes if the defence lead through a void in dummy and you hold the K of the suit it’s worth NOT ruffing in dummy because that will set your King up as a winner (right hand opponent is virtually marked with the Ace since it’s fairly well known that underleading an Ace against a suit contract is a really bad move).
The technique of discarding twice tends to work well if there’s a suit in dummy where discarding 2 losers from it will be worthwhile. Declarer discards one loser immediately and the 2nd on the now established King. Of course that only works if he defence can’t immediately cash winners in the suit – because you are going to let them in with the Ace when you discard from dummy.
On this hand discarding is not much use because dummy has two 4 card suits so discarding 2 cards from either won’t help – it just creates an extra loser. Had North held ♥Axx originally then declarer could have done this and would later be able to ruff his 2nd heart in dummy. Another less obvious position you may come across is something like Axxx opposite Kxx. There’s a deep loser normally but if you can discard 2 cards from the Axxx holding you can eventually ruff the 3rd card from the Kxx holding.
A time to consider not ruffing is if you are in danger of losing trump control if you do. That might leave the defence unable to force dummy to ruff a 2nd time. (It’s not a problem on this hand holding so many trumps).
After a club lead ruffed, and a spade to West’s Ace declarer will have to get diamonds right. Which he should do for 2 reasons:
1. East opened the bidding so is more likely to have the ♦A, especially once West shows up with an Ace himself.
2. Finding the diamond honours the other way round won’t help avoid 2 losers anyway.
If entries are a problem then declarer is best to either run ♦8 or play low to ♦9. Running ♦J isn’t as good – West doesn’t cover, East wins Ace. Now if declarer gets back to South for the last time all his diamonds are lower than North’s so a 2nd finesse will win but declarer will need yet another entry to South if he wants to score all the diamonds as tricks without having to ruff. If he runs ♦8 initially then on the next round he can run ♦J which means he’ll remain in the South hand to be able to take a further finesse. It’s a similar position to the suit combination of AJ10x opposite Q9x(x) in no trumps when there is only 1 entry to the Q9 hand so the suit needs to be run immediately. The correct play is to run the 9 on the 1st round. If that wins you remain in the same hand and can next run the Q which now repeats the same position. Low to the 10 might win but leaves declarer unable to repeat the finesse. Running the Q initially will win that trick but on the next round declarer is left with AJ10 opposite 9xx and will again be forced to win with the North hand so he won’t be able to pick up Kxxx onside. Running the Q and deliberately underplaying the 10 also fails because now West can cover the 9 and promote the defence’s 8 for the 4th round!
Julian Foster (many times NSW representative) ♣♦♥♠