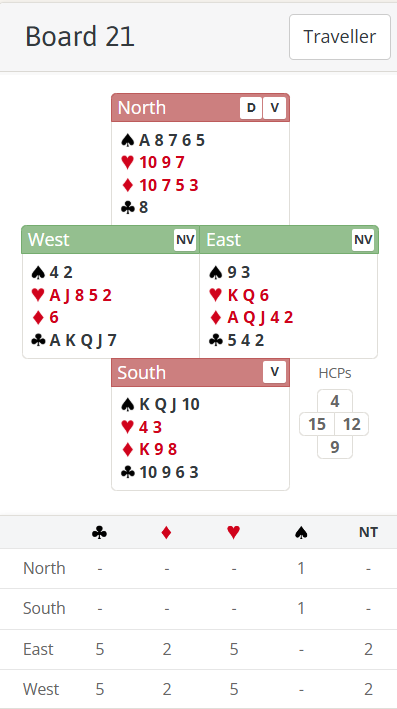
This hand is again taken from the Sydney Bridge Club Christmas party – this time the afternoon session. It shows some inferences that can be made from the opening lead and also an alternative to a “normal” finesse.
The normal bidding will be uncontested East West starting 1♦ – 1♥ – 1NT. At this point West will clearly game force but he really wants to know if East has 3 hearts. There are a couple of ways he could do that – one is to jump to 3♣ which is usually showing a strong distributional hand (hence with at least 5 hearts). Over that East would bid 3♥.
Another, depending on what bidding conventions the pair have agreed, would be to make a “checkback” bid of some sort. See advanced section for more details.
Once East shows 3 hearts, West’s hand becomes very strong and he will want to make some sort of slam try hoping to hear East be able to make a cue bid in spades to show a control there. After all, if East holds ♠AK, ♥KQ (which is only 12 points) then slam will be virtually cold.
On this hand, however, East is minimum and has no spade control so will not be able to help and the pair should subside in 4♥. What would you lead as North? Depending on the auction there’s a case for a spade (it will be an unbid suit and neither opponent has attempted to cue bid it). However, although it happens to be right on this hand, leading an ace into thin air or underleading an ace against a suit contract is generally a very bad thing to do. Hence leading his singleton club is also quite appealing (he has a weak hand too which increases the chances partner will be able to get in to give him a ruff).
If North does lead ♣8, now it’s over to West. How might he play the hand? Making 4♥ is trivial of course – he has 11 top tricks (5 hearts, 5 clubs and ♦A). So the question is can he make more now the defence haven’t cashed their spades?
Yes – by taking what’s called a “ruffing finesse” in diamonds. Play ♦A, then ♦Q. If South covers, he ruffs and can then draw trumps ending in East. Now he can discard a spade loser on ♦J (in fact he could actually make all 13 tricks – can you see how?). If South doesn’t cover ♦Q, declarer discards a spade anyway. This is what’s known as a “loser on loser” play. It’s why on this hand the ruffing finesse is better than the normal finesse. If North has ♦K declarer is no worse off since he discarded a spade loser and effectively just swapped a loser. But if South has ♦K, the play gains. It would be too dangerous to take a regular diamond finesse here – if it lost to South’s ♦K declarer has just lost a diamond he didn’t need to. What’s more the defence can then cash 2 spades to limit declarer to 10 tricks (not a good result when he had 11 on top to start with!).
Something else West should give thought to is the spade layout. He is wide open in the suit but the defence haven’t led it. Why might that be? What holdings do you think they might have? There are plenty of inferences available. See advanced section for more.
Finally note the difference made by who is declarer. With North on lead the spade lead is far from clear and declarer could now make 12 or 13 tricks. With South on lead, however, the spade lead is totally obvious and 11 tricks will result. Pairs playing a weak NT on this hand will be unfortunate as their auction will most likely start 1NT 2♦ (transfer) and that will make East the declarer. It’s often the case that system determines which side is declarer and that will often mean a different suit is lead. But that sort of variation is a normal part of bridge – it would be a boring game if everyone played an identical bidding system. In the long run you just have to accept you will gain on some hands and lose on others!
Key points to note
A ruffing finesse is often a safer thing to do than a normal finesse. If you can discard a loser while taking it, it means you can’t lose and might gain.
There are many bidding methods available after a 1NT rebid – two way checkback (2♦ game force, 2♣ relay to 2♦ followed by invites) is a good one.
Strong two suited hands are very powerful and could easily make slam if partner has the right cards to cover your losers in the other suits.
If the opponents don’t lead a suit where they have all the honours, it’s pretty likely the opening leader has the ace but not the king.
More advanced
There are plenty of bidding methods available after a 1NT rebid. Interested readers can find much more information in books or on the internet. But a method I like is two way checkback. That’s where a bid of 2♣ forces partner to bid 2♦ and bids after that are invitational (so for example 1♦-1♥-1NT-2♣-2♦-2♥ would show an invite with 5 hearts). A bid of 2♦ is an artificial game force over which you basically bid naturally. 2♣ and 2♦ have these meanings regardless of whether the pair have bid clubs or diamonds on the 1st round.
On this hand a good two way checkback sequence would be 1♦-1♥-1NT-2♦-2♥-3♥-4♥. 2♦ is a game force. 2♥ shows 3 hearts (a bid of 2♠ would show 4 spades but not 3 hearts, 2NT would deny 4 spades or 3 hearts, etc). 3♥ from West now sets hearts and shows some slam interest (this is an example of the “principle of fast arrival” I talked about recently – 2♦ has already established a game force so 3♥ is stronger than 4♥ as it’s leaving room for East to make a cue bid to explore slam – on this hand West really wants to hear a 3♠ cue bid!) 4♥ by East denies the ability to make any useful cue bid. Had West been weaker he could have just directly bid 4♥ over 2♥.
There is, however, another option here – West could jump to 3♣ over 1NT. That typically shows a strong shapely 55+ hand (which is quite descriptive and might help the pair reach 6♣, say). It has the downside of taking up more space though. Now when East bids 3♥, West can only bid 4♣ to show some interest in slam. East could cue 4♦ but now West can’t safely go on with 2 small spades. The two way checkback sequence leaves more bidding space on this occasion. Experienced pairs might want to discuss the sort of hands they would use each route for, or maybe agree that they always go via checkback and use a jump to mean something else.
The play to make 13 tricks in 4♥ on a club lead would be to immediately play ♦AQ. Assuming South covers and West ruffs, now he crosses to ♥K and ruffs another low diamond in hand. Then ♥A and cross to ♥Q to draw the last trump. Now both his last two diamonds are good to discard both his spade losers on. For that to work, however, both diamonds and trumps need to split 3-2. If the ruffing finesse loses there’s also a risk that clubs are 4-1. If North wins ♦K, the defence may well be able to take one spade and a club ruff to hold declarer to 10. In fact it could be even worse if North had led from 4 clubs. Now he could give South a club ruff, get back in with a spade and give a 2nd club ruff to end up actually beating 4♥!
So declarer might decide 13 tricks is being too greedy and look for a safer way of trying for 12. One way is starting with ♥K then ♥A (note you need to leave one top heart in the East hand to be able to get back there after the diamond ruffing finesse). Now you find out about the hearts. If they are 4-1, declarer can give up on the idea of ruffing a 2nd diamond. It also means if hearts are 3-2 then the worst that can happen if North does win ♦K is that the defence get 1 club ruff and 1 spade (so declarer still at least makes 10).
Of course all this is only relevant playing matchpoints where a 12th trick could be really valuable. At imps you should only consider a line where the worst that could happen is making 10 tricks instead of 11 – you should never place your contract at risk.
I asked what the spade layout might be from West’s perspective? When an entire suit is wide open but the defence have not led it, there are several pretty reliable inferences about the honours that can be made against an experienced opponent. Particularly in a suit contract.
1. North won’t have an honour sequence (♠AK, ♠KQ, ♠QJ etc) or he would surely have led that.
2. He is very likely to hold the Ace (leading from a broken honour holding like KJxx in an unbid suit is still quite appealing but leading an unsupported ace, or underleading an ace, against a suit contract is known to be wrong so often that experienced players will very seldom do it).
The combination of those two mean North is likely to have ♠A but not ♠K – i.e. a spade holding headed with just the A or AQ or AJ. That knowledge isn’t especially valuable on this hand but on others it might be critical to placing other key cards. It’s another case of considering not just what the opponents have done but also what they have NOT done!
That’s the honours. What about the distribution? The opponents have 9 spades but neither of them has bid the suit. That makes it quite likely it will be splitting 5-4 because if either opponent had 6, they’d have been more likely to bid (here, however, they are vulnerable with weak hands so they may have just not have enough to safely bid – it’s a more reliable inference if they are not vulnerable since these days many players will strive to bid spades if they possibly can).
Julian Foster (many times NSW representative) ♣♦♥♠