City and Polish Club – Thursday Morning 2nd October 2025.
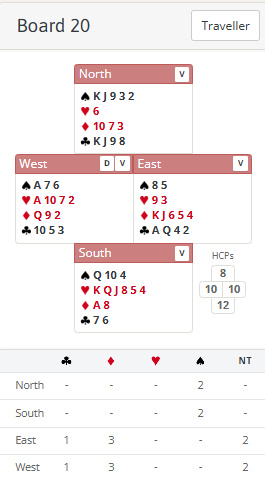
Last week the hands at the two venues were once again matching. So on the selected hand here are both sides’ points – 20 each! As expected, that leads to a close partscore battle but many North Souths ended up playing in hearts going several off vulnerable. Could they have avoided this fate? Let’s see.
West and North will normally pass. East only has 10 points but I would definitely open 1♦ on the hand in 3rd seat. From his perspective South is very likely to have an opening bid and could have a strong hand so getting in first will make it harder for North South (it tends to be harder to bid accurately when you start as the overcalling side). What’s more East is happy for West to lead diamonds should they end up defending and he also has an easy 2♣ rebid over most normal responses.
South will naturally overcall 1♥ and as West I would now bid 1NT as I have a good heart stopper and about 7-10 points. 1NT here tends to be slightly stronger than it would be as a response to a 1 level opening – that’s because West doesn’t have to bid with 5-6 points once there has been an overcall, he can pass (knowing his partner will definitely get another go if he has a really strong hand).
North doesn’t like his partner’s hearts of course so he won’t be venturing in. East continues with his plan and bids 2♣. Some Souths at this point no doubt repeated their hearts but I imagine they later regretted it when they got left to play there! South shouldn’t be bidding again here – he would effectively be bidding his hand twice. Yes he has 1 more heart than he might for his original overcall but the rest of his hand is pretty unremarkable. Further, he is vulnerable (so is risking the dreaded -200 if he bids too much) and he’s been given a hint that hearts aren’t sitting well by the 1NT bid over him. A warning sign to go quietly!
After 2♣ from East (which confirms he will be at least 54 in the minors) West may now try 3♦. He was maximum for his 1NT previously and now he knows partner has some shape, his two major aces and the ♦Qxx support are looking like very good features. 3♦ here is invitational but of course here East will pass it like a shot on his balanced 10 count!
Before we look at the play, let’s return to the 1st round of bidding. Suppose East did choose to pass in 3rd seat instead. Now things are quite different. South will open 1♥, West will pass, and North will respond 1♠. As East I would now double to show the other 2 suits and willingness to compete (my hand is already limited by not having opened so partner isn’t ever going to go too overboard!) It’s usually good to compete but here it might actually help North South reach their best contract of 2♠ – see advanced section for how. If East passes then South needs to decide whether to raise spades with 3 card support or rebid his hearts. Remember in this auction he won’t have had the warning sign of hearing 1NT being bid over him so it’s a tough decision. 2♥ seems very reasonable but today raising spades works much better!
If North South do reach a spade contract they should make 8 tricks (they lose ♠A, ♥A, 1 diamond and 2 clubs – they can set the hearts up to discard any remaining losers on). A heart contract by South is pretty horrible though. The defence will most likely start with a diamond. They should, as a minimum, come to ♠A, 2 hearts, 1 diamond and 2 clubs for 1 off. Although declarer might lose control of trumps when he is forced to ruff diamonds and end up going more off. The defence can in fact always take it 2 off although it’s not realistically findable at the table. See advanced section for what they could do.
Even though no-one played in it, let’s also consider how 3♦ by East might go. Deep Finesse says it can always make 9 tricks. The most likely lead is ♥K which declarer wins. Declarer should resist the urge to start drawing trumps. He needs to do something with his clubs. So he should take a club finesse, cash ♣A and play a 3rd club losing to North. This puts him in a position to trump his 4th club in the West hand and THEN draw trumps. Ultimately he will score the two major aces, 4 diamonds, ♣AQ and one club ruff in dummy – i.e. 9 tricks. It’s very hard to see South leading anything other than ♥K of course but suppose he miraculously found ♦A and another? Now this line won’t work – because when North wins the 3rd round of clubs he can play the 3rd round of trumps and stop the club ruff. But declarer can still make 9 tricks! Can you work out how? See advanced section (although don’t waste too much time on it – it’s double dummy and virtually impossible to find at the table!)
Key points to note
It’s worth opening a bit light in 3rd seat – it makes it harder for the opponents.
After a 1 level opening and 1 level overcall, 1NT shows about 7-10 with a stopper (partner is now always going to get another bid so you don’t need to respond with 5-6 in case he has a strong hand).
Don’t bid your hand twice! You need a strong hand and a good suit to rebid your own suit when partner hasn’t bid at all.
The opponents intervening in the bidding is often a nuisance(!) but there are times when it can actually make it easier to find your own contract! Support doubles/redoubles are one way this can be done.
Don’t always rush to draw trumps – sometimes you need to do other things first – like ruff losers in dummy.
More advanced
Had the auction started with 3 passes and then 1♥ P 1♠ X a useful method for North South to be playing would be support doubles and redoubles. Support doubles apply after a 1 major response and an overcall on the right up to 2 of your side’s major. Double basically shows 3 card support for responder’s suit and any other bid denies 3 card support. The principle can be extended if, as here, the intervening hand makes a takeout double. Redouble can also be used to show 3 card support (although it’s worth discussing this with your partner – it can still be useful to play redouble as showing a strong hand interested in penalising the opponents!) The redouble showing 3 spades would work well here as North can bid 2♠.
One way East West could definitely defeat 2♥ by 2 tricks is if West found the highly unlikely lead of a low spade! Now he can win the ♥A, play ♠A and give East a spade ruff. That cuts off North’s spades and the defence basically just then keep playing diamonds. In the real world of course no West should be underleading his ♠A – it could be ridiculous!
What about 3♦ from East after the defence find the miraculous start of 2 rounds of diamonds? It’s very hard but I think declarer needs to take a club finesse and then duck a spade! Whatever the defence do, he can then draw the last trump, cash ♣A and play ♠A and ruff a spade in his own hand. That doesn’t gain him a trick of course because he’s ruffing with one of his own long trumps. But the point is it removes South’s spades. Cashing ♣A also removed South’s clubs. Now declarer leads a heart towards dummy. South has to insert ♥J, otherwise dummy’s ♥10 will score. Declarer wins and plays a heart back to his ♥9 and South’s ♥Q. South can win but now only has hearts left. He tries to exit with ♥K but declarer discards his 3rd club! Now South has to give dummy’s ♥10 a trick on which declarer’s 4th club is also discarded. This of course is double dummy – in the real world you are far more likely to continue playing clubs with the hope they are 3-3, or the winner of the 3rd round doesn’t have the 3rd trump – no such luck on this hand!
Julian Foster (many times NSW representative) ♣♦♥♠