City and Canada Bay – Thursday Morning 26th June 2025.
Last week, we looked at board 20 and, by coincidence, I’ve picked the same board number this week. The contract was invariably played by East West so the focus is mainly on the bidding and then the defence by North South.
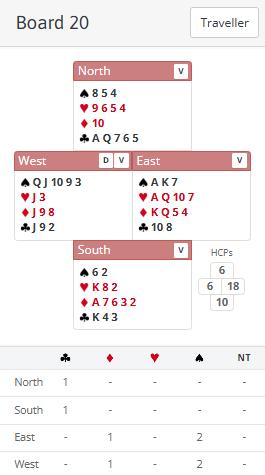
The likely start to the auction is Pass, Pass, 1♦. South, having heard his longest suit opened on his right, can’t bid and West will respond 1♠. East’s normal rebid now is a jump to 2NT – usually showing 18-19 balanced (11-14 balanced would rebid 1NT, 15-17 balanced would have already opened 1NT and 20+ balanced would have already opened 2NT or 2♣).
It’s then up to West whether to leave 2NT or move again. With only 6 points (including 3 unsupported jacks) and a lot of losers I think pass is right – especially playing pairs where you don’t gain as much for bidding a light game.
Playing imps, however, you might want to continue since you could have game available if partner has 19 and things fit well (or the opponents mis-defend). How might you continue? There are various options but 3♣ as checkback is quite common – in this case to look for a spade fit. See advanced section for more details and other bidding options. If West does continue then the pair should end up finding their 5-3 spade fit and play 4♠.
The focus then switches to the defence. Let’s first consider 2NT by East where South is on lead. What would you lead? Traditionally of course you lead 4th highest of your longest suit against no-trumps. But is that wise here when 1♦ was opened on your right? I would say not – especially if the 1♦ opening showed at least 4. For several reasons:
- It will be highly unlikely then that you will be able to get your long diamonds going if there are 4 on your right. Partner often won’t have enough diamonds to be able to lead them through to you often enough.
- The quality of your diamond pips is so poor that you will need partner to have very good diamonds for it to work.
- Partner is known to have a few points (think about it – you have 10, you know RHO has 18-19, but LHO has passed 2NT so he has at most 6 – that leaves partner with about 5-7). So it may be worth trying to find those instead.
If you decide not to lead diamonds, what do you prefer? A spade seems silly being the suit dummy bid so it’s a choice between hearts and clubs. Even though it may seem a very convenient conclusion to reach on this hand(!) I’d pick a club. Why? Because RHO opened 1♦ and not 1♣ which surely means his diamonds are better than his clubs. Hence it’s more likely clubs is his weakness than hearts (after a 1♠ response, East could easily still have hearts and choose to bid 2NT to show the balanced nature of his hand rather than rebidding 2♥).
After a club lead the defence can hold declarer to 6 tricks. They can start by cashing 5 rounds of clubs. South then has to find 2 discards – what should he signal and why? See advanced section for the answer.
After a diamond lead, there is still time for the defence. Declarer will win and might either return a diamond straight away, or run his spades, or perhaps try a heart finesse. Either way, when South gets back in he should be able to tell to switch to clubs – see advanced section for how.
Now let’s look at the lead and defence to 4♠ – this time almost certainly played by West so North is on lead. He will surely lead his singleton ♦10 hoping to get some ruffs. Singleton leads hoping for ruffs are very attractive particularly when:
- You have a weak hand (more chance partner has some values and hance the entries to get in to give you the ruffs you want);
- You have a few small trumps (if you have long trumps you are often better trying to force declarer to ruff instead; if you have big trumps they will be tricks anyway without needing ruffs);
- You have control in trumps (so you can get in quickly, then hope to reach partner’s hand to get your ruff).
This hand meets two of those criteria so it’s worth a shot. Indeed, the ♦10 lead works very well on this hand! South wins ♦A and returns the suit for a ruff (this is a classic defensive signalling position – he should return ♦2 his lowest which asks for the lowest of the other 2 suits). North should trust his partner’s signal and underlead his ♣A to get South back in with ♣K for a 2nd diamond ruff. The defence end up winning ♦A, 2 ruffs and 2 clubs which takes 4♠ 2 off.
Finally, two questions to consider (see advanced section for the answers):
- What diamond should declarer play when North leads ♦10 – and why?
- Why don’t the defence also score ♥K?
Key points to note
When declarer has bid no-trumps in the auction and shown a defined range of points, as a defender you should always add that to yours and dummy’s and subtract from 40 to work out the range of points partner will have.
At pairs don’t push for light games – with a bad hand and an absolute maximum of 25 between the hands, it’s often not worth bidding game. Different story at imps when a game bonus is worth much more.
Singleton leads hoping for ruffs are attractive from weak hands or hands with trumps that are unlikely to otherwise score.
Leading a poor 5 card suit around to a strong balanced hand that opened your suit is seldom right – look for a better option (often the auction will tell you where declarer is likely to be weakest).
Defenders can signal their entries when giving each other ruffs, or when discarding on partner’s long suit in no-trumps.
As declarer be alert to playing cards you are known to hold or which could create some doubt in the defence’s minds. Even if they should be able to work it out, they often don’t!
More advanced
Playing 3♣ as checkback after a jump 2NT rebid is quite common (even if the opening bid was 1♣). The responses are for the 2NT bidder to show an unbid 4 card major or 3 card support for partner’s suit. Normally the priority between these is simply whichever is cheaper to bid. So here the bidding sequence could be 1♦-1♠-2NT-3♣-3♥-3♠-4♠. 3♥ shows an unbid 4 card heart suit. West isn’t interested in that on this hand but he now bids 3♠ to show 5 of those (generally exactly 5 because with 6 he would probably just insist on spades). That leaves room for East to now admit to 3 card spade support as well. Checkback basically allows the pair to explore all possible major suit fits before alighting in 3NT if they don’t have one (or possibly then moving on towards slam if responder is stronger).
Another bidding method in use in this position is transfers by responder. So responder here could bid 3♥ (transfer to spades) to show 5 spades and deny 4 diamonds or hearts. That has the advantage of increasing the chances of the strong hand playing the contract and it gives additional bidding space for pairs that are able/willing to discuss all the options!
When defending 2NT, South has to make two discards on the long clubs from his partner. His first instinct might be to signal diamonds since he has ♦A. But this would be wrong. He should instead signal hearts. He wants North to lead a heart to set his ♥K up before his ♦A is knocked out. That way, the only tricks declarer scores are 5 spades and ♥A. If the defence just cash ♦A they still beat 2NT but only by 1 trick instead of 2.
Suppose South had led a diamond and then got back in either with ♦A or ♥K. He should now find the club switch. If declarer played another diamond himself then not only will that suit be completely known but surely North will signal clubs via his discard? If declarer took a heart finesse, then he will have to have reached dummy which he can only do in spades. Hence he will have shown ♠AK and the fact he played on hearts is surely an inference that he has quite good hearts himself – so that really only leaves clubs where partner can have his points. Of course declarer can make things a bit harder though. After a diamond lead when trick 1 goes ♦3,8,10 declarer should win the ♦K not the ♦Q. That might leave open the possibility in South’s mind that his partner had ♦Q10 and it is worth him playing the suit again (winning ♦Q doesn’t create the same confusion about ♦K because that would give North ♦K10 and he may then have played ♦K at trick 1).
Of course winning ♦K shouldn’t work because if the 1♦ bid showed 4 South should immediately know his partner only has 1 diamond anyway – but it costs declarer nothing to sow some potential confusion! Even if the 1♦ bid could initially have been 3, South can work out on this hand that it won’t be – usually the only time 1♦ is opened on 3 is with a 4432 shape. But the subsequent auction makes that impossible here – East can’t have 4 spades as he didn’t raise his partner’s 1♠ response.
Finally, looking at the two questions posed above.
- If North leads ♦10 against 4♠, then when South wins ♦A, declarer (West) should follow smoothly with ♦J. Given he also holds the ♦9 and ♦8 those cards are all worth the same. But more importantly, when North leads ♦10 the one card he won’t hold is ♦J. So declarer should play the card he’s already known to hold. That then leaves South uncertain as to the whereabouts of the ♦9 and ♦8. In fact he can’t even be sure the lead is a singleton – North might have led ♦10 from a holding of ♦1098 for all he knows! On that layout a diamond back would be fatal – it would allow declarer to discard two losers on ♦KQ. So by playing the ♦J, there’s a chance declarer will fool South into not giving his partner the ruff. It shouldn’t really work of course – leading dummy’s first bid suit is a very unlikely choice of lead unless it is a singleton. But, as above, it costs declarer nothing to sow some confusion!
- The defence won’t score ♥K as well because if they have taken two diamond ruffs and now switch to a heart, declarer can rise ♥A. Now he can draw trumps in two rounds ending in East and play the 4th round of diamonds to discard his heart loser. Eventually he ruffs his 3rd club in dummy (North having taken diamond ruffs means trumps can now be drawn in 2 rounds). They could score ♥K if they lead the suit early but then they can’t score their diamonds ruffs – they can’t do both.
Julian Foster (many times NSW representative) ♣♦♥♠