This hand comes from the Sydney Bridge Club Christmas Party (morning session) played on Dec 3rd – with a virtually full room of 32 tables. 16 more played the afternoon session as well.
From next week until the end of the year all weekday sessions are getting red points too – another reason perhaps to have a break from Christmas shopping and play some bridge!
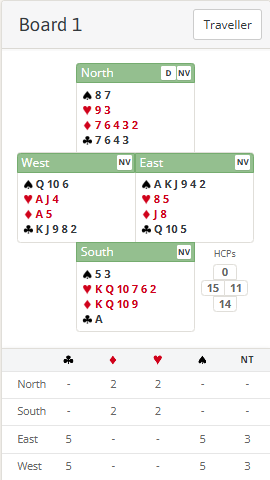
Most pairs ended up in 4♠ by East – although there is some opportunity for North South to consider a sacrifice over that. The lead was critical to the number of tricks made.
The normal start to the auction is Pass 1♠ 2♥. West of course now knows his side want to play at least game in spades and his best start is to make a “cue raise” of 3♥ (jump raises are more commonly played as pre-emotive these days). 3♥ is basically showing a values raise to 3♠ or better. See advanced section for some more refinements that can be made.
East is then close between 3♠ and 4♠. The lack of any shortage and only 11 points are obviously downsides but the 6th trump may tempt him to bid 4♠. Of course it doesn’t matter here because West will be pushing onto game anyway.
South at this point might consider another go. He has a fair bit of shape and a 5 level red suit contract might play OK – or at least have good chances of being a good save against 4♠. There are, however, two factors that might put him off:
⁃ the vulnerability
⁃ his spade holding
See advanced section for more on why.
If he does move, his best bid is 4NT. This can’t possibly be Blackwood when partner has shown nothing. It’s more usually played as a shapely hand like this with 64 or 74 in his suit and a minor (partner bids 5♣ if he prefers that to 5♥ then South corrects to 5♦). With 5 diamonds he just bids 5♦ himself.
What about the play in 4♠? It should make 11 tricks. South should lead one of his red KQ holdings. Declarer wins, draws trumps and knocks out ♣A. South cashes the red trick he has set up but the other red loser gets discarded on dummy’s long clubs.
Quite a few pairs made 12 tricks, however. This happened when South led his ♣A. He was no doubt hoping for a ruff but this is actually pretty unlikely. Why? Because he’d need partner to get in to give him a ruff. Is that likely when he is looking at 14 points himself? Not really. That’s something important to realise. When playing for ruffs the weaker your hand the better – that increases the chances of partner having the entries needed to give you the ruffs. Another useful feature to have when seeking ruffs is trump control – then you know declarer can’t immediately draw trumps. If he can, as here, all too often your shortage lead has just helped declarer set up his side suit to discard his losers before you can get them set up as tricks.
If North South did go on, what’s likely to happen? 5♥ has 5 pretty clear losers (2 spades, 2 trumps and a diamond). So that’s -500 and a disastrous score at matchpoints when the field is scoring at most 480. That only happened once although one or two pairs appear to have played in 5♠ so they may have chosen to bid on rather than double. 5♦ should also go -500 but might, in practice, get out for -300 since the defence’s tricks aren’t as obvious. Can you see what they need to do to take 500? See advanced section for the answer.
Key points to note
Cue raises (bidding the opponents suit) to show a good raise of partner’s suit are very useful. (Jump raises of partner’s suit are then played as pre-emptive). Further refinements can be added to distinguish trump length as well.
Playing for ruffs in defence can be effective but it will only work if partner has entries to give you ruffs. So there’s not much point leading shortage if you have almost all the defence’s values in your own hand.
If considering a sacrifice the vulnerability is vital but your length in the opponents’ suit is also important. A doubleton is the worst holding as it’s very likely you will have 2 losers.
Having bid one suit, if partner has done nothing, a bid of 4NT on the next round over their 4M is not Blackwood – it’s best played as showing a shapely 64 or 74 hand looking to bid on.
More advanced
Cue raises are a good way of distinguishing between a values raise and a pre-emptive raise of partner’s suit. This can be important in judging whether to bid onto slam or save or double the opponents.
Another useful factor is identifying the size of the trump fit. There’s a huge difference in the power of an 8 card and a 9 card fit. Therefore, a method used by some pairs when raising majors is to play that a cue of the opponents’ suit shows a good 3 card raise and a bid of 2NT shows a good 4 card raise. The obvious question then is what to do with a limited hand that wanted to bid 2NT naturally? In reality this tends not to come up very often and it’s often viable to either pass (with the intention of taking a penalty if partner reopens with a double) or push a bit to bid 3NT anyway.
Note this only applies over majors. Over minors it’s still useful to play a cue bid of their suit as a good raise but this time 2NT is better played as natural since you want to prioritise playing 3NT ahead of 5 minor whenever possible.
I gave two reasons why South might be put off saving over 4♠. Let’s explore them a bit more:
a) The vulnerability is equal. That means he can only afford to go 2 off (-300) to show a profit over their game (-420 to -480). Going 3 off for -500 will be disastrous. Had he been at favourable vulnerability it would be much more appealing as he could then afford to go 3 off (-500) against -620 to -680.
b) 2 spades is the worst holding to have as it’s very likely there are 2 spade losers (even if they have a 9 card fit). Holding 1 spade is obviously only 1 loser; holding 3 spades means a better chance partner only has 1 (if the opponents have a 9 card fit). 2 losers in their suit obviously significantly increases the risk that he will go for -500, particularly as there isn’t a guarantee his side even has a fit.
How does 5♦x go for 500? The defence cash 2 spades then they can play 2 rounds of hearts. West then wins ♦A immediately and plays a 3rd heart allowing East to overruff dummy and score a trick with his ♦J. It should be clear for West to do this when East switches to ♥8 and it goes ♥KA but West might be reluctant to play a 2nd heart away from his ♥Jx after winning ♥A. That would of course be crazy defending against hearts but essential when defending against diamonds! What if East switches to a club instead of a heart (something which may look very appealing to him with 4 small in dummy)? That’s actually OK too – West can win a red suit ace and now start forcing the South hand. Although South could then draw trumps that means 2 club ruffs in the South hand will remove all his trumps before he gets the hearts going. So he will probably have to play hearts himself anyway – resulting in the same outcome.
Julian Foster (many times NSW representative) ♣♦♥♠