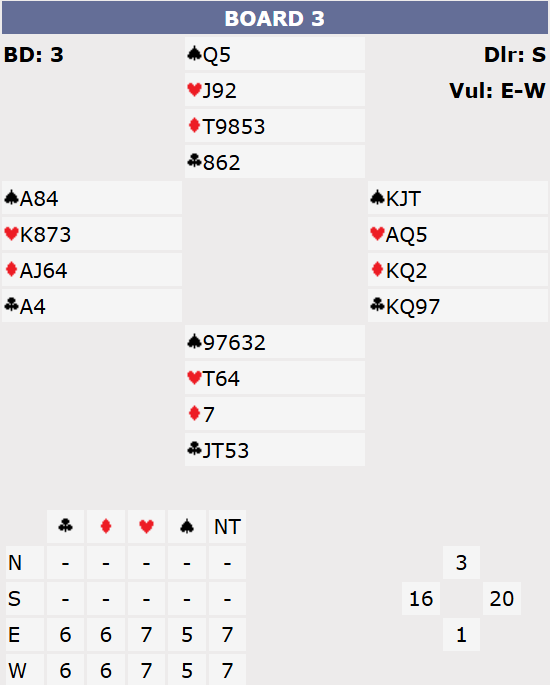
It’s not often you hold 20 points and hear partner open the bidding – let alone a strong NT opening! But that’s what happened on this hand. Most pairs bid to 6NT but 7NT was available and there were several chances to make it. The question was how to combine them all.
But first the auction. If West opens 1NT (15-17) then East should immediately be thinking between 6NT and 7NT (the pair have a combined 35-37 points). A weak no-trump auction will usually begin with 1♦ over which East starts 2♣ and West rebids 2NT which gives East basically the same information and the same decision.
Some pairs like to play 4♣ Gerber over no-trumps (i.e. ace ask). This is really a dreadful waste of a bid and I would not recommend it at all – there are many better uses for 4C. See advanced section for more.
Pairs should discuss what a raise to 4NT over a NT opening or rebid means. Most experienced pairs would not play this as blackwood (after all it can’t be keycard blackwood as you have no agreed suit). Instead they would play it as quantitative – i.e. inviting partner to bid 6NT but to pass if they are minimum. That’s no good on this hand though – East is too strong (if partner has a minimum 15 you still have 35 and are almost certainly making 6NT). A possible (but rare) bid is 5NT – which is usually played as forcing to 6NT and invitational to 7NT. On this hand West is a bit inbetween with 16 but he might go for it with two 4 card suits (had he been 4333 his hand would be a bit worse as there are fewer potential tricks in a long suit available).
Suppose East West do make it to 7NT. North is very likely to lead ♦10 which gives nothing away. Now what? The first job as usual is to count tricks. There are 12 on top (♠AK, 3 hearts, 4 diamonds and 3 clubs). So it’s purely a question of finding a 13th. It’s then a good exercise to consider what the possible chances are. Have a think before reading on. I can see 4:
- Hearts break 3-3 so West’s 4th heart becomes a winner.
- Someone has ♣J10x so the ♣9 becomes a winner.
- Guess who has the ♠Q and score 3 spade tricks.
- Squeeze someone into giving up guarding a suit in order to score an extra winner there.
On this hand it’s pretty straightforward if you start on hearts. Once they split 3-3 the 13th heart is a winner and you then have 13 tricks. But if they had not split that way (and the odds when missing 6 in a suit are for them to break 4-2) then you need to look elsewhere. So the question is how can you best combine all these chances?
See advanced section for more discussion on the best play.
Key points to note
4C as Gerber (ace-ask) in a suit contract, or in no-trumps, is not generally a good idea. There are many better ways the bid can be used.
It’s worth discussing how to bid really strong hands over no-trumps. They don’t come up often but are worth a lot when they do. 1NT-4NT (and 2NT-4NT) is best played as invitational not blackwood. 1NT-5NT (and 2NT-5NT) can be played as forcing to 6NT, invite to 7NT.
Always count your top tricks and then try to spot what chances you have for the extra trick(s) you need.
You want to combine as many of the chances as possible. That may govern what order you cash tricks in – you don’t want to be forced to discard a possible future winner yourself.
As you get more advanced, consider the holdings opponents might have that will cause them discard problems.
More advanced
4♣ gerber ace ask is not a good use of the bid, especially not in suit auctions. So often 4♣ is better employed as the means by which your side agrees clubs (followed then by cue bids), or a cue bid to show a control in clubs, or perhaps as a jump to show a splinter (club shortage). Even in no-trumps, it’s not usually necessary to go asking for key cards with 4♣. Some pairs play 1NT-4♣ as showing hearts (a “two under” transfer) which is handy as it takes a fair bit of space from the opponents if they happen to have stronger hands.
So what is the best way of combining the chances to make 7NT? Your last resort should be to guess the ♠Q since it’s fatal if you get it wrong. You want to try the other chances first if you can. The thing to be careful of is whether you have to make any discards yourself because you don’t want to have to discard a card that might later become a winner! That’s why starting with hearts makes sense because you find out if they are splitting without neeeding to make any discards yourself. It’s also worth playing ♣AK to see if the ♣10 or ♣J drops. If not then you know chance 2 isn’t working.
The downside of cashing the 3rd club is you have to discard on it yourself. You don’t want to discard the 13th heart as (assuming it’s not a winner – i.e. assuming hearts split 4-2) you want to force the defender with it to have to keep it. Therefore you’d have to discard a small spade. Likewise you don’t want to cash all 4 diamonds too soon either because now dummy will have to make a discard and you don’t really want to discard a big spade or a potentially winning long club.
My plan on the hand, had hearts not behaved was to then play 3 rounds of clubs discarding a small spade. Then run my diamonds. If someone held the long heart, the long club and the ♠Q they would definitely be squeezed. But there could also be what’s known as a double squeeze. Suppose North had started with 4 clubs and South had started with 4 hearts. They each have a winner left in those suits. So declarer’s last 4 cards will be ♠A8 ♥3 ♦J with dummy holding ♠KJ10 ♣9. At the point West cashes his last diamond North has to keep his winning club to stop the ♣9 in dummy scoring. Declarer then discards that ♣9. Now the pressure turns to South who must retain his winning heart to stop the ♥3 scoring. But that means neither defender can keep 2 spades. Declarer plays ♠A, ♠K and dummy’s 3rd spade will be a winner regardless of who has the ♠Q.
Incidentally had the hand depended on finding ♠Q, it could have been very unlucky. Why? Because it’s a hand where you can count the shape fairly well too. As soon as you cash a 2nd diamond you see South show out. That tells you North started with 5 diamonds. Once both defenders follow to 3 rounds of hearts and clubs, that means North can have at most 2 spades (and might only have 1 if he had the 4th club). So South is known to have a lot more spades than North so the odds in the spade suit are heavily in favour of the ♠Q being with South. So declarer might well lead ♠K and then run ♠J losing to North’s doubleton ♠Q! Of course all that is academic when hearts break as there are now 13 tricks without worrying about spades.
Julian Foster (many times NSW representative) ♣♦♥♠