To make a contract there is usually a key suit you need to play on. But sometimes there are other considerations as well. Today’s hand taken from a recent Sydney Bridge Club duplicate is an example.
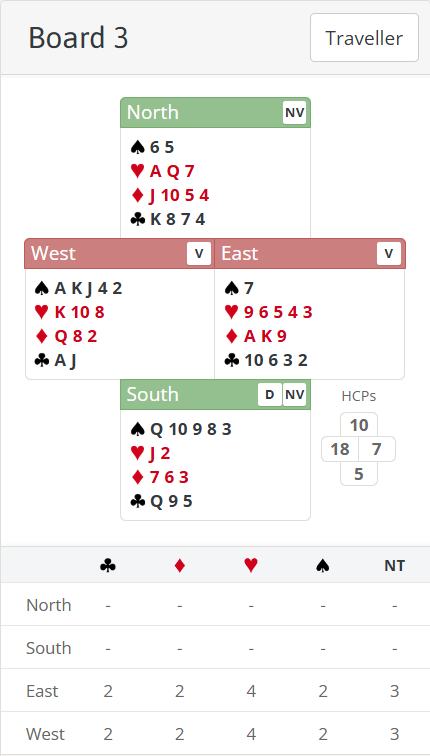
The normal start to the auction will be Pass 1♠ P 1NT. Some pairs did play in 1♠ but with 7 points East should definitely be responding. With 18 points and a response from partner, West should then be bidding to game – and the most descriptive way to do that is simply raise to 3NT.
Of course the 1NT response does not have to be balanced (it’s just any hand strong enough to respond, not strong enough to respond at the 2 level and with no 1 level suit bid available either). This time East is relatively balanced but he would start the same way with a 1732 distribution since he’s not strong enough to bid 2♥ (although with that hand he would then convert 3NT to 4♥).
It was quite surprising that in this session only 5 East West pairs out of 27 reached 3NT despite holding 25 points between them. Perhaps West only invited to game with 2NT and East declined. Either way, the issues that arise are similar. The first decision belongs to South who is on lead. He already knows something declarer does not – i.e. that spades are breaking badly. That suggests the cards may not be lying that well for declarer and we don’t therefore want to give a trick away. Hence I would lead passively on this hand – most likely a diamond from 3 small which gives nothing away.
How should East go about playing 3NT on a diamond lead? As usual the starting point is to count our top tricks (2 spades, 0 hearts, 3 diamonds and 1 club). That’s 6 so we will need 3 more tricks from somewhere. The most likely source for extra tricks is of course hearts – i.e. set up the long hearts in the East hand. Playing in no-trumps, however, that’s only of any use if we can reach them – i.e. we will need a later entry to the East hand. Such an entry can only come from diamonds which should tell us we need to retain at least one of the ♦AK in the East hand.
The question then becomes how to play the heart suit? We can’t just lead away from West each time – doing that will surely mean we will lose tricks to all of the ♥AQJ. So in the normal course of events you would lead towards ♥K108 twice and hope North doesn’t have ♥AQJ sitting over you. Is that any good here? No! Because it would require 3 entries to the East hand – 2 to lead up towards ♥K108 and then a 3rd to get back to East to cash the long hearts. Here we definitely only have 2 entries to East. Therefore, although we can certainly use one of them to lead hearts up, we can only do that once and the 2nd round of hearts will need to be played from West.
Suppose we win ♦A in East at trick 1 and lead a low heart towards ♥8, which North wins with ♥Q. He will no doubt return a diamond which we have established above we will need to win with ♦Q in the West hand to preserve ♦K for a later entry to East’s hearts. So at that point we have ♥K10 left opposite ♥9654. What should we now play from West?
On the hand we need to lead ♥K which smothers South’s ♥J and allows the hearts to be set up. That gives declarer 2 spades (3 if he takes the finesse), 3 hearts, 3 diamonds and 1 club which is enough to make his game. But why should we play ♥K on the 2nd round? See advanced section for the answer.
Key points to note
A 1NT response to a 1 major opening bid is not necessarily a balanced hand – it’s just enough to respond but with no biddable suit at the 1 level and not strong enough to bid at the 2 level.
If you are on lead and know you have a nasty surprise waiting for declarer, it’s often right to lead passively and not give anything away elsewhere.
In no-trump play, if you are considering setting up a suit, always make sure you will have an entry to be able to get back there later to cash the winners.
Don’t leave a suit blocked if you can ever avoid it. Particuarly in no-trumps where the blockage might cost a number of tricks.
More advanced
The play on the 1st round of hearts is likely to go ♥3 2 8 Q. Once we are back in the West hand we have ♥K10 left opposite ♥9654. Ideally we’d lead again towards the ♥K10 but we already know we can’t afford to do that. At first glance you might think the play at this point is a guess. We could play ♥K hoping one hand has ♥J singleton left, or we could play ♥10 hoping one hand has ♥A singleton left. But we should recognise the 2nd play is of no use to us here even if it works. Why? Because even if that was the position whoever wins the ♥A is surely going to return a 3rd diamond which will knock out the last entry from the East hand and that will leave the hearts blocked. Therefore, only the 1st holding (singleton ♥J) is any use to us. Now, even if the defence duck ♥A, we just play another heart to set the suit up and we still have ♦K entry in East to enjoy it. So it’s the entry position that actually determines how we have to play the key suit to give ourselves a realistic chance.
There’s one other thing that can be inferred from the play in the heart suit. The “principle of restricted choice” suggests South has ♥J left. This principle arises most commonly where there are two honours that can be used to win a trick and when one is played, that implies the other hand is more likely to hold the other – purely because if the hand winning the trick had both, they would have had a choice of which card to use to win the trick. The most common example of restricted choice is missing QJ in a suit. Suppose you hold A10xxxx opposite Kxx and when you play the K, the J is played on your right. When you lead towards the A10xxx on the next round should you play A or finesse the 10? Even though with 9 cards the initial odds are to play for a 2-2 break, the fact the J has been played on round 1 now makes it a far better proposition to next finesse the 10. There is only one holding you lose to – exactly QJ doubleton but you gain when the suit is Qxx opposite J (of which there are more holdings).
Restricted choice on this hand isn’t that useful in practice. When North wins ♥8 with ♥Q, it certainly suggests South has ♥J but he might have ♥J left on its own, or ♥AJ left. Had we had the luxury of another entry, we could have led again from East to discover which. As it is, the entry position means we have to play from West which in turns means we have to hope for singleton ♥J which, fortunately, works on this hand.
There is one other thing we could perhaps try on this hand which is a deceptive play designed to put pressure on North. We could win ♦Q at trick 1 and immediately lead ♥10 from dummy. This preserves both diamond entries in East and it might tempt North to make a mistake if he holds ♥AQx. He might think he needs to dive in with ♥Q in order to lead a 2nd diamond through (perhaps thinking his partner had led from ♦Kxxx or something). Now we can win ♦A and lead a 2nd heart to establish the suit. Note the importance of leading ♥10 not ♥8 from dummy though. If we’d led ♥8 we might still land up with a blockage even if our deceptive play worked. Imagine North wins ♥Q and plays a diamond. Now the 2nd round of hearts will go ♥ x J K A and the 3rd diamond exit leaves ♥10 in dummy again blocking the suit. Getting the ♥10 out of the way earlier would instead mean we could now overtake ♥8 with ♥9 to run the rest of the suit.
Managing entries and avoiding blocking suits is a very important aspect of declarer play!
Julian Foster (many times NSW representative) ♣♦♥♠