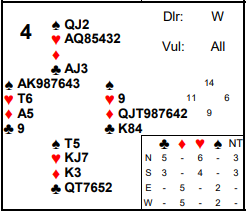
When you are dealt an 8 card suit you can usually be pretty confident it’s the longest suit in the hand. Not on today’s hand (taken from the Spring Nationals Mixed Teams) which featured an even more unusual 9 card suit! We are often told shape beats points – this was another example.
Most Wests will have opened 1♠ (although some might have tried 4♠). North probably overcalls 2♥ (some might consider 4♥) and it’s now over to East.
In our match the two Easts took wildly different approaches after 1♠ – 2♥. One passed, the other bid 5♦! Over the pass, South stretched a bit to bid 2♠ showing a good raise of hearts (see advanced section for more on cue raises). West, not unreasonably, jumped to 4♠ with his 8 card suit. North, although slightly uncomfortable about his spade holding, knew about the heart fit so tried 5♥ and that became the final contract.
At the other table after 5♦, South didn’t bid 5♥ and 5♦ might well have become the final contract as it did at many tables. However our West raised to 6♦! From West’s perspective if partner has 1 spade and as little as ♥A and ♦K that might well be enough for slam. Today though 6♦ quickly went 1 off when North cashed two aces.
At quite a few tables 5♦ also went off although it can be made. Suppose the defence start with 2 rounds of hearts. Declarer ruffs and basically has to decide if trumps are 2-0 or 1-1. Do you know the odds? What is the most likely? And what’s the most likely on this hand? See advanced section for more discussion. Those that played a diamond to the ace went off – they could cash two spades to discard 2 clubs but that still left a club loser to go with a heart and the ♦K. What would you do as South if declarer played ♦Q?
What about 5♥ by North? Just looking at the two hands it seems to depend on the club finesse with an expected 2 spade losers. However, no doubt to the despair of West the contract is actually cold for an overtrick! North can ruff the likely diamond lead, draw trumps and lose a trick to ♣K. East still can’t lead a spade so all of North’s spades all get discarded on South’s winning clubs for a score of NS +680. One table in fact suffered the particularly unlucky score of -1050 (5♥ doubled making 6).
8 card suits are pretty rare at bridge. 9 card suits even more so! When East passed over 2♥, they probably hoped to be able to bid diamonds next time to show a long suit but a weak hand. However, when the auction returned to East at the 5♥ level that was not so appealing! There is of course no right answer with these distributional freak hands but bidding high quickly and putting the pressure on the opponents is usually best. 5♦ immediately will describe the hand pretty well and make it almost impossible for South to show heart support. Now it is a very big call for North to voluntarily go to 5♥ himself. There is a saying in bridge that an 8 card suit is trumps. That’s even more the case for a 9 card suit. The East hand is worth almost nothing in any other contract but is worth a cast iron 7 tricks with diamonds as trumps.
Key points to note
A cue raise is a bid of the opponent’s suit used to show a good raise of partner’s overcall (about 9+ points). Immediate raises then show weaker hands that are just competitive or pre-emptive.
Shape is always more powerful than points. 8 card suits don’t come up very often. 9 card suits are even rarer. Don’t be afraid to bid with them!
Jumping to a high level quickly puts pressure on the opponents. It may also stop them being able to make a cue raise. That means they may not be able to distinguish hands with values as opposed to hands with shape.
Covering honours is done to promote lower cards in your, or your partner’s hand. If you know partner has shortage in the suit and you have no card to promote yourself then it cannot gain to cover.
Although it is worth knowing the basic mathematical odds of various suit breaks, in practice there is almost always more information to consider (e.g. an auction). Given everyone starts with 13 cards, if an opponent is long in one suit, the odds are they are going to be shorter in another.
More advanced
Cue raises are used by almost every established bridge partnership these days. After partner overcalls, you cue the opponent’s suit to show a good raise of partner. An immediate raise of partner’s suit is just competitive and a jump is pre-emptive. This has two main advantages. Firstly whenever you have a fit it allows you to raise freely to put pressure on the opponents without being worried partner will think you have too much. Secondly it allows partner to judge whether to bid further towards game if you show values or it may enable partner to double them if they bid over you. The typical point range for a cue raise is about 9+ points (perhaps a good 8 – especially if you are already a passed hand).
Some partnerships define their raises more closely. For example some play that a cue bid shows values with exactly 3 card support and a 2NT bid shows the same but with 4 card support. This again can help partner judge later in the auction if they know what size trump fit you have.
The play in diamonds revolves solely around not losing a trump trick. When missing 2 cards in a suit the pure mathematical odds of a 1-1 break are fractionally better than a 2-0 break (52% v 48%). But we are very seldom operating in complete isolation. Here if North has overcalled hearts, he’s likely to have 6 when vulnerable. That leaves a lot less space in his hand for any diamonds. With such a close percentage difference to start with, the knowledge of the likely heart split swings the odds a lot towards playing for trumps to be 2-0.
When trumps are 2-0 declarer can of course make by just finessing in trumps to score 11 tricks (9 diamonds and ♠AK). But if the defence haven’t cashed 2 aces (say they start with 2 rounds of hearts) declarer might now need to set the spades in dummy up – if ♣A did sit over ♣K he could lose 3 club tricks.
To set spades up declarer will need two entries to West. One to play a spade and ruff in hand, and another to get back there to cash the now winning spades (with a 3-2 break). If diamonds are 1-1 he can play a diamond to the ♦A, ruff a spade in hand, then cross back to ♦5 and cash the spades from the top which are all winners once they have split 3-2. Alternatively if South has 2 diamonds declarer needs to play a low diamond and finesse the ♦5! Then he can again ruff a spade and cross back to dummy with ♦A, drawing the ♦K in the process.
Some Easts might have tried ♦Q hoping to tempt South into covering. Should South fall for this trap? No definitely not! The purpose of covering is to promote lower cards in your hand or your partner’s. If East has jumped to 5♦ vulnerable missing ♦A and ♦K surely he will have at least 8. That leaves at most 1 for partner. Therefore it cannot possibly gain for South to cover and he should duck smoothly. Declarer then has to guess what to do. Running ♦Q will mean 11 tricks (now there’s only 1 trump entry to West so the spades can never be set up). Playing ♦A will mean 12 tricks if diamonds are 1-1 but 10 tricks on the actual layout. There’s not a lot to go on but, as we saw earlier, North’s heart overcall in the auction should point declarer towards finding the winning line.
Julian Foster (many times NSW representative) ♣♦♥♠