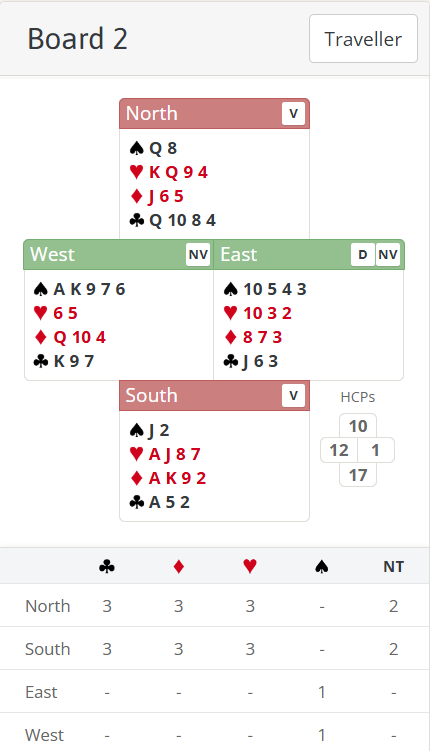
Quite a number of North South pairs played 4♥ on today’s hand. That’s pretty reasonable – they have a 4-4 fit and a combined 27 points.
For many pairs South will have opened a strong 1NT, North will stayman and then raise 2♥ to 4♥. Some Wests might overcall 2♠ but that shouldn’t matter (North doubles for takeout and, even if East raises to 3♠, South can bid 4♥).
For those playing a weak NT, South will most likely open 1♦ instead. This allows West to stick in 1♠. North doubles that, East raises spades to some degree (but, despite the favourable vulnerability and 4 cards support, his hand is revolting so he may only bid 2♠). South most likely bids 4♥ immediately but even if he shows an invite, North will accept it.
4♥ made at a number of tables although it should go off. West will naturally start with the top two spades. But now what?
At this point West can’t lead another spade – that would give a trick away by allowing declarer to trump in one hand and discard a loser from the other. Nor can he lead a diamond (declarer would win ♦J in dummy and now only loses 2 spades and 1 club). A low club is also likely to be fatal – can you see how? See advanced section for the answer.
West is in danger of being “endplayed” – i.e. on lead at a point when he has to give a trick away. Fortunately at this early point in the hand he still has some trumps and those are by far his safest exit. What can declarer do then after drawing trumps? If he plays a club, West wins and gets out another club. Even though the 13th club is a winner, declarer can only discard his 4th diamond on it so he will still lose a trick to ♦Q.
If declarer plays 3 rounds of diamonds, it’s similar. West scores his ♦Q and now can safely lead a low club. Even though the 13th diamond is a winner, again the only thing that can be discarded on it is dummy’s 4th club so declarer will still lose a trick to ♣K.
A few pairs played in 3NT. This contract was hopeless. Even on a low spade lead, declarer is still only up to 8 tricks. This hand should be a good lesson of the value of Stayman! Even after a 2♠ overcall it should be quite easy to find your heart fit.
There was one other variation. Some East West pairs, no doubt attracted by the favourable vulnerability, “sacrificed” in 4♠ over 4♥. They got doubled and usually made 7 tricks (there are 6 pretty obvious losers – 2 in each side suit). That was a score of -500. That’s great if North South are actually making 620 in 4♥. In practice, however, they often weren’t so -500 was a bad score. This is quite a common scenario – pairs taking what’s known as a “phantom sacrifice” – bidding on over a contract that wasn’t making to start with. It can be quite hard to judge this at the table of course (for both sides) but, in general, people tend to sacrifice too often. See advanced section for more thoughts on this area.
Key points to note
Hands with a 4 card major opposite a 1NT opening should almost always look for a major suit fit with stayman. Otherwise you risk playing 3NT with no stopper in a suit. Even if 3NT makes, 4 major in a 4-4 fit will often be worth an extra trick.
As a defender keep an eye out for times where you could be thrown in. Perhaps cash winners first before giving up the lead? Perhaps think what your future exits are going to be?
If you are endplayed, try and find an exit which only gives 1 trick away and doesn’t allow you to be thrown in a 2nd time.
Sacrificing at pairs over an opponents’ game contract only gets you a good score if the penalty in your own contract is lower than their game score, their game contract is making, and most pairs their way are bidding the game. The point about most opponents bidding the contract is often forgotten.
More advanced
West needs to be careful on this hand. He should try to count declarer’s points, likely shape, and likely tricks – and defend accordingly. West, holding 12 points, can tell from the auction that his partner will have very little so he may need to score both ♦Q and ♣K. It would be easy to panic, think you need partner to have something in one of the minors, and try switching to that one. In reality you have to defend passively on this hand.
Can you see how a low club from West at trick 3 would also be fatal? Declarer wins in dummy with ♣10, draws trumps and plays ♣A and another. Now West is back on lead again – and this time is really endplayed. His only choices are to lead away from his ♦Q or give a ruff and discard. Interestingly, on this particular hand the ♣K from West at trick 3 is a better exit than a low club. It will look very strange(!) but see what happens – declarer wins but that still only gives him 2 club tricks. East will now get in at some point with ♣J and he will be able to lead a diamond through. Alternatively West will get on lead with ♦Q and can now lead a club safely to set up East’s ♣J. But of course ♣K is not a realistic play – it only works because East has ♣J which is not something West can tell. If declarer held that card, it would definitely be giving up a trick.
There will often be cases as a defender when you are genuinely endplayed. It’s then important to consider what you do. You have to give ONE trick away but that might not be fatal – it might only be declarer’s 8th trick in 3NT or 9th trick in 4 major. You want to avoid giving more than one trick away, or being placed in a position where you can be endplayed a 2nd time.
I also mentioned earlier that people tend to sacrifice too often at pairs. For a sacrifice to work it’s worth appreciating that 3 things all have to happen:
- The opponents’ contract has to be making
- The value of the penalty in our contract has to be less than the value of their contract
- Most of the pairs their way have to be bidding their contract.
On this hand the 1st item falls down. In practice, however, you see the 3rd item being forgotten a lot. If the opponents can make 620 in 4♥ and you score -500 in 4♠x you have done well right? Not necessarily! Suppose only 1 pair actually bid 4♥ and all the others were in a partscore. Now -500 compared to a string of -170’s doesn’t look so good does it?! Again it’s often hard to tell – but if you think the opponents’ contract is normal then you should be more inclined to try a save. If you think not many pairs will bid game their way then you are probably better off defending and just hoping their contract goes off.
Julian Foster (many times NSW representative) ♣♦♥♠