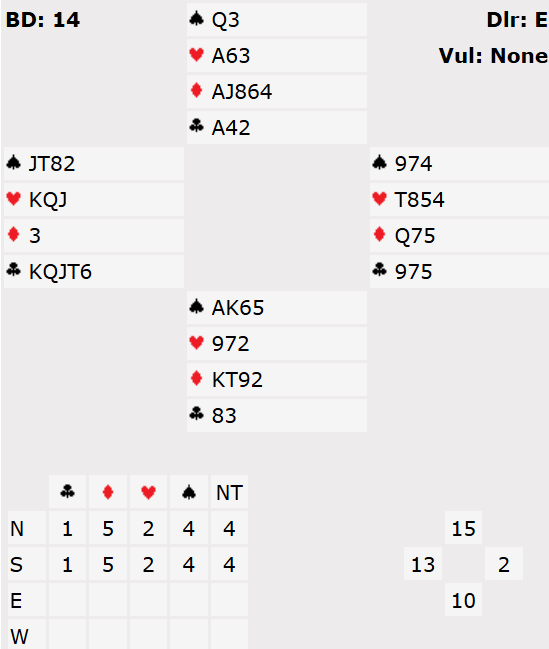
Today’s hand (taken from the pairs event at the New Zealand bridge congress) was a good example of technique both from declarer and defender’s perspective. The main theme was a hold up play to cut the defence’s communications.
The auction began with 2 passes and West opened 1♣. Many players would overcall 1♦ but North elected to bid 1NT which showed the general nature and strength of the hand (15-18 balanced).
There are a couple of other benefits to 1NT as well. It can be an advantage to conceal a 5 card suit (particularly a minor) which can be a later source of tricks in no-trumps. It also removes the ability for East to bid a major suit at the 1 level which might allow his side to compete or at least indicate a good lead. (Of course on this hand East wasn’t going to bid anything(!) but North didn’t know that at the time). After 1NT South raised to 3NT which became the final contract.
East led ♣7 (MUD – i.e. middle up down from 3 small, quite a common lead convention). West of course continued clubs and declarer ducked the first two rounds and won the ♣A on the 3rd round. Note how important this play is. Now East has no more clubs so it is safe to lose a trick to him but not to West who has 2 club winners ready to cash.
As declarer you of course start by counting your tricks. There are 3 spades, 1 heart and 1 club on top plus either 4 or 5 diamonds depending on whether you can find ♦Q. However, you only need 4 diamond tricks to make 9. That should influence how you then play the diamond suit. In isolation with 9 cards missing the Queen the odds are to play ♦AK and try to drop the ♦Q. But here there is a more important consideration. East is the safe hand so you should play ♦K and then run ♦10. Even if this loses to ♦Qx in the East hand your contract is still safe as East has no more clubs (or if he does that means clubs have broken 4-4). Today West shows out on the 2nd round of diamonds so you concede a trick to ♦Q and score 9 tricks.
There are some additional points of interest to this hand though. Firstly how might West have made things harder for declarer? Secondly when declarer starts running all his diamond tricks what should West discard? See advanced section for more discussion.
Key points to note
A 1NT overcall is a pretty descriptive bid so it’s often a better option than bidding a minor.
The hold-up play by declarer is a standard technique to wait and win the Ace on a later round so as to exhaust one defender of a danger suit.
Once one hand is “safe” you can finesse into that hand and it’s often right to do that even if the odds normally indicate a different play.
When discarding you generally need to cover a threat you can see and have to hope partner can cover one you can’t.
More advanced
How might West have made things harder? After declarer ducks 2 clubs (which he has to do to have any chance) West should realise that her clubs are now dead. She should switch to ♥K. This puts much more pressure on declarer because now if he loses a trick to ♦Q he will have 2 more heart losers as well. Therefore he has to get the diamonds right to make the contract which is by no means certain.
At the table after East won ♦Q he played a heart which declarer won. He had 9 tricks but now had chances for a 10th. He ran his diamond winners. His last 4 cards were ♠Qx, ♥63. Dummy’s last 4 cards were the 4 spades. West was under pressure. Her last 5 cards were ♠J10xx and ♥K from which she had to make a discard. What should she discard?
This also showed another defensive technique. West could see the 4 spades in dummy and knew only she could beat the 4th round. She couldn’t see what hearts declarer had in his hand. So she correctly clung onto her spades (the threat she could see) and threw ♥K hoping that her partner held ♥10 to cover the threat she couldn’t see. That hope came off and declarer just made 9 tricks. If declarer had held ♥10 the discard of ♥K meant that would now have been a winner. But in that case there was nothing West could do – she would have been genuinely squeezed. Declarer of course knew he didn’t have a genuine threat in hearts but it cost him nothing to try just in case West made an error! An extra overtrick when playing pairs can be extraordinarily valuable.
The spades of course only threaten to be worth 4 tricks because declarer has ♠Q. Can West know that? Yes – by counting points. As soon as she sees dummy West should do that exercise. She has 13, dummy has 10, declarer has advertised 15-18. That’s 38-41 which leaves at most 2 points for partner. Therefore, when partner produces ♦Q he can’t possibly have anything else and ♠Q must be with declarer.
Julian Foster (many times NSW representative) ♣♦♥♠