Today’s hand is again taken from the SBC Stroke Awareness session held on Wed 9 Sept.
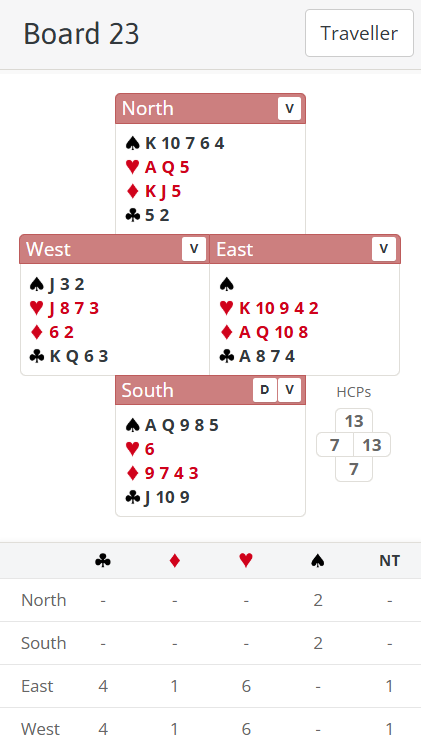
The auction will almost certainly start Pass Pass 1♠. East will probably bid 2♥ – it could be very wrong but he surely has to do something with a void spade. Double is his other choice but that risks losing a 5-3 heart fit.
South, knowing of a 10 card fit, will likely now jump straight to 4♠. That shouldn’t make but is, on paper at least, a good save over the heart game East West can make. It’s hard for East West to bid on in hearts now . Surprisingly perhaps West is closest to doing so. He has 4 card heart support and, after the jump to 4♠, he knows his partner can surely have at most 1 spade since he is looking at 3 himself. He also has club cards that might be useful. So even though he has a balanced 7 count, in the context of the bidding he might well consider 5♥. East on the other hand would be taking a big risk to bid again without knowing of any fit.
Against 4♠, East will usually lead a heart. Even though that runs to ♥AQ, it shouldn’t actually cost. Declarer should only make 5 trumps, ♥A and 2 heart ruffs in South (or ♥AQ and 1 ruff). But several pairs did make it – some after the ♦A start. But even that isn’t fatal as long as East doesn’t play a 2nd diamond.
A diamond lead from an ♦AQ10 holding is about the last thing I would consider on this hand – it has a huge risk of giving up a trick. I wouldn’t lead either minor suit ace into thin air but if you are going to pick one then ♣A is better. At least that way you may find out if partner has ♣K. If he does you have not ruined the defence’s diamond holding so you can perhaps cross to ♣K to get a diamond through. If he doesn’t have ♣K he is more likely to have ♦K so you can at least now cash your diamonds. ♣A is only likely to cost in the exact case where partner has ♦K and ♣QJ (where it may have been necessary for him to get in with ♦K to lead ♣Q through declarer’s ♣K).
On a heart lead declarer should win, draw trumps and eliminate hearts by ruffing ♥5 in dummy. This costs him nothing but means when he loses a trick the defence can no longer lead hearts or they will be giving a trick away with a ruff and discard. That increases the chance they may lead a minor and help him.
After a heart lead best defence still defeats 4♠ by 2 tricks though. East scores 3 diamonds and the defenders also take 2 clubs. But to do that East needs to be patient and not cash any of his diamonds. Instead he needs to just wait for them to be led up to. He also may need to underlead his ♣A to get partner in for a diamond through. To do that he needs to get some help from partner.
This can be done when declarer draws trumps. Once declarer wins ♥Q at trick 1, East already knows West only has ♥J. He can discard something himself on the trumps to signal diamonds (or perhaps, if playing low encourage, it may be clearer to discourage clubs if he thinks ♦8 might not be clear to partner). But West can also signal. Once East discards on a trump, all 3 of West’s spades become useless for taking any tricks. But the order he plays them can send a signal. Playing 2,3,J (i.e. lowest first) should show interest in the lowest relevant suit (clubs), playing highest first should show interest in the highest relevant suit (diamonds). Both defenders know there is no future for them in hearts so that suit can be removed from consideration. A more neutral order (3,2,J for example) might indicate no preference. Of course this requires partner to be awake to notice and not just think West is simply following with his lowest card each time! Such signals are very common amongst top level defenders. That signal helps East when he wins the first diamond. It should warn him that his partner prefers clubs to diamonds – hence he should probably switch to ♣A and lead another.
As it happens on this hand East West do better to bid on in hearts. They can in fact make 6♥! But the play is pretty delicate. Can you see how they can make 12 tricks? See advanced section.
Key points to note
It’s usually right to show a 5 card major by overcalling rather than making a takeout double – you tend to miss 5-3 fits if you double since partner will almost never bid a 3 card suit.
Jumping straight to game with a shortage and a known 10 card fit puts enormous pressure on the opponents.
Avoid leading aces into thin air. Particularly from AQ holdings. It’s far too likely to cost a trick.
When defending, if declarer draws trumps you can use the order you play your little trumps to give a suit preference signal to partner.
Be careful with entries – on some hands you need to project a fair way ahead to spot a problem. You may find you actually need to play suits in a different order.
Watch the spot cards carefully when playing a suit. Sometimes you need to unblock middle cards so you can build a later entry in the hand you want it.
More advanced
They’ll never bid it of course but how do East West make 6♥? Let’s assume a spade lead. Obviously trumps need to be drawn so the starting point is cross to ♣K and run ♥J. North probably wins ♥A and plays another spade. Ruff, cross to ♣Q. Now it might seem natural to finesse again in trumps. But think ahead to what will happen if you do that. Drawing trumps will use all of East’s trumps (3 to draw North’s trumps and 2 have already been used to ruff spades). That still leaves a spade loser in West to do something with and it can only be discarded on a diamond. But at this point you are in the East hand.
Now – how careful were you when you crossed to ♣K and ♣Q?! Did you play ♣8 and ♣7 and preserve that precious ♣4?! If you have done that you can at least now play ♣A and get back to West by playing ♣4 to ♣6. Now you can finesse a diamond. But that’s still not good enough. You can lead up to the ♦10 or ♦Q, then ♦A and ruff one in West. Thanks to the lucky ♦KJx in North that sets up East’s 4th diamond. But you can no longer reach it!
So let’s go back to when we are in dummy a 2nd time with ♣Q. At this point you actually need to defer playing trumps and lead a diamond through North instead and take a finesse. Then cash ♦A and ruff a diamond in West (fortunately setting up the 4th diamond for East). NOW lead a trump to finesse. After drawing the last trump you are in the East hand and can cash that winning 4th diamond to discard the spade loser.
Another variation is to start with ♥8 from dummy at trick 3 and if North ducks rather than winning ♥A you can now lead another heart. This time he wins ♥A and might now exit ♥Q to take out 2 more of your trumps. But the difference now is you still have ♣Q so you have an extra entry to the West hand. Can you use that? As long you’ve been careful in clubs, you might think you can – i.e. it will give you an improved chance in diamonds by allowing you to take two finesses. You can play ♣7 to ♣Q, finesse ♦10, ♣A, then ♣4 to ♣6 to be able to finesse a 2nd time in diamonds. That also lets you discard a losing spade. This line works whenever North has ♦KJ and doesn’t require him to have specifically ♦KJx. So perhaps this allows you to make if North had ♦KJxx? No in fact it would not! There’s a flaw in the logic here. Before reading on, can you see what it is?
Count North’s shape! He opened 1♠ so has at least 5 of those. He has shown up with 3 hearts. If he has ♦KJxx as well then his shape must be 5341. Which in turn means clubs are 4-1 and our fancy unblocking plays in clubs are useless because we have a club loser anyway! So we are in fact still reduced to the lucky diamond layout that actually exists.
In general, however, it’s well worth remembering suits like this club suit. They come up quite a lot and thinking ahead to manage the pips to ensure a later entry in the right place is the hallmark of a strong player versus a weaker player!
Julian Foster (many times NSW representative) ♣♦♥♠