The term “memory squeeze” is sometimes used when declarer runs off a long trump suit forcing the defenders to make lots of discards and work out what loser(s) declarer has left in their hand – i.e. what suit to keep. Even though they often have the information from how the earlier play went sometimes people simply forget and find themselves having a horrible guess late in the hand.
Today’s hand taken from the Gerda Stern Mixed Pairs event at the Spring Nationals is an example. This event was matchpoint scoring but also Swiss – the total matchpoint percentage each match was converted to a VP score out of 20. Because of the matchpoint scoring, making one extra trick can be worth a huge amount.
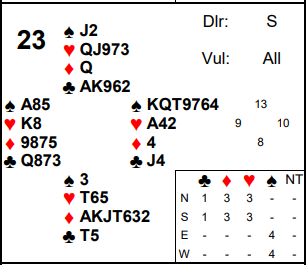
First the bidding. South opened 3♦ which went Pass Pass to East who closed proceedings with 4♠. This seems pretty reasonable all round and 4♠ was a very common contract. Most of the time it made 10 tricks losing one diamond and two clubs. However watch what happened at one table.
After two rounds of diamonds, declarer ruffed, played ♠K, ♠A to draw trumps. She then led a low club. North won ♣K on which declarer deceptively played ♣J. North exited a heart which declarer won in dummy with ♥K, played ♥A and ruffed a heart in dummy. She then ruffed a diamond back to her hand and played out all her remaining trumps (her only other card being ♣4). At trick 12 North found herself hving to discard from ♣A and ♥J not sure whether declarer’s last card was a club or a heart. Eventually she got it wrong and discarded ♣A so dummy’s ♣Q scored trick 13 for East West +650 and a huge matchpoint score on a hand where nearly everyone else scored 620.
There are several reasons why North could, and should, have got this right. But it’s a scenario you regularly see at bridge. How can the defenders get this sort of problem right more often? These are some of the things to think about – some easier than others of course!
1. Remember what suit(s) declarer has already shown out of.
2. Defend differently earlier so as not to be in this position.
3. Watch signals from partner.
4. Think about how declarer has played the hand.
5. Count the shape.
In this case it’s number 4 that’s the biggest clue. What has declarer done? She has drawn 2 rounds of trumps and ruffed a heart in dummy. But she has lots of trumps so surely if she had started with a 4th heart she would have tried to ruff that in dummy as well? The fact she hasn’t done that makes it almost certain she had a club left not a heart.
Some of the other techniques can also be used on this hand though. See advanced section for more – and also on how declarer played the hand well to create the problem in the first place.
Key points to note
At matchpoints making one extra trick can be worth a fortune. So it’s often worth just running a long suit to put the defence under pressure to discard the right things.
There are several ways to work out what declarer might have left. Sometimes you can count the shape. But easier is often just to think about how declarer has played the hand and realise they’d have done something different if they had a different card left.
When defending try not to get left in a position where you might have to guess later what declarer has left.
When declaring you can sometimes play a hand to hide cards in your own hand so it’s harder for the defenders to work out what you might have left (e.g. don’t exhaust yourself of a suit because when you ruff it the defenders then immediately know you have none left).
More advanced
It’s perhaps worth going through all 5 items in the earlier list.
1 (remembering what suits declarer has shown out of) isn’t much help – we’ve seen declarer ruff a diamond but that’s all.
2 (defend differently earlier) is possible. After winning ♣K, North could have tried ♣A. Now she’d know for sure whether East had any more! (If the ♣A does get ruffed and the ♣Q gets set up that doesn’t really matter because all declarer can discard on that is a heart – which she could ruff in dummy anyway).
3 (signal from partner) isn’t that useful here. South should certainly throw all his clubs and hearts away to help the count (see item 5) but he doesn’t really have anything he can signal.
4 (how declarer plays the hand) is the easiest way to get this hand right – and that’s often the case. Just imagine the hand you are giving declarer if they had one suit left and then think about how you’d have played the hand. Often that will tell you declarer would have taken a different line. (Of course that inference is only available against reasonable players). Here if declarer had a heart left she would would have started with 7411. On which declarer would surely have not drawn 2 rounds of trumps, she’d only draw 1 and then seek to ruff both her heart losers in dummy.
5 (counting the shape) can be done here and is a good general exercise for serious players to do on every hand whether they are defending or declaring. It’s hard work to start with but, like everything, it gets easier with practice. As soon as anyone except dummy shows out on a suit, a count of it is available. I usually try to count by the number of rounds played. So 4, 8, etc – until someone shows out. Then you know how many that player started with and can add that to yours and dummy’s and subtract from 13 to find out how many the 4th player had. Let’s work through each suit here:
DIAMONDS. At trick 2, North discards on a diamond and declarer ruffs. South has seen all 13 diamonds now and knows they are 7411. North has seen declarer ruff so she knows declarer started with 1. Add that to her 1 and dummy’s 4 to get 6. That leaves 7 for partner. Declarer has seen North discard so she too can work out South started with 7.
TRUMPS. 2 rounds have been played and South showed out on the 2nd. That tells North that South began with 1 spade. Her 2 and dummy’s 3 make 6 again leaving 7 for declarer.
HEARTS. If North is watching carefully she has actually seen all 13! Declarer has played 3 rounds, and South has followed to all 3. That’s 6 plus 2 in dummy plus the 5 she started with. Alternatively she can count 2 full rounds is 8, then 3 on the 3rd round ruffed in dummy. That’s 11 plus the 2 more she still has. So that should tell her Declarer can’t have a heart left.
CLUBS. All North has seen is 1 round where East and South followed. She can see 9 between her hand and dummy but doesn’t immediately know where the other 2 are. But the full count of the other suits shows declarer is 731x and South is 137x. So x=2 in both cases.
Finally notice that declarer played the hand cleverly. She did not take her heart ruff before leading a club from dummy. Do you see the difference that makes? If she had taken the heart ruff that would have left dummy with no trumps. Therefore at the point North won ♣K she could have safely tried another club (now there’s no entry to dummy so setting up ♣Q wouldn’t matter). Or North could have safely exited a heart. But now when declarer ruffs it’s known she has no more hearts left. On the play as it went when North exited a heart no one discarded so she didn’t immediately know how many hearts declarer started with.
Very often a strong declarer will try to play a hand like this just to make it less obvious to the defence what is going on. The vast majority of the time it will make no difference but occasionally it pays off! After all bridge is a game of imperfect information played by imperfect humans. We all forget things and defence is hard – so giving the defence a helping hand to make a mistake is often worthwhile!
Julian Foster (many times NSW representative) ♣♦♥♠