It’s always important to count your tricks as well as your losers. Today’s hand is an example where doing that should point you to the best chance of making the contract – although good defence can always beat it.
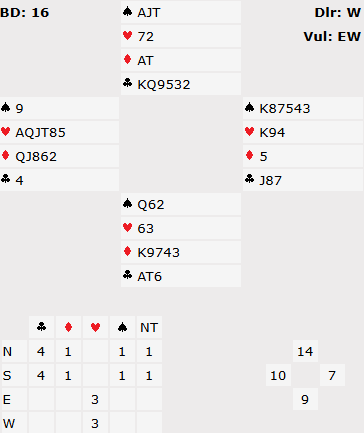
Despite only 10 high card points, the West hand is a clear 1♥ opening as it has such strong shape. At our table the bidding continued 2♣ X 3♣ (in our system the 1♥ opening could have been a 4 card suit – that’s why East didn’t immediately raise – playing 5 card majors the more likely auction is 1♥ 2♣ 2♥ 3♣ 4♥).
Over 3♣ West bid 3♦, North competed further with 4♣ which ran back to West who tried again with 4♦ (partner’s original double had implied spades and diamonds). Now East of course corrected to 4♥ which became the final contract.
The defence started naturally enough with 2 rounds of clubs, the 2nd of which declarer ruffed. Now what? A count of losers is good news – just 1 spade loser, 1 diamond loser and 1 club loser. But of course it’s not as easy as that. 3 losers does not mean 10 winners – you need to count your tricks as well. So where are 10 tricks going to come from? You have 6 obvious trump tricks, it’s pretty likely North has ♠A for his 2♣ overcall so the ♠K is likely to be a 7th trick but you still need 3 more from somewhere.
In suit contracts extra tricks can typically come in two ways – ruff losers in dummy, or set up a long suit in dummy to discard losers on. Let’s look at each in turn.
Ruffing diamonds in dummy would work if the defence didn’t ever touch trumps. Once you score a low diamond ruff in dummy the rest of the ruffs are high trumps. So you would make 6 trumps in hand, ♠K and 3 diamond ruffs in dummy.
But is that likely to happen? If the defence play just 1 round of trumps you can only ruff 2 diamonds in dummy. Unless one of the defenders luckily holds ♦AKx, even on the best break (4-3) that still means you will lose 2 diamonds tricks. Together with 2 black suit losers. What’s more they will have 2 chances to play a trump – once when North wins ♠A, and again when one of them wins a diamond. That should tell you that ruffing diamonds in dummy is unlikely to bring you 10 tricks.
So what about the other option. Can we set the spades up in dummy? It takes a favourable layout but it can be done. Lead towards ♠K. Assume North takes ♠A. Now if you can reach dummy twice more, you can play ♠K and ruff a spade in hand. With the suit breaking 3-3 you can get back to dummy and run the remaining spades. With trumps breaking 2-2 even an initial trump lead won’t do. Win in hand and lead a spade. A 2nd trump is won in dummy, ♠K, ♠ ruff and a 3rd trump back to dummy draws the trumps and lets you run the spade winners. But Deep Finesse shows 4♥ can be beaten. With such favourable breaks in both majors, can you see what the defence have to do? See Advanced section.
Hint – if declarer is threatening to set up a long suit in dummy, the best defence is usually to attack the entries to that long suit
Key points to note
Shape is far more important than points!
When declaring you need to count winners as well as losers. When you don’t have enough – you need to consider where more tricks could come from.
Setting a long suit up in dummy is almost always a good idea – provided you can get back to it later.
Defenders may need to attack entries to dummy to stop a long suit being set up.
More advanced
To beat 4♥ the defence have to prevent the spades being set up as winners. That certainly means attacking the later trump entries to the spades. But there’s more to it than that. We saw earlier that an initial trump lead isn’t good enough. Declarer needs to lead a spade towards dummy. So the defence also need to try and prevent that. Assuming South has raised clubs in the auction, North knows only one club is cashing. So what about then playing ♦A and a 2nd diamond? That is attacking the trump entries to dummy as it forces dummy to ruff (otherwise you immediately have 4 losers). But it’s still no good on this layout. Declarer can ruff a club to hand and play a ♠ up. North wins ♠A and can’t force another trump from dummy because he doesn’t have a third diamond. So once again declarer can cross to a trump himself, play ♠K, ruff a spade and cross back to dummy’s last trump for the spade winners.
So the key to the successful defence is first to lock declarer in dummy because he can’t lead spades from there. That actually requires ♦A and another diamond at tricks 1 and 2. Declarer is now stuck. He can’t lead a spade away from the ♠K. If he crosses to hand with a trump to lread a spade he’s used one of the later trump entries himself and anything else allows the defence to now switch to a trump before a spade has been led towards dummy. Once dummy has only 1 more trump entry the spade suit is dead. Declarer can set the spades up but there’s no point because he can’t get back there to enjoy them. Note that the defence do still need to play a trump at some point – otherwise declarer can revert to the line of ruffing 3 diamonds in dummy. But they need to have forced a trump out of dummy via a diamond ruff first.
In the real world starting with ♦A and another is an almost impossible defence to find of course since North has a totally natural club lead. So East West might well score a fortunate +620 despite only holding 17 high card points between them. Another demonstration of how shape is so much more valuable than points! With the defence so hard, perhaps North South should take out insurance and bid 5♣? That makes 10 tricks losing just 2 hearts and ♠K. But it’s not so easy since both the North and South hands look like they contain defensive tricks. On another day they could easily find themselves scoring -300 in 5♣x when 4♥ was easy to defeat all along. No one ever said bridge was an easy game!
One final point worth mentioning. If the auction does begin 1♥ 2♣ 2♥ 3♣ then West should just immediately bid 4♥. You know you have a heart fit and a lot of shape and want to try game. So why help the opponents by telling them you have a diamond suit on the side?
Julian Foster (many times NSW representative) ♣♦♥♠