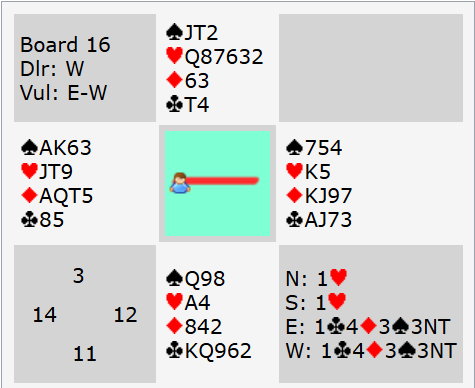
Sometimes your contract looks completely hopeless. At that point you have to consider is there any chance left? Today’s hand was an example where there was – but it’s not that easy to see. It’s also so obscure that it’s questionable whether it’s even worth trying for! Would you have made 3NT by East or West after the defence annoyingly find a heart lead?
The auction at our table was a simple 1NT (12-14) Pass 3NT which put North on lead. Before we get to the real point of the hand, what would you lead? After an auction like this, it’s almost always right to lead a major. Dummy almost certainly doesn’t have a major (otherwise he would have surely used Stayman). Declarer may or may not have a major but if you can find a major he also doesn’t have then you will have most likely got the defence off to the best start.
Another principle when leading is you want to set up a suit in a hand that will have later entries to it. Rightly or wrongly I decided that, with so few points, the odds of me being able to set up my hearts and get back in to cash them were very low. Therefore I started with ♠J hoping to find partner with spades. Today that was completely wrong. It allowed declarer to set up 3 spades (with ours breaking 3-3) to go with 4 diamonds, 1 club and 1 heart.
At the other table after the same auction, North made perhaps the more normal lead of a heart. Declarer chose to try ♥K which lost and the defence played 2 more rounds with South pitching an encouraging club on the 3rd round of hearts. Was that the right play by either declarer or by South? See advanced section for more.
Had declarer played a low heart at trick 1, the position ends up much the same because South wins ♥A and plays another to leave North with the winning hearts. The only difference in that case is declarer doesn’t know hearts are 6-2 since all he’s seen is both defenders play two rounds and South hasn’t made a discard. Either way as declarer it looks like you have 2 spades, 1 heart, 4 diamonds and 1 club which is only 8. Meanwhile North is sitting with 2 or 3 winning hearts. Can you see any remaining chance to make your contract?
Here’s a clue. It’s actually easier to play the hand when you have seen hearts split 6-2. Now you know you cannot afford to lose a trick to North but you can afford to lose one to South. Does that help? See advanced section for what you have to do.
Lastly it’s worth considering what might happen if the pair are playing a strong no-trump opening. Now West will open 1♦ and East might raise or bid no-trumps himself. It’s certainly more likely that East will end up as declarer. This turns out to be much better. Now South is almost never going to lead ♥A and another. He will probably try a low club which runs to declarer’s ♣J. Now declarer just needs one heart trick so he might well cross to a diamond and run ♥J to make easily.
Key points to note
Against a 1NT-3NT auction it’s usually right to lead a major (dummy almost certainly won’t have a major or he’d have bid a transfer or used stayman).
If one hand is the “safe” hand that you can afford to lose the lead to then try to lead through them. Sometimes if they play an honour you can duck a trick to them to keep the danger hand off lead.
When knocking out declarer’s last stopper in a suit in no-trumps, the card you exit with should be a suit preference signal to partner indicating where you think your most likely entry is.
If your partner has winners but no clear entry in no-trumps, a discard of a high card might create an entry for partner.
More advanced
Once you know South is the safe hand, there is only one lie of the cards that will work. The only hope for an extra trick is in spades (♣KQ with South might have been a remote chance originally but that would require North to have 5 clubs – surely impossible now he has also shown 6 hearts!) That means spades have to be 3-3 but there’s more to it than that. If you play ♠AK and another, South can throw his ♠Q under the ♠A or ♠K and now North will have an entry with ♠J for his hearts. So you have to duck a spade but do so in a way that North cannot gain the lead. There is a way of doing that. You need to cross to dummy with a diamond and lead a spade. Assuming South plays low you win ♠A, now cross back with another diamond and lead another spade. If South plays the ♠Q on either of the first two rounds you DUCK it which keeps North off lead. If South plays low on the 2nd round you win ♠K and now play a 3rd round losing to South’s ♠Q. He has no more hearts so you scrape home with 3 spades, 1 heart, 4 diamonds and 1 club. That is of course lucky since North might have had ♠Q all along (you also need to retain a diamond entry to your hand to reach the 13th spade so you can’t afford to cash all 4 diamonds either).
After the play described (heart to ♥K and ♥A, heart to ♥Q and a 3rd round of hearts) there’s another opportunity for South to shine. He can DISCARD ♠Q! Now he can’t be thrown in with it and North will eventually have a certain entry to his heart winners. What’s more he should find this because North can give a clue. When he plays the 3rd round of hearts to knock out declarer’s last heart card he has a free choice of which heart to play. So he should exit with ♥8 (his highest remaining), a suit preference card indicating he prefers spades.
But Deep Finesse says 3NT can always be made. So what does declarer have to do to counter that brilliant defence? He has to NOT play ♥K at trick 1! Now the best the defence can do is play 2 round of hearts which means they do set their suit up but only 2 rounds have been played so there is no opportunity for South to make a discard. Then the play of leading spades through South twice as described above works.
The play is of course very risky. It’s an incredibly low percentage chance to make 3NT in isolation – it requires hearts to be 6-2 not 5-3 and it requires spades 3-3 with South having ♠Q. For the mathematicians the chance of a 6-2 split is only about 17%. Then you need spades 3-3 (36%) and South to have the ♠Q (50%). So your overall chance is roughly 17% x 36% x 50% = 3%!! Of course it improves if the play has revealed hearts actually are 6-2. But you still need spades 3-3 with the ♠Q in one hand which is about 18%.
When it doesn’t work you are likely to be at least 2 off and maybe more if spades don’t break either. So when playing matchpoints there is a definite case for cutting your losses and cashing 8 tricks for -100. Even at imps you are risking -200 or -300 almost all the time for a very small chance of +600 so it’s dubious whether it’s worth playing for. That said, it’s always very satisfying if you do spot a fortunate lie of the cards that will let you make, you play for it, and it does come off! Regardless, it is worth noting the technique of leading through a defender in the hope of being able to duck should they be forced to play an honour.
Julian Foster (many times NSW representative) ♣♦♥♠