A theme in bridge is to “cover an honour with an honour” – the idea being to promote lower value cards in either your, or your partner’s, hand into winners. That’s good advice.
But, like all bridge “rules”, it’s not as simple as that. In particular if there are TOUCHING honours visible in dummy it’s frequently wrong to cover the first of them. You are better to let the first one win and then cover the second one. Let’s see why.
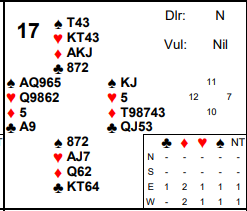
The bidding on today’s hand (from the recent Victorian Festival of Bridge played in Melbourne) was 1NT (11-14) P P 2♣ (both majors), P 2♦ P 2♠, end. 2♦ was asking partner to pick his better major (preferring to play a 5-1 heart contract than a 4-2 spade contract).
North led ♦A. After seeing dummy it’s pretty clear to switch to a trump to try and prevent a heart ruff. Declarer won ♠K and led a heart from dummy. South won ♥A and continued trumps. Winning in dummy with ♠J, declarer next led ♣Q. South, looking at ♣K10xx and thinking about promoting the ♣10 covered. Declarer of course won ♣A. But this was an error by South. Why? Let’s see what happened later.
Declarer drew the last trumps with ♠A and led a low heart which ran to South’s ♥7. She continued a diamond ruffed by declarer who played yet another heart this time won by South’s ♥J. Now the problem became evident. The defence couldn’t play another diamond to force out declarer’s last trump because, with their diamonds breaking 3-3, that would set up all the remaining diamonds in dummy as winners. And the ♣J was an entry to them. So South instead exited a low club which let declarer score his ♣9 (exiting ♣10 of course would have been better – that squashes declarer’s ♣9 and North’s ♣7 then stops the suit). Declarer played a 4th heart to North but had now set up his 5th heart and still had a trump too.
The net result was 8 tricks. All this stems from South originally covering ♣Q. That turned the ♣J into a later entry to dummy which meant the defence couldn’t safely play 2 more rounds of diamonds.
Letting the ♣Q hold would mean exactly the same number of club tricks for declarer (2) but now there’s no later entry to dummy as South retains ♣K10 over the ♣J. What’s more the defence now have another safe exit to declarer’s now singleton ♣A.
This is one example of a general principle that it’s usually wrong to cover the first of touching honours. Instead wait and cover the next. In this case the problem was it gave declarer a later entry. But there are other positions where it costs to cover immediately as well – see Advanced section for more.
Of course it’s not always that easy in practice. It’s fine when you can see the touching honours in dummy. Not so easy when they are in declarer’s hand and you can’t see them. Now the defence may not be able to tell if the honour being led is on its own or has another one below it. So they will tend to follow the default “rule” and cover.
Key points to note
Generally don’t cover the first of touching honours. Wait and cover the 2nd.
Covering touching honours is frequently wrong because:
a) it can give declarer a later entry to that hand he may not otherwise have had;
b) it can allow declarer to pick up the suit for no loser;
c) it can give away the position of the higher honour which declarer might otherwise guess wrong later.
More advanced
So when else does covering touching honours cost? Sometimes it allows declarer to pick up the whole suit. For example Dummy holds QJ9x and declarer Axx. Suppose you hold Kxx sitting over dummy (so partner holds 10xx sitting under dummy). If you cover the Q immediately now declarer loses no tricks because he can finesse the 9 on round 2. Conversely, if the defence let the Q hold now declarer can’t play the suit again without promoting a trick for the defence (covering J now promotes partner’s 10).
Another scenario with touching honours actually came up in the last match of the same event at the Victorian Festival of Bridge. This time the spade position was ♠A982 in hand opposite ♠QJ63 in dummy. Your right hand opponent had pre-empted in clubs and you ended up playing in hearts. Left hand opponent leads ♠4, you play ♠Q from dummy and RHO follows with ♠5. After drawing trumps how should declarer continue? At the table he played ♠A and got a nasty surprise when LHO showed out leaving him to lose two spade tricks to the ♠K10. RHO had started with ♠K1075 and had (correctly) not covered ♠Q at trick 1. Had he covered it would have made it easy for declarer who wins ♠A and later just loses one spade trick to ♠10. So this is another position where it’s wrong to cover touching honours – it may solve a problem for declarer.
Yes on this hand declarer was a bit unlucky as it’s surely far more likely LHO has led from spade length including the ♠K and unlikely RHO has 4 spades when he pre-empted (he was actually 4117 shape). But he had plenty of entries to dummy and he also held ♠9 so it wouldn’t have cost to continue a low spade towards ♠J. When the position is as expected (i.e. LHO has led from ♠Kxxx) declarer still scores 3 spade tricks. But that also caters for the actual layout – when LHO shows out the ♠J loses to ♠K but now declarer remains with ♠A9 and the suit can be picked up with a marked finesse against RHO’s remaining ♠10x.
When might it be right to cover touching honours? Sometimes when you have a short honour holding like Kx. Now, if you don’t cover, declarer might play a low one on the next round and your honour will be wasted as it hits thin air. Although there are times, even with this holding, when it might still be better not to cover! For example suppose declarer has QJ9x opposite Axxx. If he leads Q and RHO ducks then on the 2nd round declarer has to guess whether RHO began with Kx (in which case he should now lead a low one) or Kxx (in which case he should now lead J to pin the 10 from LHO’s original 10x). Conversely if RHO covers then declarer has little choice but to try the 9 on the next round (he only loses to precisely K10 doubleton with RHO).
Julian Foster (many times NSW representative) ♣♦♥♠