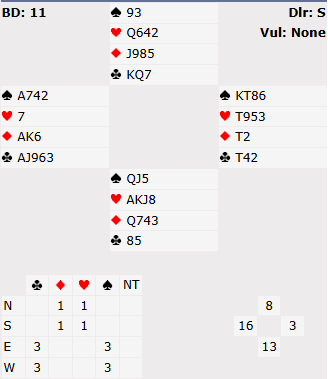
Today’s hand is taken from the SBC Fixed Income Solutions Christmas in Winter pairs congress held yesterday on 1 August 2026.
There was a wide variety of results on board 11 from the 2nd round: https://nsw.bridgeaustralia.org/showtraveller.asp?id=679189&board=11&pair=1
In many cases North South played in a red suit going off. Few East West pairs found their spade fit where they could make 9 tricks. Let’s see how they might have done so.
Playing Standard most Souths will open 1♦ and the immediate question is what West should do? It’s a tricky decision. With 16 points he’d like to do something but there are problems with every bid he might consider:
- Double isn’t really viable since partner is going to respond in hearts a massive proportion of the time – and then what will you do?
- A 2♣ overcall is certainly possible but it’s not a great 5 card suit and it risks missing spades.
- 1NT would show the values (typically 15-18) but whenever I do that, partner invariably transfers to his 5 card heart suit and passes you in a stupid 2♥ on a 5-1 fit! Also this hand looks more suitable for a suit contract (see Advanced section for more discussion on this).
The option I prefer is actually Pass! It’s very rare for the hand to be passed out at the 1 level and it could well be easier to compete with this hand later. Look what happens if you do pass. North will respond 1♥ which South will no doubt raise to 2♥. At this point the West hand has a perfect action available – double. This double is best played as takeout – but this time just showing both black suits. You couldn’t double the first time as you didn’t have hearts but now the opponents have bid and raised those. Double now will almost always show exactly 4 spades and 4+ clubs (with 5 spades you would have overcalled 1♠ last time). There are occasions when you pass over a bid and then double on the next round that it’s penalty – but that’s not useful here. See Advanced section for more.
If West does double 2♥, North will probably pass and East has an easy 2♠ bid which finds their fit. North South might choose to push onto 3♥ but it’s not obvious for either of them with balanced hands (and it risks being doubled for -300 anyway). Playing a double on the 2nd round like this as takeout (showing the remaining 2 suits) shows how you can still successfully compete, despite having previously passed.
If West does choose to overcall 2♣ initially that’s probably going to lead to both sides missing their major suit fits! North will probably raise to 2♦ (it’s now risky for him to double because that shows both majors and he’ll be worried South will bid spades). The East hand is so weak it will probably pass but if it does anything it will be a raise to 3♣. If South passes 2♦ then West might come back in with 2♠ but if South raises to 3♦ then it’s too dangerous for West to bid 3♠ and he still can’t double for fear partner will bid hearts.
What about the play? A spade contract by East West should make 9 tricks – losing 1 spade, 2 clubs and 1 heart. South will surely lead a top heart. North might signal clubs (see Advanced section for how) so South might switch to those. But a more challenging defence is a 2nd round of hearts to force West to ruff. Now you have to be more careful. If you try to draw trumps, you will be in danger of losing the 4th round of hearts. Suppose you play ♠AK and then start on clubs. North will win and play a 3rd heart which will remove the last trump from West. Then when North wins another club, the defence can cash the 4th round of hearts. Instead you are better off playing clubs immediately and preserve all the small trumps in the West hand to absorb more heart ruffs.
A heart contract by North South can be held to 7 tricks. The defence can take 2 spades, 2 diamonds and a diamond ruff, plus 1 club. A diamond contract can also be held to 7 tricks – this time with a heart ruff. West leads his singleton heart. Then when he wins ♦K, he needs to get partner in with ♠K to give him the ruff – which is something he might well try as he will be able to see the ♣KQ sitting over him so knows there is no future there.
Finally, I mentioned that if North South push onto 3♥ they risk being doubled for -300. That’s not so likely when playing in teams or butler pairs (it’s very risky to double partscores unless you are pretty sure it’s going off – scoring -530 is a disaster!) But it’s much more likely if you were playing matchpoints pairs – see Advanced section for why.
Key points to note
Sometimes you have quite a decent hand but no suitable bid over an opponent’s opening. Then it can be better to pass – you can still compete on the 2nd round.
If the opponents have bid 2 suits and you now double on the 2nd round, it’s best played as still takeout (now showing the other 2 suits – you couldn’t double initially as you couldn’t stand partner responding in the 2nd suit the opponents have now bid).
In a suit contract, if dummy shows up with a singleton of the suit you’ve led it’s a good idea to play partner’s card as suit preference rather than count or attitude. That helps identify which of the side suits to look for more tricks.
Matchpoint pairs and Imps are extremely different games! A small score difference can have a huge impact at pairs but be irrelevant at imps. That means if the opponents bid over you in pairs, you may need to double to try and score more than your contract would have done. At imps such a double is much riskier.
More advanced
I mentioned the West hand was more suitable for a suit contract. In general hands with aces tend to be better for suit play. Aces give you control and entries – which in turn give you the ability to set up longer suits with ruffs. Hands with softer values (especially queens and jacks) tend to be better for no-trump play. When you set those long cards up, they will still be tricks for you (in a suit contract that will only be possible if you have drawn trumps).
There are certainly auctions where if you pass over an opponent’s bid and then double on the next round it should be penalty and it’s definitely important for established partnerships to discuss what their doubles mean in a lot of sequences! For example if the auction from North South had gone 1♦ – 1♥ – 2♦ what would double by West mean now? Some pairs would say that is penalty – you passed over 1♦ and this auction doesn’t show that North South have a fit (which is very different to the auction 1♦ – 1♥ – 2♥; now North South have announced a fit it’s almost certain East West will have one too).
But I would still play a double of 2♦ as takeout on the same logic as before – the reason you couldn’t double over 1♦ wasn’t because you had a penalty of diamonds, it was because you didn’t have hearts and couldn’t stand partner responding in that suit. That’s no longer the case now the opponents have bid them. This tends to be a lot more common situation than holding a penalty of diamonds. Of course if you do play it as takeout then with a penalty of diamonds you just have to pass again over 2♦ and hope partner can re-open with a takeout double himself.
I mentioned that when defending a spade contract North can signal clubs. How? A very useful agreement for defenders to have against a suit contract is when dummy has a singleton of the suit led, partner’s card should be suit preference rather than count or attitude. Both defenders know they have no more tricks available in the suit led so attitude in that suit isn’t useful. Nor is the count likely to be useful either. They usually need to look elsewhere for tricks so it’s more important to work out where. A low card shows preference for the lower of the other 2 side suits (clubs here) and a high card shows preference for the higher remaining side suit (diamonds here). So on this hand North could play ♥2 at trick 1 to show interest in clubs. Of course sometimes you have no preference at all – so it’s useful to play that a middle card expresses that (or a desire to continue the initial suit to force dummy to ruff).
Finally, why might East West be more likely to double 3♥ at pairs than teams? It’s down to the scoring method and the vulnerability. At pairs even a 10 point difference in score can make a huge difference because you score points based on how many other pairs you beat, not by how much you beat them. If East West are making 2♠ they will be scoring at least 110 (in fact 140 is available). With West’s strong hand, he would be quite confident that is the case (even opposite partner having nothing except 4 spades there’s still good chances to make 8 tricks). If you defend 3♥ going off, you are likely to score +50 or +100. But that will be very bad if a lot of pairs are scoring 110 or 140 your way.
If you double and change +50 to +100 it won’t make much difference as you are still getting less than the 110 or 140 you had available. But if you change +100 to +300 now you will get a huge board. What’s more you aren’t risking much. If it does make then scoring -530 will obviously be bad – but the point is passing and scoring -140, +50, or +100 would already have been bad. The SIZE of the score at pairs doesn’t actually matter, all that matters is how it compares to what how many other pairs have done. The vulnerability has a big impact on these considerations too. When both sides are not vulnerable, you tend to want to declare. Had North South been vulnerable you’d be happier passing them as you are scoring +100 for each undertrick not +50.
It’s all very different playing events scored by imps. Now there is no difference between +110 and +100 at all. Even +50 and +110 is only 2 imps. Whilst going -530 will be disastrous. This time the size of the score DOES matter!
Julian Foster (many times NSW representative) ♣♦♥♠