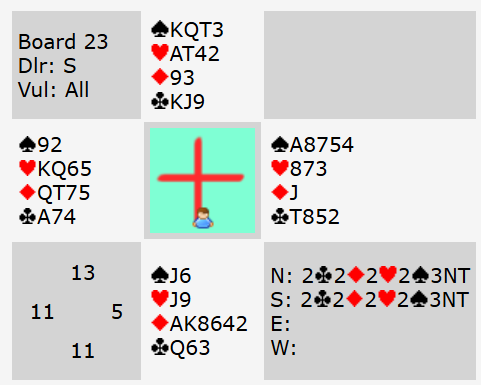
On today’s hand taken from a recent teams congress most North South pairs played 3NT. But only 3 out of 10 made it. How would you have fared?
The auction is likely to have been the same at most tables. 1♦ P 1♥ P 2♦ P 3NT. Once South doesn’t rebid spades, North knows they don’t have a fit in either major so with his good black suit stoppers and 13 points he has an easy 3NT bid.
Despite the 11 points and two dubious value Jx holdings, I’d always open 1♦ as South – primarily because it’s a good suit which you want partner to lead, but also because it’s easier to bid when your side starts the auction than if you have to overcall. But if neither South nor West choose to open, the auction is likely to either be 1NT – 3NT (if playing weak NT) or 1♣ – 1♦ – 1NT – 3NT (if playing strong NT and a checkback method where North’s 1NT rebid can include majors). Pretty much all routes lead to North playing 3NT. Most Easts led a low spade. How would you go about it?
As usual we should start by counting tricks and thinking about where more might come from. The spade lead means we could easily set up 3 tricks there. We have 1 heart immediately but might be able to make 2 if the honours are split (run ♥J expecting it to lose, then run ♥9). We can set up 2 club tricks but no more. The obvious best chance for more tricks is the diamond suit where we could make 5 tricks if they break 3-2. That would be more than enough. Suppose we play ♠6 from dummy and win in hand. The first catch on the hand is how to play the diamond suit. Playing ♦AK and another won’t work even if the suit did break – we could set the winners up but how would we get to them? ♣A sits over ♣Q so we have no entry to the South hand. The solution is we need to duck the 1st round of diamonds! Now if they break 3-2, we can run the rest of the suit.
So at the table North lead a low diamond. After East played ♦J, declarer ducked. West overtook with ♦Q in order to play a spade back (which is fair enough – West can’t see how good declarer’s spades are and she knows diamonds are not behaving for declarer). East gave this a lot of thought but eventually won ♠A and now, knowing his spades could never be set up, switched to clubs. West won ♣A and played another. Most declarers probably now tried the diamonds and were disappointed when they broke 4-1. This meant the defence ended up scoring 2 diamonds and a trick in each of the other suits. Unlucky? Not at all! Can you see what declarer should have done instead? See advanced section.
Key points to note
When setting up long suits in no-trumps, you need an entry to them. Sometimes the only way to do that is duck an early round of the suit.
Always count your tricks and your losers. Once you have one chance for your contract, do you have to rely on that? If it fails, will you have too many losers?
Try and avoid putting all your eggs in one basket. Maybe there’s time to try another option as well just in case your main chance doesn’t work?
More advanced
The main chance to make 3NT on the hand is for diamonds to break 3-2. But it’s important to also consider what might happen if they don’t. There was no rush to check that at the point West played a 2nd club. If diamonds were breaking, they still would be later in the hand! Declarer still had stoppers in all the other suits.
So better play is to win in dummy with ♣Q and run ♥J. On this hand it’s easy as West has both heart honours but if ♥J had lost, you have still now set up an extra chance. East will probably exit another club. Now when you cross to ♦A if diamonds were 3-2 you are obviously fine. But when you find out about the bad break now you have put yourself in the position where you can try your 2nd chance of a 2nd heart finesse – play ♥9 to ♥10. That ends up scoring 9 tricks via 3 spades, 2 hearts, 2 diamonds and 2 clubs.
The key to the hand is realising that relying solely on diamonds is putting all your eggs in one basket and when it fails, you have too many losers.
The spade lead from East seems completely normal and will be a winner a lot of the time. But on this particular hand the most challenging defence is actually for East to lead a club. After two rounds of clubs now it’s no good for declarer to duck a diamond because the defence plays a 3rd club to set up East’s 4 club while he still has ♠A entry to it. Now they will score 2 clubs and a trick in each other suit. Declarer has to immediately play on spades to knock East’s ♠A out before that 13th club is set up. Then he again needs to play on hearts and not diamonds to make 9 tricks.
This hand is harder playing matchpoint pairs where the overtricks matter much more. Now you might well play for diamonds to behave as that could easily lead to 10 tricks (in theory you have 3 spades, 1 heart, 5 diamonds and 2 clubs for 11 tricks but the defence will score a diamond and two black aces first). Given diamonds will break 3-2 about 68% of the time, playing safe for 9 tricks will lose most of the time. But when playing teams, the priority is to make your game (i.e. 9 tricks) as often as possible. Overtricks are a minor consideration!
Julian Foster (many times NSW representative) ♣♦♥♠