If a 1 level opening bid is followed by 2 passes, the situation is not the same as it is directly over the opening bid. Today’s hand taken from a recent congress looks at why not.
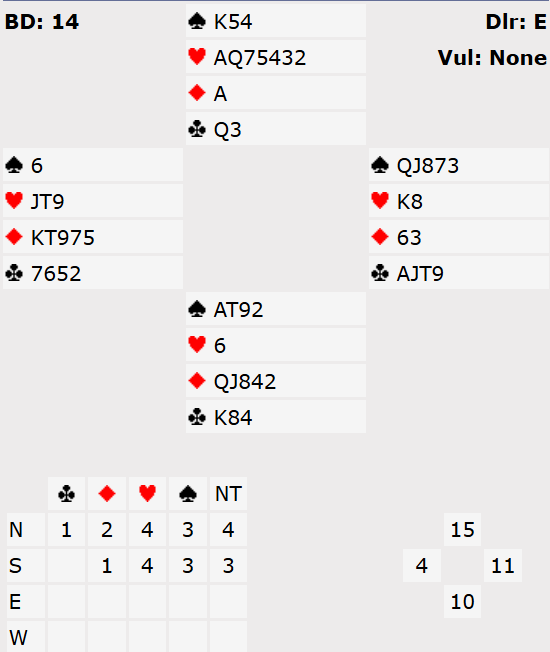
East opened 1♠. South couldn’t really bid over that (a 2♦ overcall is horrible with a poor 5 card diamond suit and only 10 points). 1♠ was passed to North. What would you bid now?
After these sorts of auctions it’s sensible to re-open the bidding with less than you would do if you had been sitting directly over the bid – primarily because partner may have had to pass with quite a reasonable hand (basically any hand that doesn’t have a clear overcall, couldn’t make a takeout double, and isn’t strong enough to overcall 1NT – so potentially up to a balanced 14 point hand). So it’s entirely possible your side could have a contract on – sometimes even a game.
Re-opening in 4th seat is known as making a “protective” bid because it’s protecting a possible contract for your side. You might come back in on as few as 8 or 9 points with a suitable hand. That makes the North hand here too strong for a 2♥ bid. It also highlights another key difference between the situation immediately over an opening bid.
Many pairs play jump overcalls over an opening bid as a weak pre-empt. That is well worthwhile (especially at favourable vulnerability) as it can give a responding hand a difficult problem. But in this position that doesn’t make sense. At this point there is no-one left to pre-empt – except perhaps partner who might have had to pass over the opening bid with quite a reasonable hand. Therefore it’s usual to play a jump overcall in this position as a stronger hand – usually about 12-15 points and a decent 6 card suit. Hence North bid 3♥ at the table.
With a double spade stopper, South now tried 3NT. With a 7th heart and a singleton ♦A, there’s a good case for North to go back to 4♥ but at our table North passed. Can you see a reason why North might have chosen to pass? See advanced section for more.
As an aside, it’s also worth sorting out what ranges your no-trump bids show in protective seat. See advanced section for more discussion on that.
Returning to 3NT, West chose to lead his singleton spade. Although a club or a diamond might have worked better this time, a spade is reasonable. That’s because his hand is so weak that it’s unlikely he will ever be able to get his own diamond suit going – it’s better to try and set up partner’s long suit as his hand will have the entries.
The hand now became a play problem for South. How would you now play 3NT? There are only a total of 15 points missing and East must have nearly all of them for his opening bid. The spade suit is also completely known. As usual you should start by trying to count tricks. You can set up 3 spades, ♥A, ♣K (♣A is surely with East) and potentially 2 diamonds if you manage your entries carefully (you would need to cash ♦A, then cross to hand, then play ♦Q to force out ♦K and you still then need another entry to South to cash ♦J). All that still only comes to 7 tricks. That should tell you that you will have to try and get more tricks from hearts as the only realistic chance to make. That in turn means you want to keep entries in the North hand – so you run the opening spade lead round to hand and win East’s ♠J with ♠A.
In hearts one obvious possibility is to take the heart finesse – there’s room for West to have one card and it might be ♥K. Another is to assume ♥K is offside but play for it to be doubleton and try ♥A and another. I tried the latter and got lucky when ♥K popped up. Now East tried ♣J (basically hoping his partner had ♣K) but that was no good at it ran to dummy’s ♣Q. There are now potentially 11 tricks available – 2 spades, 6 hearts, 1 diamond and 2 clubs if you can lead towards ♣K. But the problem is you can’t easily reach them as South also has to discard on all the hearts! Nevertheless 11 tricks can now be made – see advanced section for what happens.
Key points to note
After a 1 level opening bid is passed round to you, it’s reasonable to “protect” the auction lighter than usual – maybe even as few as 8 or 9 points with a shape suitable hand.
A jump bid in 4th position after 2 passes is not a weak pre-empt – it’s usually played as an intermediate hand of about 12-15 points.
When leading from very weak hands against no-trumps, it’s usually better to try and find partner’s suit – his hand will have more entries than yours.
It’s worth regular partnerships discussing what range various no-trump bids show in 4th seat (that’s 1NT, 2NT, and double following by no-trumps).
Hands are much easier to play when one hand is known to have almost all the points.
More advanced
One reason North might be nervous about going back to 4♥ is his spade holding. Partner has shown a spade stopper and he has ♠Kxx himself. Given East has at least 5 spades, that means West must be very short. There’s a risk that he might be able to get some spade ruffs. It would be very sad to find the defence going ♠A, spade ruff, club to A, second spade ruff! Playing in 3NT avoids that problem.
What about no-trump ranges in 4th seat? This is an area regular partnerships should discuss. A 1NT overcall in direct seat is almost universally played as strong but in protective seat there’s a case for making it weak (12-14) because it’s awkward to re-open those hands otherwise and partner might be sitting there with a balanced 14 point hand himself. But that of course then leads to the question of how you show a strong no-trump hand? Those would have to start with a double and then re-bid no-trumps. Another question is what is 1X P P 2NT? In direct seat it’s most commonly played as “unusual” – typically showing 55+ in the minors and also frequently a weak pre-emptive action. As discussed above the weak pre-emptive action in 4th seat doesn’t really make sense. Therefore many pairs choose to play it as strong 20-22 balanced. So 1NT immediately is about 12-15, double then no-trumps at a minimum level is about 16-19, and 2NT immediately is 20-22. If you do play it as minors, then it should be a strong hand (now a 20-22 balanced hand would have to double and jump rebid in no-trumps).
On the hand here, after running all the hearts the North hand is left with ♠Kx – ♦A ♣x. South’s last cards are probably going to be ♠109 – – ♣Kx. East will likely be down to ♠Qx – – ♣A10. When declarer cashes ♦A what can East do? Discarding a spade means declarer has 2 more spade tricks. Therefore he probably throws ♣10. But now, if declarer has been counting how many spades have been discarded, he can discard a club from his own hand (baring his ♣K) and then lead a club to throw East in with ♣A to force him to lead a spade through the ♠109. This position is known as a “strip-squeeze/endplay” where East is stripped of all his exit cards and then thrown in. Although this is quite an advanced play, it’s much easier to find when East is marked with all the honour cards and you can basically picture exactly what his remaining cards are.
Julian Foster (many times NSW representative) ♣♦♥♠