Today’s board (taken from the Victorian Festival of Bridge currently being held in Melbourne) saw a wide range of scores because both sides had large double fits and could make lots of tricks if the defenders didn’t cash their tricks first. So it’s important for defenders to have some signalling methods to help do this. Let’s have a closer look.
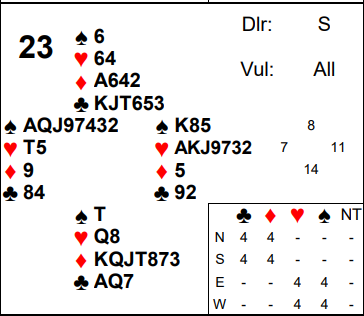
For most pairs the normal start to the auction will be 1♦ 4♠. This puts North to a decision but he is likely to bid with primary diamond support and a decent 6 card club suit. Of course it may depend on whether partner’s 1♦ opening showed at least 4 diamonds to start with – but when someone pre-empts with a long suit, that increases the chances that partner’s own bid was natural. Therefore North will likely bid (see advanced section for a bit more discussion). At our table I bid 5♦ in this position and the auction proceeded 5♠ all pass. At the other table North bid 5♣ and this later encouraged South (knowing about a double fit) to bid onto 6♣ over 5♠ which got doubled and went 2 off for -500.
Against high level contracts in a situation like this it’s very often essential that the defenders cash their tricks before they run away. So, while leading aces into thin air is frequently wrong against lower level contracts, at this level it gives you a view of dummy and a much better idea of what you then need to do. Another important technique is to play count signals – you may well need to cash your tricks in the right order. Imagine if you hold AKQ to some number of a suit and dummy goes down with 3 low. You need to know how many partner has to know how many tricks you can cash. Against a lower level contract it may not matter if you just continue that suit until declarer ruffs because you will probably get in again. But against a high level contract with a long suit in dummy getting it wrong might be fatal. If you allow declarer to ruff in they may quickly be able to draw trumps and claim lots of tricks discarding losers elsewhere.
On this hand after ♦A lead, it’s pretty obvious when you see the enormous heart suit in dummy that the only hope is to try a club. This duly enabled North South to cash 2 clubs and defeat 5♠ by 1 trick. However, at our table South signalled for a club switch at trick 1 anyway. How did she do this? By playing the ♦3 under the ♦A. The idea is that in a suit contract when there’s a singleton of the suit led in dummy, an attitude or a count signal isn’t useful. The defenders both know they don’t have any more tricks available in that suit. What’s far more useful is a suit preference signal which indicates to partner which of the two side suits you’d prefer a switch to. So here the lowest diamond clearly then indicates the lower suit – i.e. clubs. Of course on this particular hand the signal isn’t really needed since clubs is obviously the only hope. But there are many other more balanced hands where the opening leader could be completely guessing which side suit to switch to without a signal from partner to help.
Of course on some hands a switch may not be required at all – the right defence could be to continue the suit led and force dummy to ruff. See advanced section for more on this.
When playing imps, it’s often worth bidding on since you want to avoid a disaster like doubling a 5 or 6 level contract making. With really large double fits around, both sides can usually make a lot of tricks so the worst that can happen if you bid on is you lose a smallish penalty. If instead you double you risk a potential disaster. This hand was a good example of what can happen. Both sides have 13 tricks available in their own two suits – but both sides also have 3 losers. Scores ranged all the way from North South +1740 (6♦ doubled making 13 tricks on a club lead) to East West +1860 (6♠ doubled making 13 tricks on a heart lead)! Both those results should be ample proof that you should NOT lead passively against these sorts of contracts – you need to cash what tricks you can before they run away!
Key points to note
Against high level contracts you often need to cash your tricks before they run away. Therefore leading an ace is often a good idea. Definitely do NOT lead passively – that’s a good way to learn the scores for slam doubled making with an overtrick!
In a suit contract where dummy has a singleton of the suit led and partner is likely to hold the lead, you should play suit preference signals. This helps partner know what suit to switch to.
Count signals are more critical than attitude when defending high level contracts. These help you cash your tricks in the right order.
At imps be wary of doubling high level contracts with big fits around. Bidding on can often be safer – yes you might go off but you can’t score a disaster like conceding a doubled slam making!
More advanced
It is worth more advanced pairs discussing what North’s bids mean in this sort of sequence. In particular what is a 4NT bid over 4♠? One obvious interpretation is key card blackwood in diamonds. Potentially another could be a hand like this with diamond support but longer clubs. If partner was 43 in the minors, they might well prefer 5♣ in a 6-3 fit instead of 5♦ in a 4-4 fit – particularly as the 4♠ pre-empt makes it more likely that things will break badly. It’s also worth discussing whether a 5♣ bid by North is unilaterally clubs or whether it shows a hand like this with some diamonds as well. After all how often are you going to have a hand that genuinely wants to introduce a new suit, vulnerable, at the 5 level? You’d usually need an absolute minimum of 7 good clubs. A more frequent occurrence could well be a hand like this where you want to give partner a choice of which minor to play. In the absence of any discussion 4NT is probably going to be taken as blackwood so is too risky.
When defending a suit contract playing a suit preference signal once there’s a singleton of the suit led in dummy makes a lot of sense since there are clearly no more tricks coming in that suit so the defence usually need to look elsewhere. But suppose partner has no preference, or actually wants to encourage the suit led (perhaps you want to continue the suit to force dummy to ruff – either to remove later entries to a long suit in dummy, or to weaken the trumps in dummy to hopefully promote a trump trick for the defence). Then what do you do? A good idea is to play that a high card is suit preference for the higher side suit, a low card is suit preference for the lower side suit, and a middle card is just encouraging in the originally led suit.
Julian Foster (many times NSW representative) ♣♦♥♠