
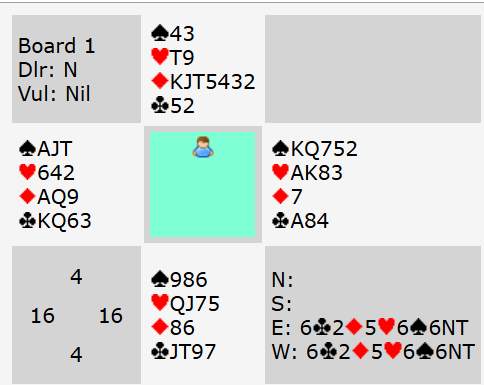
A pre-empt forces you to start bidding at a much higher level which naturally makes it harder to reach the best contract. On the other hand, a pre-empt can often help declarer figure out the shape of the hand and how to play a contract later. Today’s hand taken from a New Zealand teams congress shows both aspects.
It can be seen that East West can make slam (although it’s not immediately obvious – we’ll expore the play later). At most tables, however, North started with a 3♦ pre-empt. This forces them to start bidding at the 3 level which makes things much harder. East will most likely double for takeout. It’s not ideal with a 5 card major as you’ll always struggle to get partner to bid a 3 card suit – but overcalling 3♠ with a fairly poor 5 card suit could be very wrong and miss a big heart fit. Double is much more flexible when you have so much less bidding space available.
West will most likely make the practical bid of 3NT over that. He’s a bit stronger than he might be but he doesn’t have an obvious biddable suit. East will likely pass that. He is also stronger than he might have been for an initial double but not so much stronger that he can afford to move again (partner’s 3NT might easily be based on just 8 or 9 points). The pre-empt has basically caused two problems for East West – firstly it’s made it harder to identify their fit, secondly neither player has been able to get across the fact they have more values than they might have had. So a potential slam is missed.
At our table South stuck in a dangerous 4♦ raise! Now West could no longer bid 3NT so he doubled instead. East could have passed that to collect 1,100(!) but instead bid 4♠. Once again they didn’t have room to show their extra values.
If North starts with a pass East will of course open 1♠. That already makes things easier because West immediately knows they have a spade fit. He will most likely respond 2♣ and East will rebid 2♥. Pairs playing a “2 over 1” system (i.e. where a 2 level response is game forcing) are well placed now because West can bid 2♠ knowing it won’t be passed. That gives both players time to show their extra values, make cue bids, etc – and it’s quite likely they will reach 6♠. Not playing 2 over 1 it’s not quite as easy but West might jump to 4♠ on the 2nd round. This is known as a “delayed game raise” and tends to show a game forcing hand but with only 3 card spade support (with 4 card support he’d have started with a 2NT game forcing raise over 1♠). East might well choose to go on over that anyway – his ♣Axx is an excellent holding after partner responds 2♣ (where he will have a 5 card suit a lot of the time). He also has a singleton diamond and ♥AK. He might well bid blackwood and when he finds partner has 2 key cards he’ll surely bid to 6♠.
Suppose you do arrive in 6♠ by East and South leads ♦8. Now the hand is a play problem. You have 11 top tricks (5 spades, 2 hearts, 1 diamond and 3 clubs). What are the chances to make a 12th?
There are 4 immediate possibilities:
- diamond finesse
- clubs breaking 3-3
- hearts breaking 3-3
- ruff a heart in dummy
You can play clubs from the top to test if they are 3-3 – which you can do at any time after trumps are drawn. But to test for hearts 3-3 you would need to duck a trick first – then try ♥AK and hope your 4th one becomes a winner (do you see why you’d need to duck a heart? See advanced section). If it doesn’t you might then resort to the diamond finesse. However, the diamond lead here means you can’t test both hearts and diamonds (if the diamond finesse loses it’s already too late to duck a heart).
So if you decide to try for either clubs or hearts to break you would draw trumps then duck a heart. Then test each suit in turn. Today neither suit breaks. So do you curse your bad luck, go 1 off and move onto the next hand? You shouldn’t! 6♠ was makeable even though both suits didn’t break. See advanced section for how.
If you want to try to ruff a heart in dummy you’d need to play 3 rounds of hearts before drawing trumps, then you ruff the 4th heart in West, draw trumps and score 5 spades, 2 top hearts, 1 heart ruff, ♦A and 3 clubs. There a risk with that play though – if you start with ♥AK and North has a singleton (a definite risk if he started with 3♦) he will be able to ruff the ♥K and you’ll still have an inescapable heart loser. Can you see a way to protect from that? See advanced section.
If North did start with a 3♦ pre-empt that should warn you there’s a good chance suits won’t split. Because he has a lot of diamonds (and you find out when you draw trumps that he also has 2 spades) it doesn’t leave him much room for hearts and clubs. Which makes it significantly more likely that South will have length in both those. Does that suggest another possible line of play? See advanced section for more.
Key points to note
Don’t be afraid to pre-empt – starting the bidding at the 3 level will make things much harder even for the best opponents!
A delayed game raise is a bid where you initially respond at the 2 level and then jump to game on the 2nd round. It shows a hand with game forcing values, that side suit, and 3 card support for opener’s major.
When an opponent pre-empts it makes it much more likely that suits will split badly. That also increases the risk of a ruff.
If you are going to test for one or more suits to break, it can often pay to run off your remaining trumps before doing so. It makes no difference to you – but a defender may in fact be squeezed (even if you don’t know what a squeeze actually is!)
More advanced
If you are going to test for hearts 3-3, it’s safer to do that after drawing trumps (in case North only has 1 and can ruff ♥K). But once you’ve drawn trumps you can’t then afford to play ♥AK and another because your 4th heart is then a loser. Hence you duck a heart to retain control in the suit. When you then play ♥AK that lets you test them for 3-3 but when they aren’t it still gives you another chance. Of which more in a moment….
If you decide the best line is ruffing a heart, the best play is probably to win ♦A, play a heart to the ♥A, cross to dummy with ♠A and lead a 2nd heart through North. That protects you from North having a singleton heart. Now if he ruffs, you just play low and haven’t wasted your ♥K. When he in fact follows you can win ♥K and lose the 3rd round to South. If hearts are 3-3 all along there is no problem. If they aren’t, whatever South does you’ll be able to ruff your 4th heart in dummy with a high trump, cross back to hand (either with ♣A or a diamond ruff) to draw any remaining trumps and claim 12 tricks.
But what about an even better line? After North pre-empted we saw it’s quite likely South has length in both hearts and clubs. That means he is vulnerable to a squeeze. Win ♦A, draw trumps and duck a heart. So far that’s exactly the same as the line which will test hearts or clubs for being 3-3. If South wins the heart, he’ll probably play a 2nd diamond through, if North wins he’ll probably exit a club. It doesn’t really matter. You can test hearts by cashing ♥AK to see if they break (but not clubs yet – see below for why). But when hearts don’t break the key thing is that you should play off your remaining spades! In dummy you keep the 4 clubs. At the point declarer plays his last trump, he will have ♥x and ♣Axx remaining. Dummy will have ♣KQxx. South will have ♥Q and ♣J1097 remaining. What can South discard? Nothing! A heart discard makes declarer’s last heart a winner, a club discard makes dummy’s clubs all good. He has been squeezed. Note that this line still works when either clubs or hearts are 3-3, and it also works if either suit is 5-1. Whenever South has the length in both, he is in trouble. The only time it won’t work is if North has 4 hearts or 4 clubs – extremely unlikely after he’s known to have 2 spades and at least 6, possibly 7, diamonds.
This squeeze isn’t particularly convoluted or advanced. You are basically still playing for either suit to break 3-3 but you are just playing off your last trumps before that. The key things you need for a simple squeeze (there are variations for more complex ones) are:
- An entry to the potential long suit usually in dummy (clubs here). So that is why you should NOT play off all the clubs to test that suit early on. After all if they are 3-3, they are still going to be 3-3 at the end of the hand! You need an entry to that potential 4th club.
- To need all the remaining tricks. That usually means you need to have lost a trick first – ducking the heart here achieves that. If you don’t do that it usually means the defender has a spare card they can still afford to discard.
- A threat card in another suit (hearts here) in your own hand that threatens to become a winner. Here you can cash ♥AK first (because that leaves the potential heart winner in your own hand where you’ll be playing the trumps from). When you find South has the 4th heart you now play off the trumps and he’s still squeezed because he can’t discard that 4th heart without making your last heart a winner.
It’s surprising how often something like this does come up. Just having an awareness of the basic requirements for a squeeze (e.g. ducking a trick first) can be very useful. You don’t need to have worked out the full hand or what might happen – just play off your trumps and then test your suits rather than the other way around. You may find one of your long cards has become a winner even if you don’t really understand how or why. It can be quite amusing hearing one defender tell the other “you shouldn’t have discarded x” when in fact they couldn’t have discarded y either!
Julian Foster (many times NSW representative) ♣♦♥♠







I think the squeeze plays slightly better with hearts as the pivot suit. Win AD, draw trumps, concede a heart to rectify the count. Likely won by South who leads another diamond through, on which you play low from dummy and ruff in hand. Now play off the last trump, giving up a heart from dummy to hyper-extend that menace, allowing you to keep TWO single menaces in the dummy. Then three rounds of clubs ending in dummy, so dummy has a heart, QD and a club, while the closed hand has AKx in hearts. Thus the heart-club squeeze against South is still in play, but if North has an unlikely 4 hearts and KD, that squeeze operates as well. You are unable to do this with clubs/KD against North, as there is no “upper” threat.