One defender found a killing lead on today’s hand and it was possible by listening to the auction. Sadly her partner didn’t also find the killing play! But there were several interesting points to learn from the hand.
For East West pairs playing a strong notrump they will probably have the simple uncontested auction 1NT – 2♣ – 2♦ – 3NT.
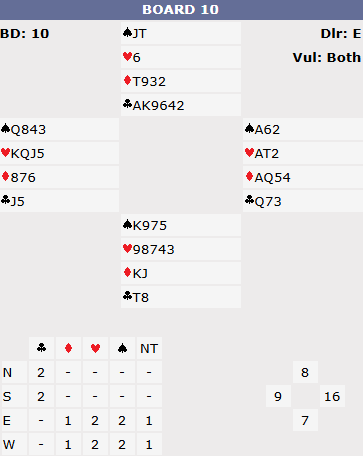
My own auction was longer because we play a weak NT opening. So we bid 1♦ – 1♥ – 1NT – 2♦ – 2♥ – 2♠ – 2NT – 3NT. This gave a lot more information away as we’ll see.
After the strong NT auction, South will quite likely lead a major. East is known from his 2♦ response not to have a 4 card major. West presumably will have at least one since he used stayman but he doesn’t necessarily have to have both. So if South can find the lead of a major West doesn’t have then he may well get the defence off to the best start.
The weak NT auction is very different. After the 1NT rebid (showing 15-17), the 2♦ bid was an artificial game force, 2♥ showed 3 hearts, 2♠ then showed 4 spades, 2NT denied 4 spades. After this auction, South at our table led the ♣10 which was well worked out. Can you see why she might have chosen that? See advanced section for the answer.
At the table North played ♣K, ♣A and another. Declarer played ♥A, ♥K and then ran ♦8 losing to South’s ♦J (her only hope was to lose a trick to South who might have no clubs left). South did indeed have no more clubs so now tried a spade. No good – declarer won with ♠Q in dummy and now took a diamond finesse losing (yes double dummy she could have dropped South’s ♦K at that point but she didn’t need to). South continued spades but it was too late. By now declarer had 2 spades, 4 hearts, 1 club and 2 diamonds. Why 2 diamonds? Because North had discarded a diamond on ♥K at trick 5 so declarer’s 4th diamond was now a winner.
The discard of that diamond by North was most likely fatal. Had he clung onto all 4 of his diamonds, declarer would have had to drop South’s ♦K offside to make the contract or duck completely to lose to it but setting up both her ♦A and ♦Q. If she finessed ♦Q into ♦K (a perfectly reasonable play) she would only have had 8 tricks. Discarding from any 4 card suit is always extremely dangerous – especially one declarer is known to hold from the bidding or that you can see in dummy. It is amazing how often a seemingly innocent discard from 10xxx or something actually proves fatal.
North made another mistake on the hand though. Can you see what it was?
Key points to note
If you are on lead, go over the opponents’ auction. Often it will tell you a great deal!
Maintaining communication between the two defenders’ hands is critical.
Be incredibly careful about discarding from a 4 card suit – especially one that declarer is known to hold.
More advanced
Why did South lead ♣10? By listening to our quite revealing auction. East had opened 1♦ (which showed at least 4 and also means her diamonds were longer than her clubs – had she held equal length in the minors she would have opened 1♣). East later showed 3 hearts but denied 4 spades. When you put all that together there aren’t many balanced shapes left that East can now be. Possibilities are 2353, 3343, 3352 (and maybe sometimes 2362). What about West? It looks like he has 44 in the majors. He responded 1♥ initially but probably only has 4 since he didn’t want to play in hearts after partner showed 3, and he later showed 4 spades. So East is known to have at most 3 clubs and West only has 5 cards in the minors too. Therefore the weakness is likely to be clubs.
Another way of considering it is by elimination. South knows from our auction that her partner has a singleton heart (there are 4 on her left and 3 on her right) so that cannot be a good lead. Spades might work but it looks dangerous to lead away from ♠Kxxx when there are 4 known to be sitting over her. Leading a diamond from ♦KJ round to declarer’s first suit is obviously a ridiculous lead. So that only leaves clubs!
After that well reasoned lead, it was a shame the defence didn’t continue their good work. North needed to DUCK at trick 1! His partner has hit the jackpot. He can also deduce the ♣10 must almost certainly be a doubleton – it will deny ♣J (with ♣J10 South would have led ♣J) so declarer is known to hold that card and South also can’t have ♣109x since North is looking at ♣9 himself. Therefore declarer surely has ♣Jxx so he does have a club stopper. But holding no other possible entry North needs to maintain communication with his partner. Hence he needs to duck immediately. After a duck at trick 1, declarer is powerless. Whenever South gets in (either with ♠K or ♦K) she simply plays a 2nd club and now North has 5 more clubs to cash! How does South know to play a 2nd club though? Because North should signal encouragement at trick 1 (low or high depending on the pair’s agreed methods). What North should NOT do is stare for ages at ♣10, make it very obvious to everyone that he likes the lead and THEN duck! That’s unethical. The only legitimate signals you can send at bridge are with the bids you make and the cards you play, not the speed with which you do any of those things and certainly not with any facial expressions. Of course that’s easy to say but it’s not so easy at the table – especially if North hasn’t seen this sort of position before.
Lastly its perhaps worth thinking how you would play this club suit if you were declarer in no-trumps. If dummy had the North cards with no other entry, you need to duck the 1st round and then hope to run the suit after that (i.e. that the suit splits 3-2). In other words – exactly the same thing to maintain communications between the two hands that the defence need to do here!
Julian Foster (many times NSW representative) ♣♦♥♠