Something often taught early on in bridge (or in fact any similar trick taking game like whist or 500) is “second hand plays low, third hand plays high”. Like everything in bridge there are no 100% rules and there are of course exceptions to this. But overall it remains very true and today’s hand was an example.
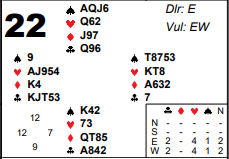
East West can make 4♥ although, with only 19 combined points, by no means all pairs bid it of course. The normal start to the auction is P P 1♥ P 2♥. Now West, with a 5-5 shape, should make a try for game (give partner just ♥K and ♣A and there’s certainly going to be a chance for 10 tricks – the shape is far more valuable than the high card points). It’s marginal for East whether to accept the game try – his singleton club isn’t great in terms of helping set up the club suit but it does limit any losers. What’s more the two cards he does hold (♥K and ♦A) are both likely to be very useful to partner.
At our table the auction was slightly different because North overcalled 1♠. Even though it’s a 4 card suit, this has a lot to be said for it – he’s not vulnerable, it’s the suit you want partner to lead and it could lead to a spade contract for your side. That meant that South bid 2♠ but West still bid 3♣ as a game try. Now East jumped to 4♥ – no doubt expecting his partner to be void in spades and hence his side would have no losers or wasted values there.
Switching now to the play, North doesn’t have an appealing lead but he tried the unbid suit, diamonds. Declarer won ♦A in dummy and led the singleton club from dummy. At a lot of tables South, seeing the singleton club in dummy, took ♣A. Now it was easy for declarer. He could ruff a 2nd round of spades or win any other switch. Now ♣K and a club ruff in dummy set up his remaining clubs. He just lost 1 spade, ♥Q and ♣A.
What South needed to do was remember 2nd hand plays low! Imagine, for the moment, that the hand was being played the other way up so the singleton club was in declarer’s hand and the ♣KJ10xx were visible in dummy. Would you take the ♣A then? Almost certainly not – you’d play low smoothly and hope declarer mis-guesses. This is actually no different!
The natural instinct for less experienced players when seeing the singleton club in dummy is to be concerned you might lose your ♣A. However, that’s actually very unlikely when declarer is known to hold length in clubs. What’s he going to do? Attempt to ruff 3 clubs in dummy? That makes the play much harder for him – frequently it will be best for him to simply give you the ♣A anyway.
Observe the difference here if South does play low smoothly. Declarer could guess right and win ♣K but even if he does he still has to ruff 3 clubs in dummy to bring down your ♣A. If he guessed wrong and plays ♣J losing to ♣Q it’s even worse! The defence can then always defeat 4♥ although, depending on what line declarer then tries, it can get quite close. See advanced section for more.
While it’s definitely right for South to play low here, there are of course exceptions. When do you think it will be right for South to take ♣A? See advanced section for the answer.
Key points to note
4 card suit overcalls obviously have risk but can be worthwhile to indicate a good lead for partner.
5-5 hands are powerful and don’t need much from partner to make game. The shape is much more valuable than the high card points.
When declarer leads a side suit singleton from dummy towards a suit he is known to hold its very often right to duck even when you hold the Ace. You will very seldom lose the Ace as a trick and ducking often makes the play much harder for declarer.
More advanced
When might South win ♣A? When his clubs are shorter. It’s right for South to play low on this hand because he has 4 clubs. With shorter clubs he would be worried ♣A will fall with only 2 ruffs in dummy. When you have length in a suit declarer is known to hold then it’s very unlikely to cost to play low in these positions – and it could gain heavily. If declarer’s suit is strong (say ♣KQJxx) it’s still ok to duck because then declarer is most likely to just keep leading them from the top and lose to the ♣A anyway.
At the table when South played low, declarer did guess wrong. When North won ♣Q he switched to a trump. Although that potentially gave up his trump trick, it stopped a club ruff and the trick soon came back. Declarer won and began a cross ruff (still hoping the ♣A would ruff down) but ruffing 2 clubs in dummy didn’t help him. What’s more, he had to get back to hand with a diamond ruff (a spade would have allowed the defence to play another trump). But once he ruffed in dummy with ♥K that promoted a trick back for ♥Q. He ended up losing a spade, ♥Q and 2 clubs for 1 off.
After the club mis-guess and a trump return the hand actually gets quite involved.
Ruffing clubs no longer works as we saw above but something else declarer might have tried is run ♣K from hand, not ruff it, and lose to ♣A. That sets ♣10 up as a winner (it would also have worked as a ruffing finesse had North started with ♣AQ). But that means to make 10 tricks he will need 7 trumps to go with ♦AK and ♣10.
South can thwart that by returning a 2nd trump when he wins ♣A. That limits declarer to 1 ruff in dummy and a maximum of 6 trump tricks. Which means he then needs the 5th club as a trick instead. The club suit still isn’t good due to South’s ♣8 but it can be set up with one more ruff. However, as long as North retains ♥Q the defence can still prevail. The 2nd club ruff in dummy will be with ♥K. If declarer could easily get back to hand he could draw North’s ♥Q to be able to cash the 5th club but that’s his problem. To have been able to ruff another club he will have had to ruff a diamond to get back to hand earlier – but now playing a 4th diamond from dummy will promote North’s ♥Q. If instead he tries a spade at that point South needs to be alert to hop up with ♠K (that time it IS an exception to 2nd hand plays low!) and play a 4th diamond himself for that trump promotion. Had declarer led a spade himself earlier then North can win it and lead the 3rd trump stopping any club ruffs. Now the defence score no hearts but instead get 3 clubs.
Leading a singleton from dummy in a position like this is an area where knowledge of how strong your opponents are is useful! Most strong players sitting South will duck smoothly with club length. Most weak players will take ♣A. So that also helps with what club to play. If you judge your opponent to be weak and they don’t play ♣A then you will probably place that card with North and try ♣J. Against stronger players it’s a genuine guess.
Julian Foster (many times NSW representative) ♣♦♥♠